Parts Cleaning (When Using Label Paper)
To enable comfortable and safe use, conduct cleaning periodically when using label paper.
Perform the maintenance described here also when the  LED of the printer lights up orange (cleaning notification).
Check Safety Information - Maintenance before conducting cleaning.
Perform Maintenance (When Using Thermal Paper) when using only thermal paper.
Caution
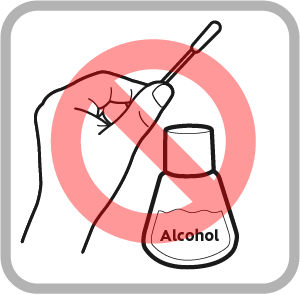
- Never use an alcohol solvent for the cutter, stationary knife and platen roller because special treatment is conducted for them.
Cleaning method (check video)
The periodic cleaning procedures (when using label paper) can be checked in the video.
For details of the procedures and cautions, refer to Cleaning method.
| 00:22 | (1) Cleaning of thermal head |
| 00:58 | (2) Cleaning of cutter unit |
| 02:01 | (3) Cleaning of stationary knife |
| 02:53 | (4) Cleaning of platen roller and paper feeding path |
Cleaning method
When using label paper, periodic cleaning is effective in preventing failures such as paper jams. Perform steps 1 to 6 below.
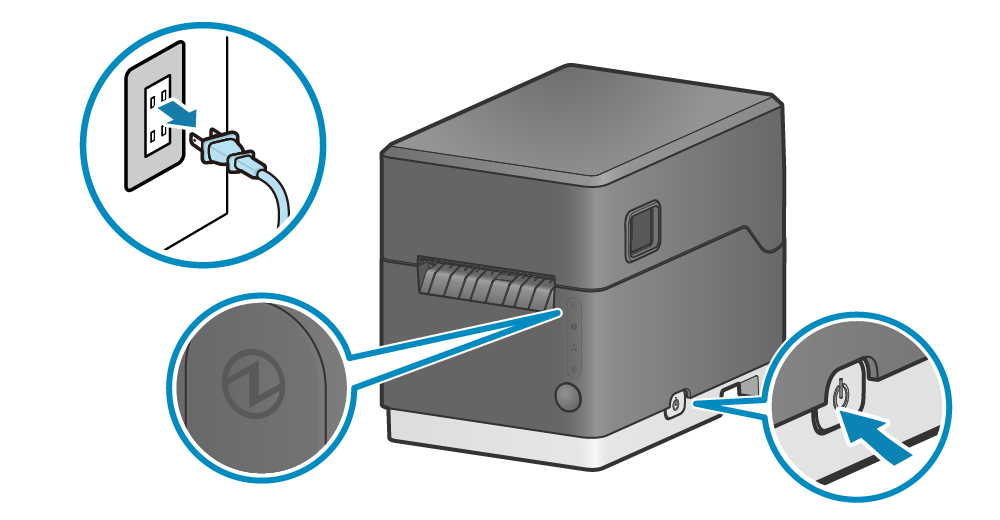
1. Turn power off
- Turn the power off, and disconnect the power plug of the AC adapter from the electrical outlet.
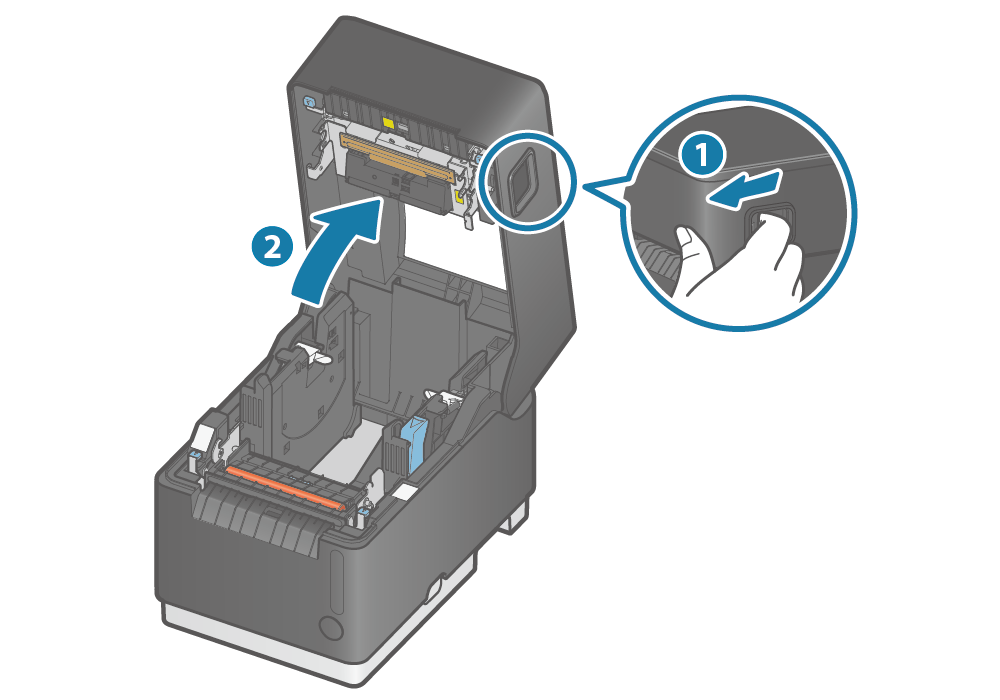
2. Open printer cover
- Pull the cover opening lever forward
 to open the printer cover
  .
.
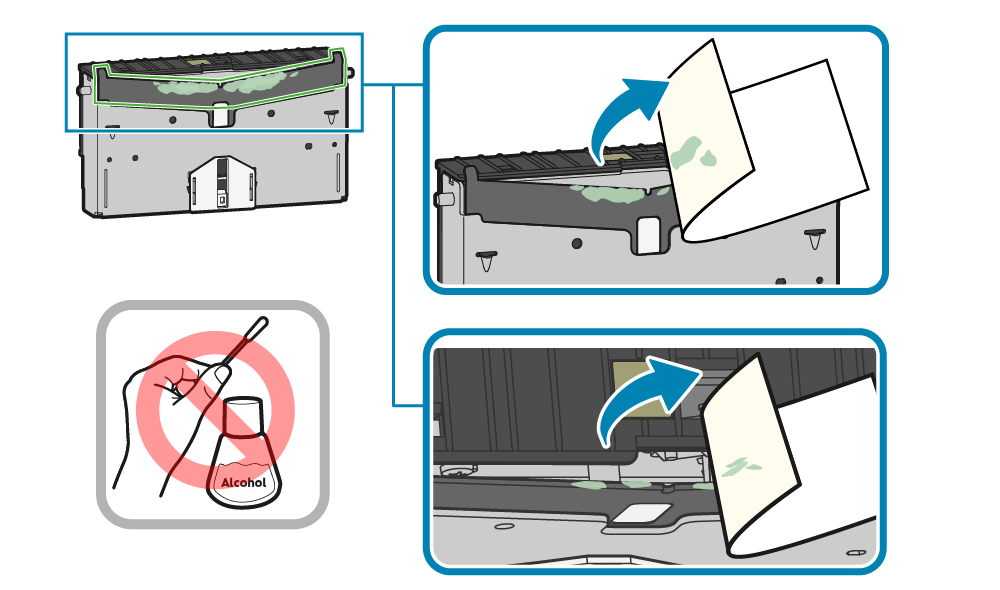
3. Clean thermal head
- Apply and press the label used to the thermal head (green frame) several times to remove dirt and glue.
- Commercially available adhesive tape (Scotch tape etc.) may be used instead of the label used.
- If it is very dirty, put an alcohol solvent (ethanol, isopropyl alcohol) on a cotton swab (or soft cloth) and remove dirt from the thermal area of the thermal head.

Caution
- If label paper used for cleaning tears and adheres to the thermal head, remove the paper with your hands.
- Because special treatment such as non-adhesive coating is performed for the cutter, stationary knife and platen roller (red frame), never use an alcohol solvent for them.
- The thermal head is a part that can easily be damaged. Use a soft cloth and carefully clean the head so it does not get any scratches.
- Do not clean the thermal head immediately after printing when it is still hot.
- There is risk that static electricity may damage the head after the thermal head is cleaned so be careful about static electricity.
- Turn the power on only after the alcohol has completely dried.
4. Clean cutter unit
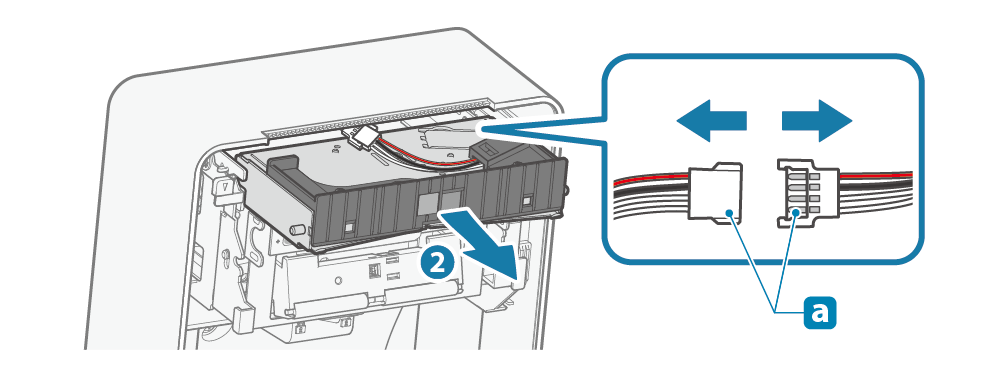
Remove the cutter unit
- Lower the left and right levers to unlock the cutter unit, lift the unit slightly, and then pull it out toward you.
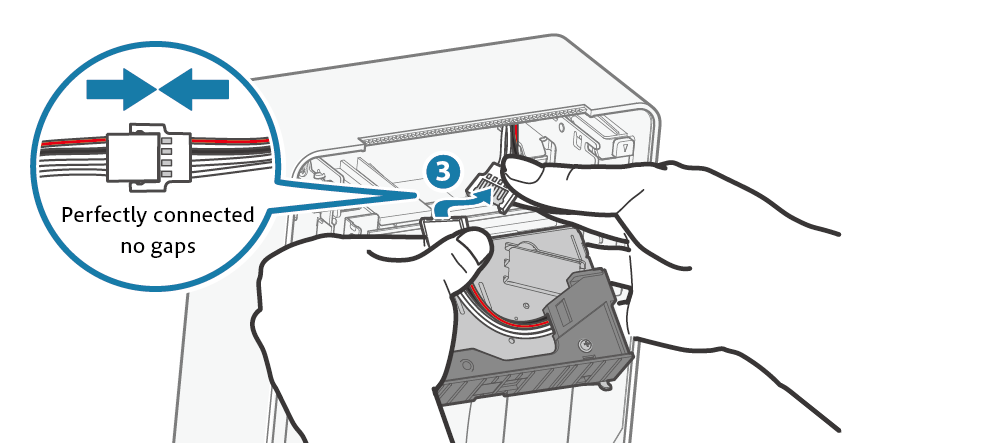
- Disconnect the cable connector
 and remove the cutter unit.

Clean cutter unit
- Apply and press the label used to the blade and/or blade edge (green frame) on the rear side of the cutter unit several times to remove dirt and glue.
- Commercially available adhesive tape (Scotch tape etc.) may be used instead of the label used.
Caution
- If label paper used for cleaning tears and adheres to the thermal head, remove the paper with your hands.
- Because non-adhesive coating is performed for the cutter blade, never use an alcohol solvent for them. Otherwise, the coating is removed and the blade fails to cut paper.
Mount the cutter unit
- Securely connect the cable connector
 .
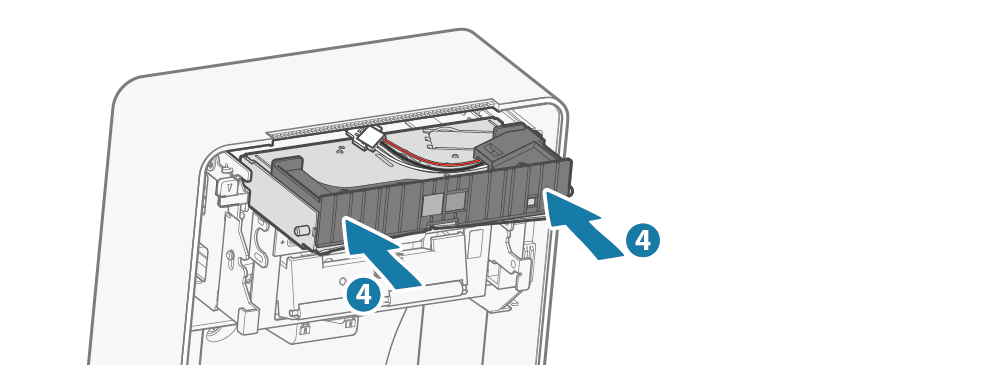
. - Insert the cutter unit parallel to the cover as indicated by the arrows and push it in until the left and right levers are locked
 .
.
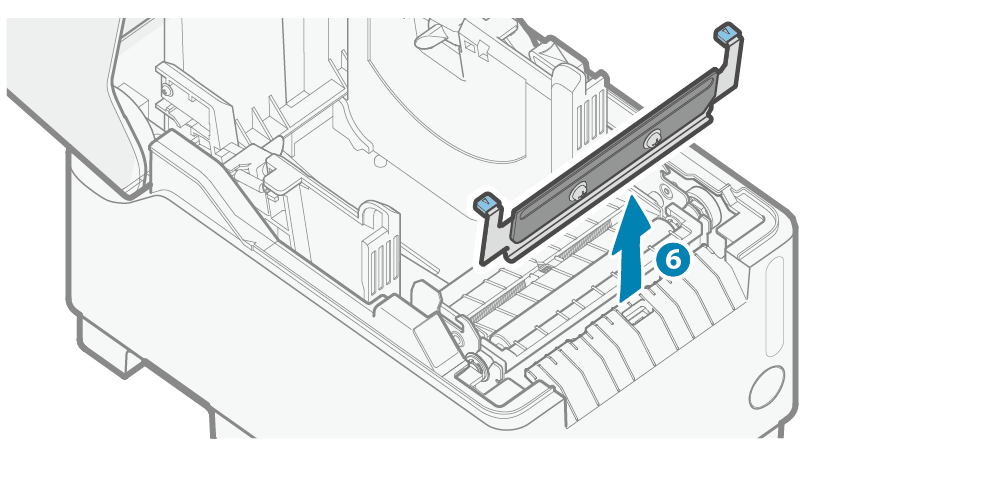
5. Clean stationary knife
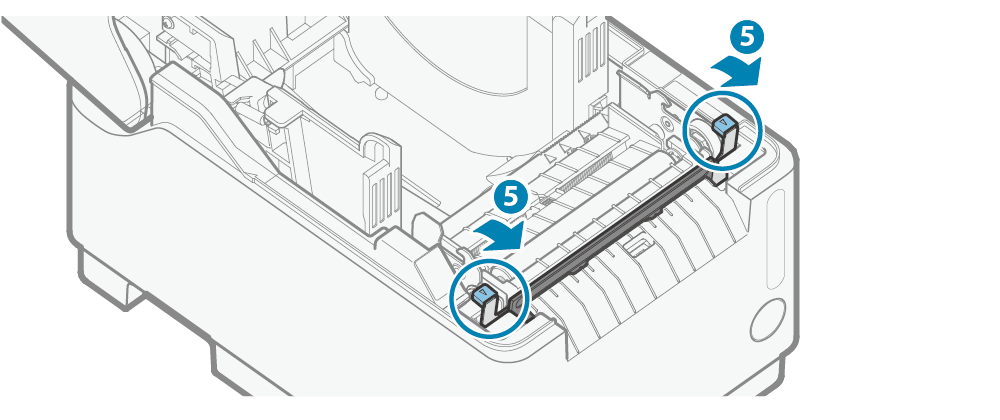
Remove the stationary knife
- Tilt the left and right levers of the stationary knife
 , and remove the stationary knife
 .
.
Clean the stationary knife
- Apply and press the label used to the blade (green frame) of the stationary knife several times to remove dirt and glue.
- Commercially available adhesive tape (Scotch tape etc.) may be used instead of the label used.

Caution
- If label paper used for cleaning tears and adheres to the thermal head, remove the paper with your hands.
- Because non-adhesive coating is performed for the blade of the stationary knife, never use an alcohol solvent for them. Otherwise, the coating is removed and the blade fails to cut paper.
Mount the stationary knife
- Insert the stationary knife into the gap between the platen unit
 and the case
 , and push it in until it clicks and locks.
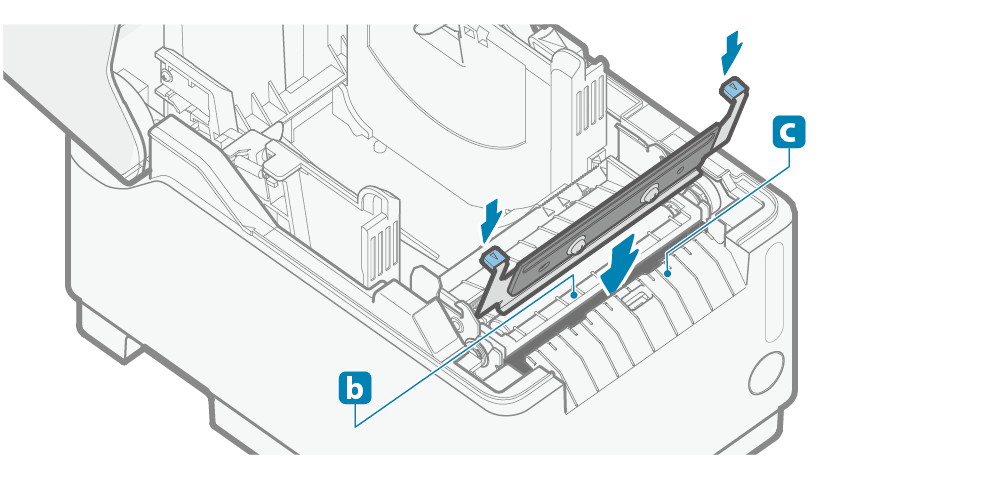
Caution
- When mounting the stationary knife, pay attention to the front or back orientation.
6. Cleaning of platen roller and paper feeding path
- Apply and press the label used to the area from to
 to remove dirt, glue, paper scrap, etc.
 - Commercially available adhesive tape (Scotch tape etc.) may be used instead of the label used.
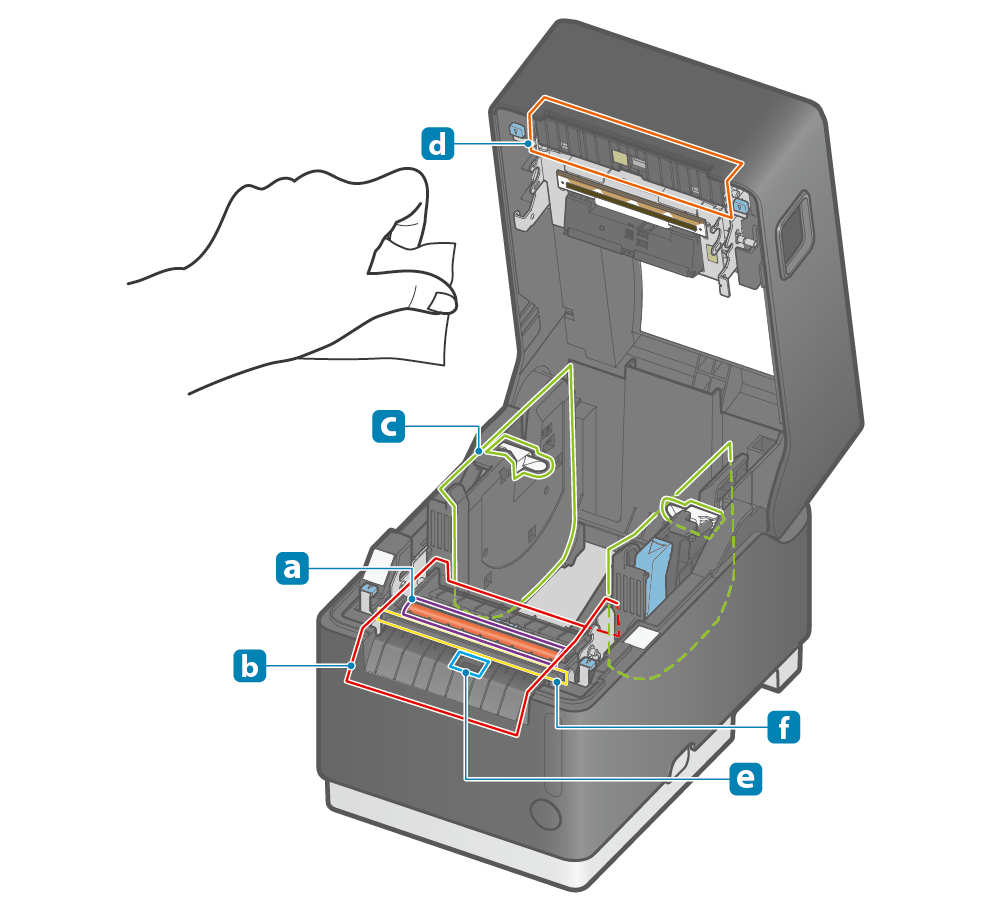
Platen roller [Purple frame]
Paper feeding path (side walls) [Red frame]
Paper guide shaft, paper guide [Green frame]
Cutter cover, upper cover (tear bar) [Orange frame]
 Hold print sensor [Blue frame]
 Stationary knife [Yellow frame]
Caution
- If label paper used for cleaning tears and adheres to the thermal head, remove the paper with your hands.
- Because special treatment is performed for the platen roller, never use an alcohol solvent for it.
Otherwise, a paper feeding failure may occur.
- If the section from to is very dirty and an alcohol solvent (ethanol or isopropyl alcohol) is needed, pay extreme attention so as not to apply such solvent to the platen rollerand stationary knife.
- When false detection by the hold print sensor occurs, remove glue adhering around the hold print sensor.
Printer's external maintenance
- Wipe off the dirt on the plastic section using a soft, dry and clean cloth.
- If it is very dirty, soak a soft cloth in water containing a very small amount of neutral detergent, completely squeeze the cloth and gently wipe off the dirt. Wipe off any moisture using a soft, dry cloth.
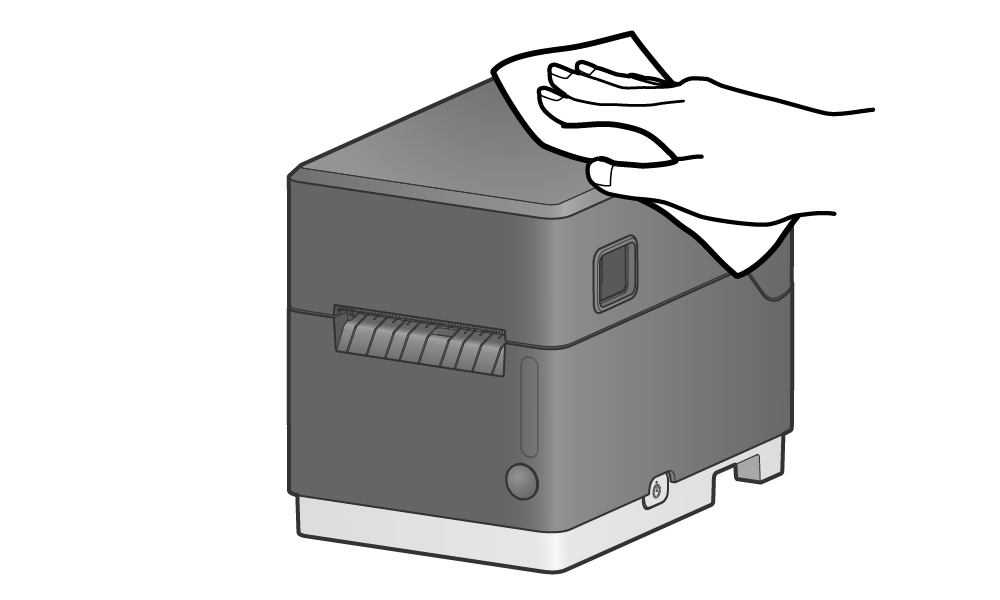
Caution
- Do not use neutral detergent without diluting it. Otherwise, it will cause plastic parts to change color or deteriorate.
Updating printer information
After cleaning is finished, update the printer information by using the configuration app.
This process will update the next cleaning notification, and turn off the LED if it is on.
iOS/Android
Download and install Star Quick Setup Utility onto the host device to be used.
Use App
- Start Star Quick Setup Utility and select to the connected printer.
- When the LED (cleaning notification) of the printer is lit, the icon is displayed on the connected printer and the [Parts Cleaning] menu appears under it.
When cleaning is conducted before the cleaning notification appears, tap [Parts Cleaning] in [Printer Settings].
- Place a check mark on “Complete cleaning” on the explanation screen opened by tapping [Parts Cleaning], and tap [Apply].
- The notification period for periodic cleaning is updated and the LED (cleaning notification) of the printer is turned off if it is on.
Windows
Download and install Star Windows Software onto the host device to be used.
Use App
- Open [Star Windows Software] - [Printer Utility] from the Start menu to connect to the printer to be set.
- Select “Maintenance” on the utility functions list.
- Place a check mark on “Completed cleaning” on the explanation screen opened by clicking the “Parts Cleaning” tab, and tap [Apply].
- The notification period for periodic cleaning is updated and the LED (cleaning notification) of the printer is turned off if it is on.

Update by using printer operation
- Remove the paper roll if it is set and close the printer cover.
- Turn on the printer and check that the printer shows that there is no paper (Power LED is flashing red).
- Press and hold down the Multi-Function button for 5 seconds or longer and then release it.
- The notification period for periodic cleaning is updated and the LED (cleaning notification) of the printer is turned off if it is on.