Set Up External Devices
USB devices can be connected to the USB-A port for purposes such as using and charging a USB connection compatible product.
Also, with devices that support external drawer connection, an external drawer (sold separately) can be connected and used in conjunction with the mPOP main unit.
Check for Support of Connection to External Drawers
USB-A port
External drawer connector
USB-A port
Connect the cable of your USB device to the USB-A port (Standard 0.5A / Tablet 1.5A) in order to supply power to the USB device. You can also connect a USB-compatible product * for use with mPOP.
*USB-compatible products: BCR-POP1, SCD222U or USB HID class (keyboard mode) devices
USB-A (Standard 0.5A) can supply a maximum of 2.5W, while USB-A (Tablet 1.5A) can supply a maximum of 7.5W.
Connect to the port appropriate for your purpose, such as when using USB-A (Tablet 1.5A) to charge a tablet device.
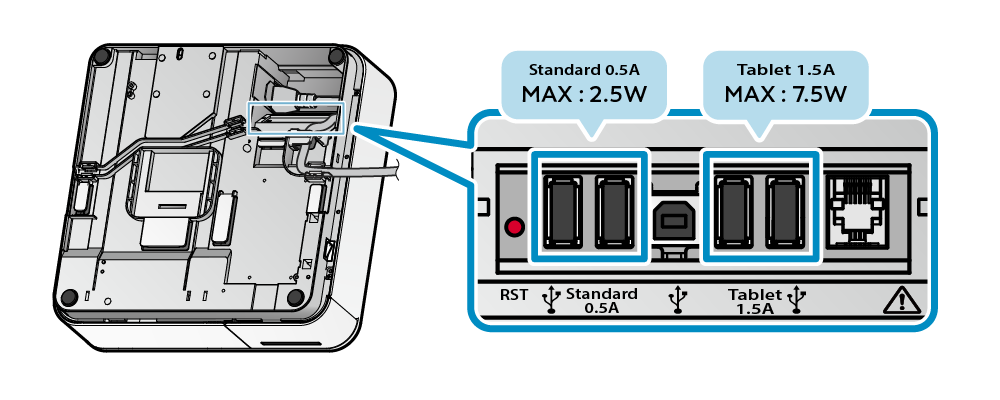
A USB cable for connection to the USB-A port is not included in the accessories. Use a commercially available (or one included with the USB device) USB cable.
Caution
1. Connect USB cable
- Connect the USB cable connector to the USB-A port (0.5A/1.5A) located on the bottom of mPOP.
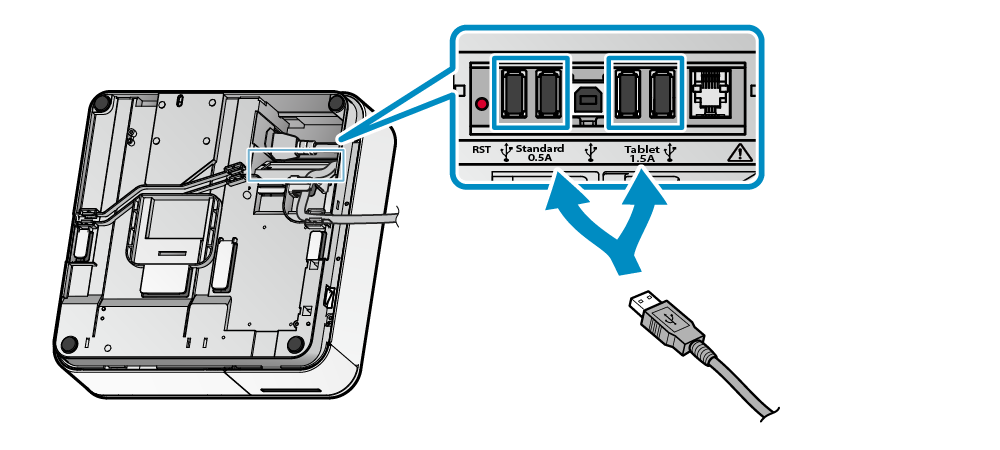
2. Connect USB cable
- There are 2 cable outlets to the right and left, and should be wired according to where the main unit and the peripherals are placed.
For details, refer to Wire Cables.
Note
Only USB-compatible products can communicate with mPOP through the USB-A port (0.5A).
External drawer connector
1. Turn power off
- Turn the power off, and pull the power plug from the electrical outlet.
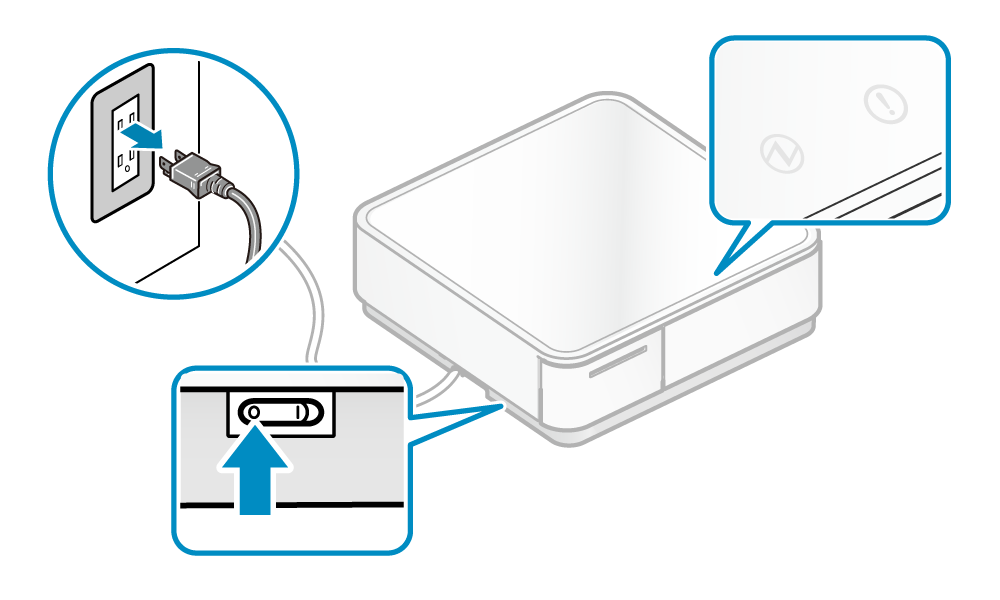
2. Connect the external drawer cable
- Connect the external drawer connector to the port located on the bottom of mPOP.
- Cables are not included in the accessories. Use a commercially available cable or the cable provided with the external drawer.
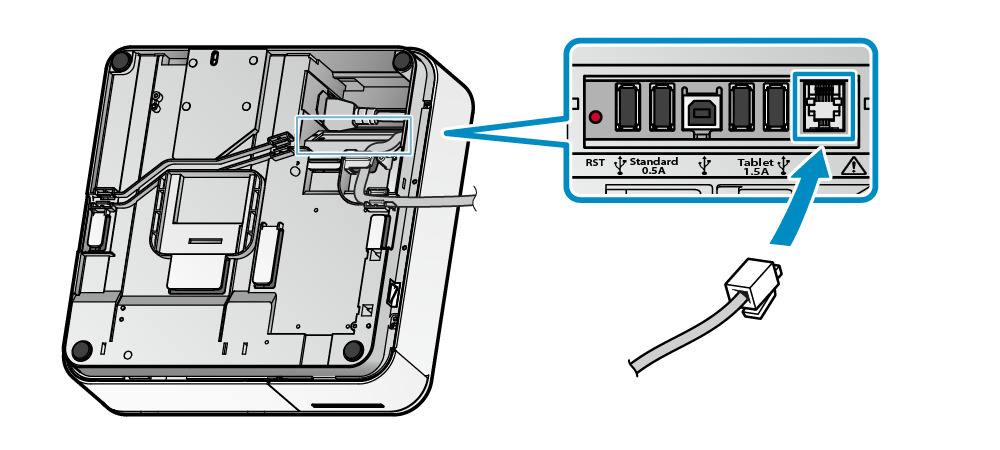
3. Connect cables
- There are 2 cable outlets to the right and left, and should be wired according to where the main unit and the peripherals are placed.
For details, refer to Wire Cables.
4. Insert power cable plug into electrical outlet.
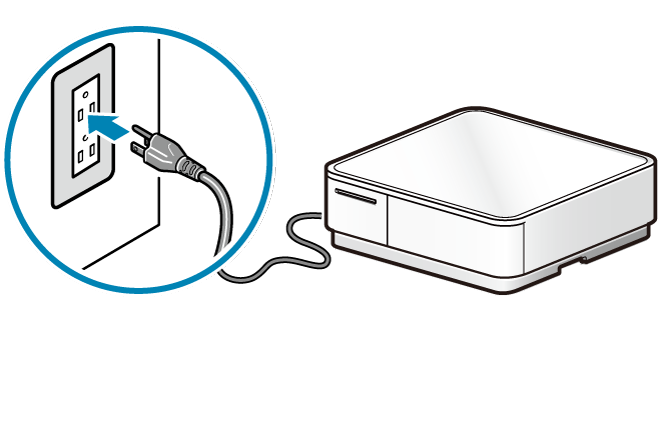
Caution
Check for Support of Connection to External Drawers
To check whether your product supports the connection of an external drawer, check whether a connector for an external drawer is mounted on the panel on the bottom of the main unit.
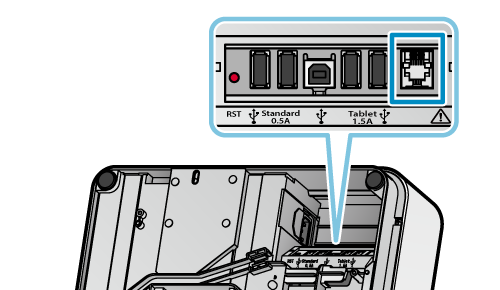
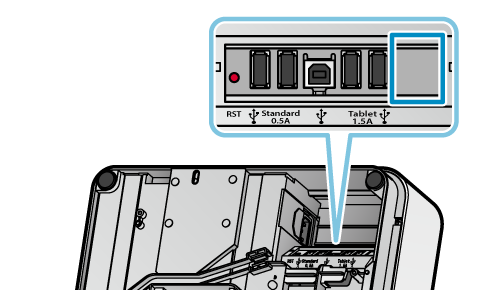
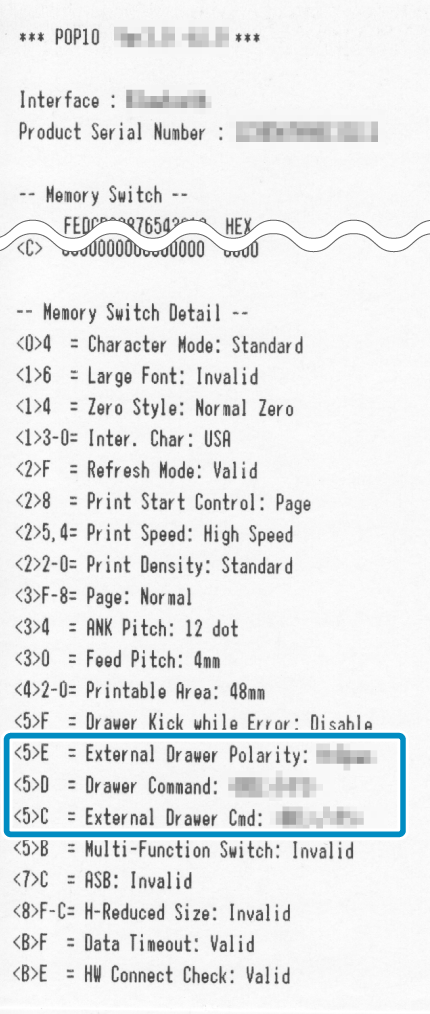
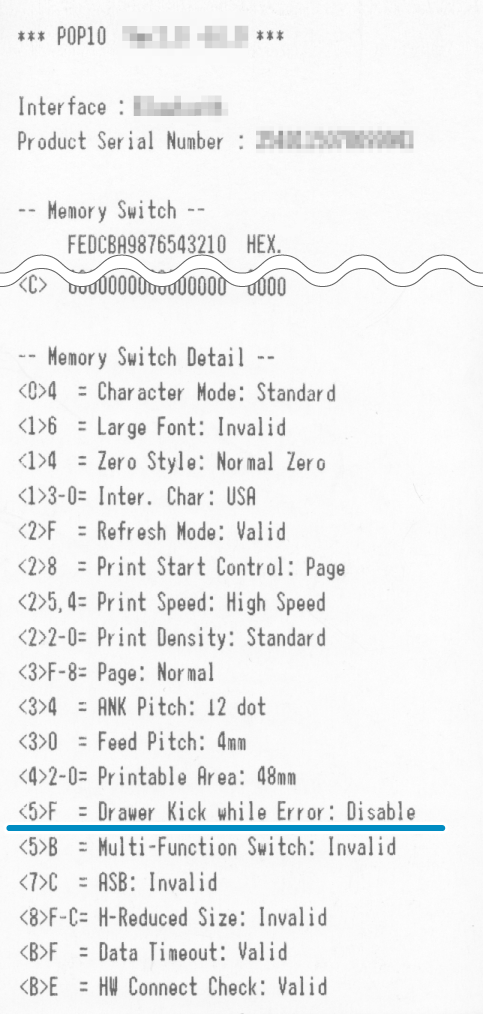
You can also check from the contents of the “Memory Switch Detail” item that is printed during self-printing.
Self-Printing
USB devices can be connected to the USB port for purposes such as using and charging a USB connection compatible product.
Connect to the correct port for the connector shape of the USB device that you are connecting.
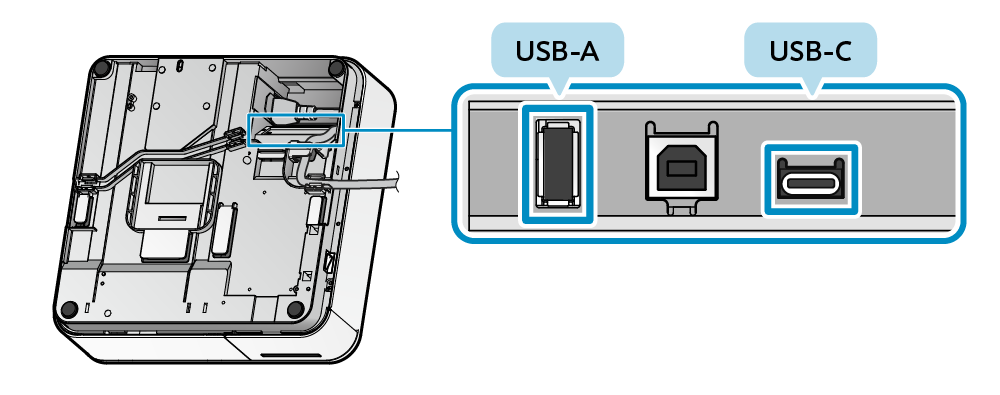
USB-A port
USB-C port
USB-A port
Connect the cable for the USB device you are using to the USB-A port (0.5A) in order to supply power (maximum 2.5W) to the USB device. You can also connect a USB-compatible product* for use with mPOP.
*USB-compatible products: BCR-POP1, SCD222U, BSH-20U, BSH-20B, BSD-40U, BSH-32B, BSH-32U or USB HID class (keyboard mode) devices
A USB cable for connection to the USB-A port is not included in the accessories. Use a commercially available (or one included with the USB device) USB cable.
Caution
1. Connect USB cable
- Connect the USB cable connector to the USB-A port (0.5A) located on the bottom of mPOP.
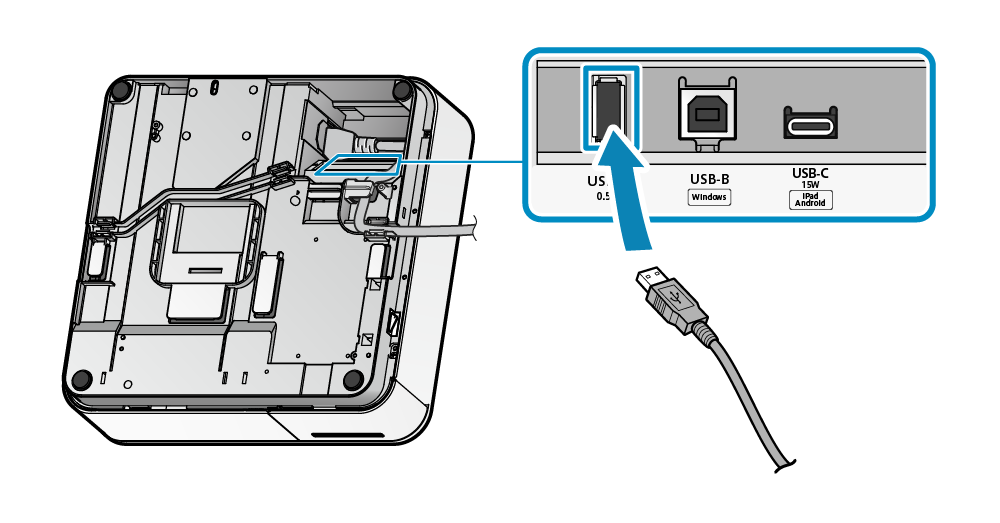
2. Connect USB cable
- There are 2 cable outlets to the right and left, and should be wired according to where the main unit and the peripherals are placed.
For details, refer to Wire Cables.
Note
Only USB-compatible products can communicate with mPOP through the USB-A port (0.5A).
USB-C port
Connect the cable for the USB device you are using to the USB-C port (iPad 15W) in order to supply power (maximum 15W) to the USB device. You can also connect a USB-compatible product* for use with mPOP if the product includes a USB-C port or if the connection was converted to a USB-C port.
*USB-compatible products: BCR-POP1, SCD222U, BSH-20U, BSH-20B, BSD-40U, BSH-32B, BSH-32U or USB HID class (keyboard mode) devices
A USB cable for connection to the USB-C port is not included in the accessories. Use a commercially available (or one included with the USB device) USB cable.
Caution
1. Connect USB cable
- Connect the USB cable connector to the USB-C port (iPad 15W) located on the bottom of the mPOP unit.
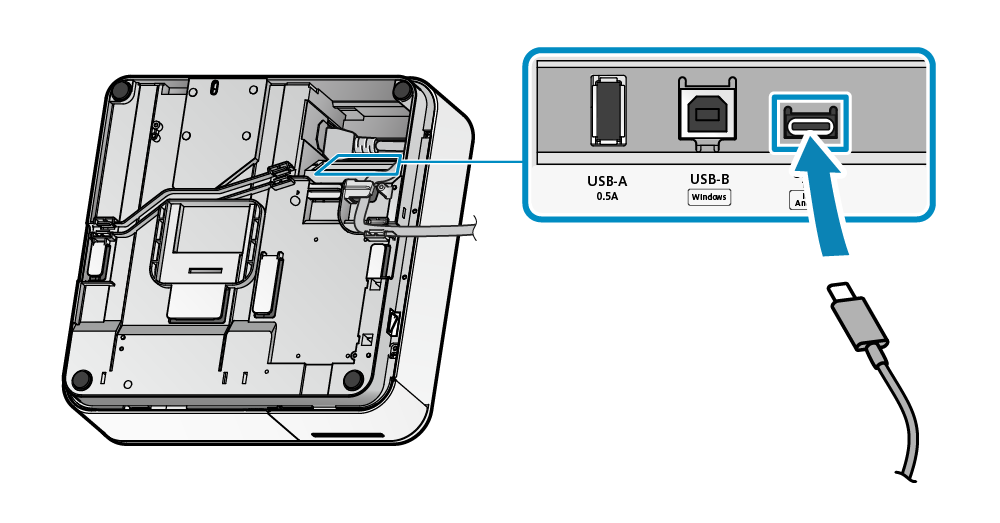
2. Connect USB cable
- There are 2 cable outlets to the right and left, and should be wired according to where the main unit and the peripherals are placed.
For details, refer to Wire Cables.
Note
USB devices can be connected to the USB port for purposes such as using and charging a USB-compatible products.
Connect to the correct port for the connector shape of the USB device that you are connecting.
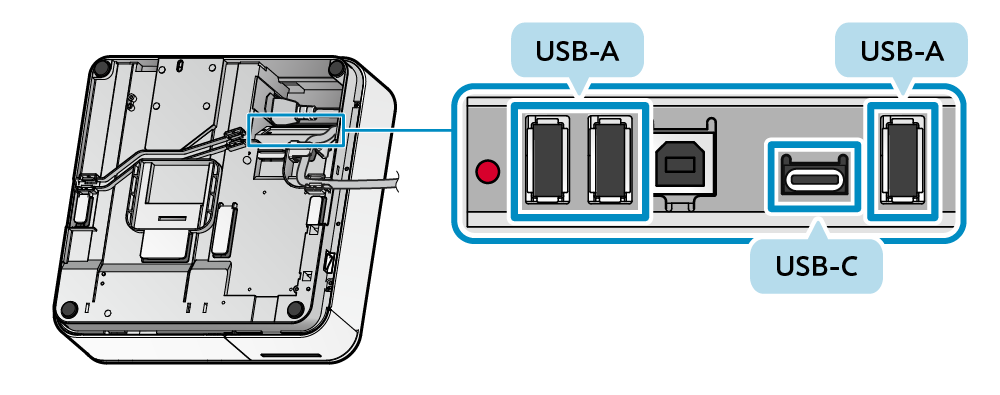
USB-A Port
USB-C Port
USB-A Port
You can connect a USB-compatible product* for use with mPOP.
* USB-compatible products: BCR-POP1, SCD222U, BSH-20U, BSH-20B, BSD-40U, BSH-32B, BSH-32U or USB HID class (keyboard mode) devices
You can also connect the cable for the USB device you are using to the USB-A port (0.5 A) in order to charge the USB device (maximum 2.5 W).
A USB cable for connection to the USB-A port is not included in the accessories. Use a commercially available USB cable (or one included with the USB device).
Caution
1. Connect the USB cable
- Connect the USB cable connector to the USB-A port (0.5 A) located on the bottom of the mPOP unit.
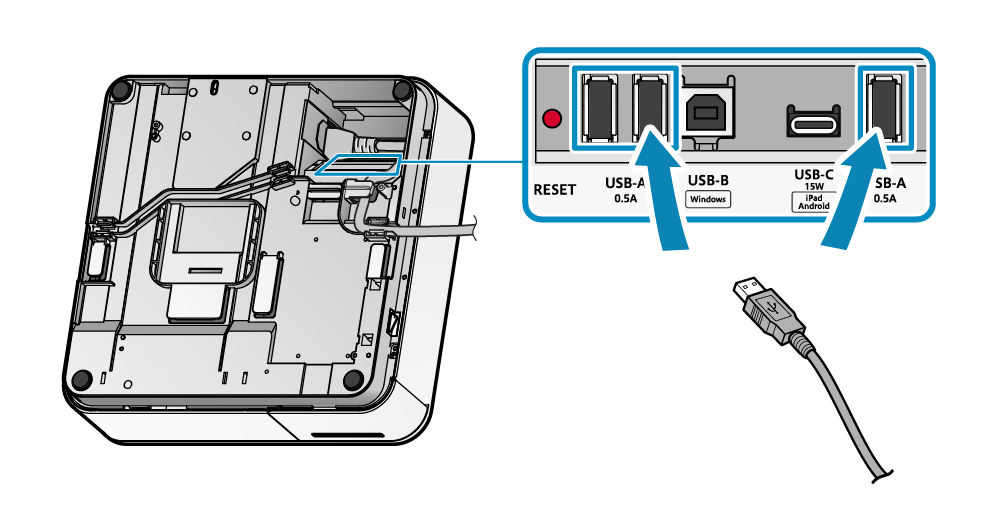
2. Route the USB cable
- There are 2 cable outlets to the right and left, and should be wired according to where the main unit and the peripherals are placed.
For details, refer to Connect Cables.
Note
Only USB-compatible products can communicate with mPOP through the USB-A port (0.5 A).
USB-C Port
You can connect the cable for the USB device you are using to the USB-C port (15 W) in order to charge the USB device (maximum 15 W). You can also connect a USB-compatible product* for use with mPOP if the product includes a USB-C port or if the connection was converted to a USB-C port.
* USB-compatible products: BCR-POP1, SCD222U, BSH-20U, BSH-20B, BSD-40U, BSH-32B, BSH-32U or USB HID class (keyboard mode) devices
A USB cable for connection to the USB-C port is not included in the accessories. Use a commercially available USB cable (or one included with the USB device).
Caution
1. Connect the USB cable
- Connect the USB cable connector to the USB-C port (15 W) located on the bottom of the mPOP unit.
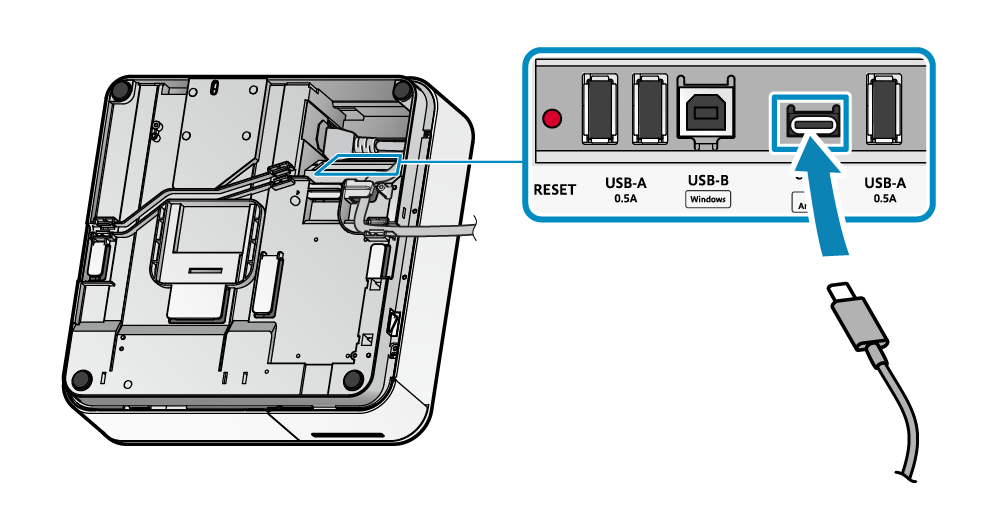
2. Route the USB cable
- There are 2 cable outlets to the right and left, and should be wired according to where the main unit and the peripherals are placed.
For details, refer to Connect Cables.
Note