Place Bills/Coins
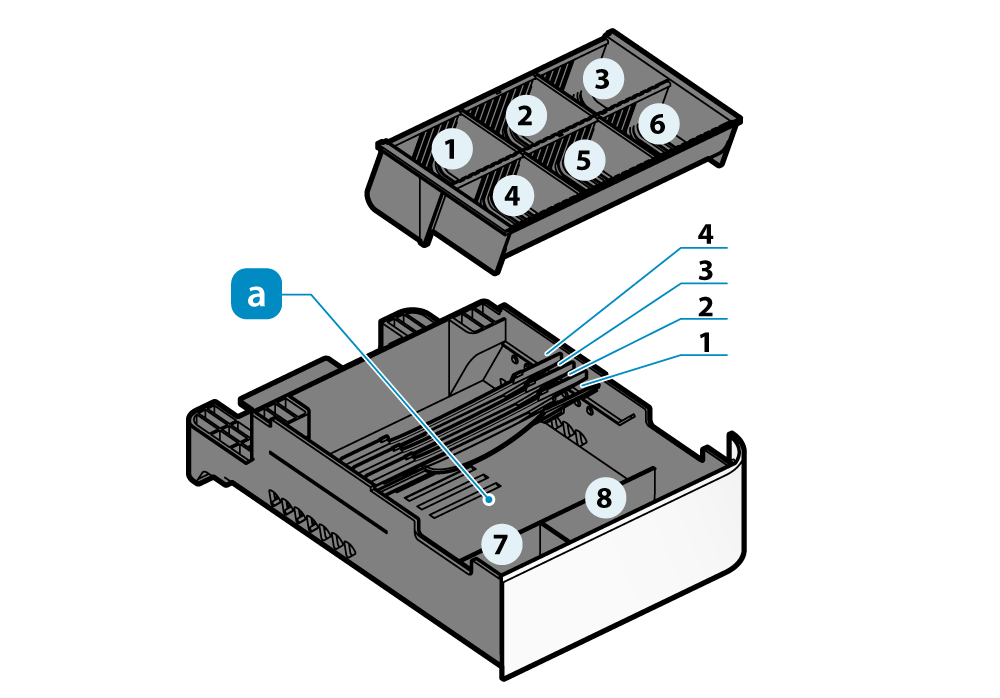
Up to 4 types of bills and 8 types of coins can be stored.
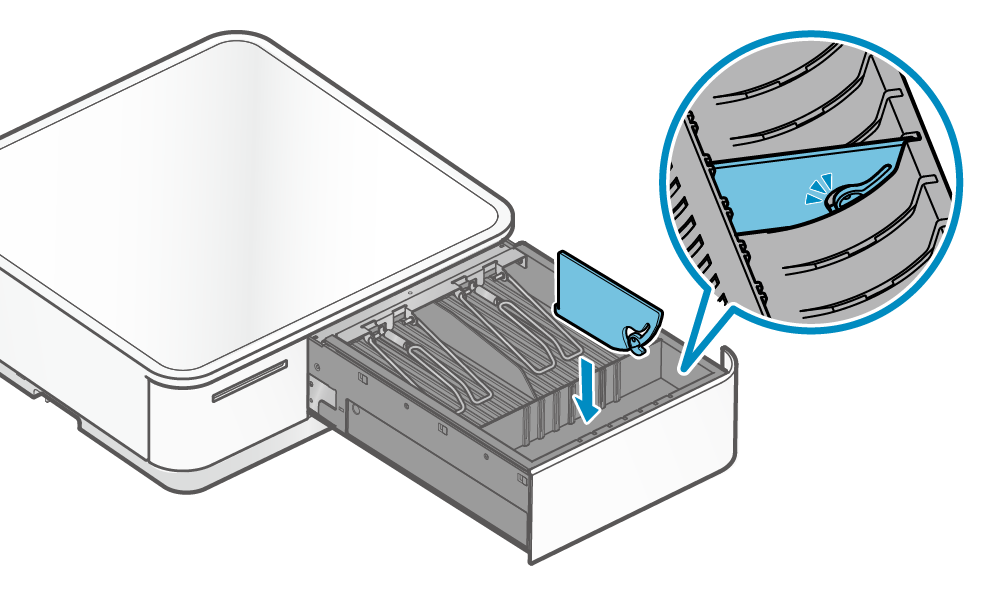
For the coin tray, the 2 dividers for the front and back can be placed in a preferred location according to your usage.
For the bill tray, around 30 bills* can be stored in each divided section. (*In the case of new bills)
Change coin tray layout
Change bill tray layout
The utility space  beneath the coin tray can be used to store bills that do not fit and other objects.
Caution
This product is not equipped with security functions like a safe.
When using this product to deal with cash, take full responsibility in its management.
We will not be held responsible for any damages incurred in regard to money when using this product.
Place Bills/Coins
1. Open the cash drawer
- Open the cash drawer by using the application that you use.
Refer to When Cash Drawer does not open when opening the drawer without using an application.
2. Place bills/coins
Note
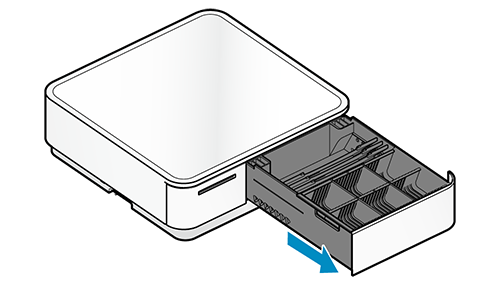
Remove the drawer tray
1. Open the cash drawer
- Open the cash drawer using an application.
Refer to When Cash Drawer Does Not Open when opening the drawer without using an application. - Please pull out the printer fully before opening or it may damage the mPOP.
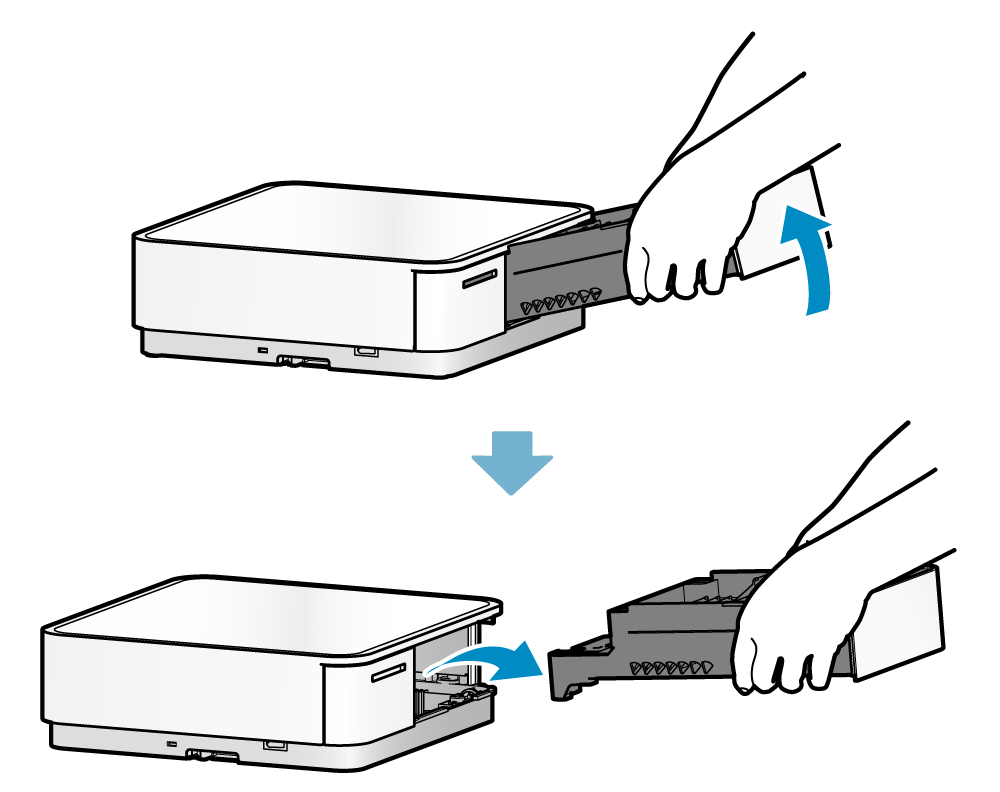
2. Remove the drawer tray
- Lift up the front side of the drawer tray and then the back side to remove.
- Do the opposite to place the drawer tray in its original position.
Change the coin tray layout
1. Open the cash drawer
- Open the cash drawer using an application.
Refer to When Cash Drawer Does Not Open when opening the drawer without using an application.
2. Remove the coin tray
- Hold both sides of the coin tray when removing it.
If you hold the divider when removing the tray, the divider may come apart and the coin tray may fall.
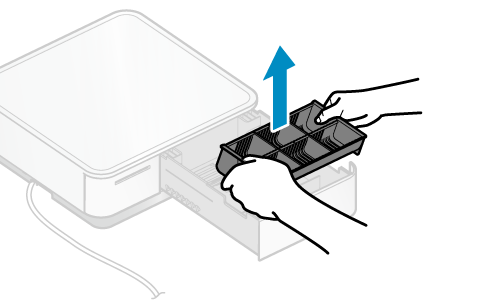
3. Remove the divider
- Push the hook
 that is in front of the divider with something that is tapered and lift
  . While widening the coin tray towards the back
  , remove the divider
  .
. - Remove the divider in the back before removing the divider in front.
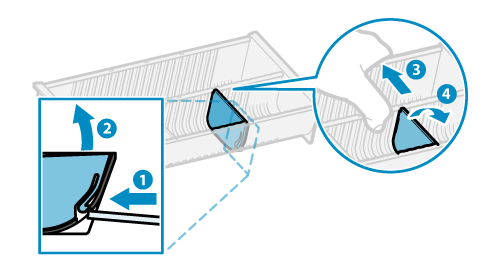
4. Install the divider
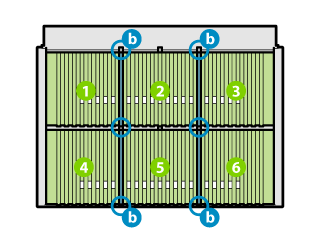
- Push the dividers along the grooves of the coin tray.
- Secure the divider hooks on the front and back side into the holes in the coin tray.
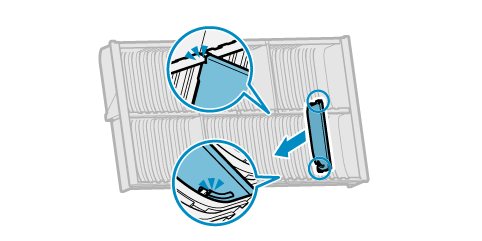
- When the divider is set at the central spot
 , it will divide into 4 spaces, and when it is set to the right and left spots
  , it will divide into 6 spaces.
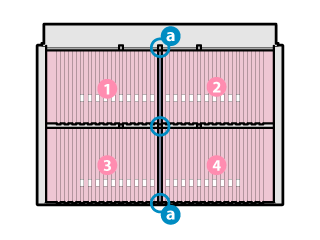
5. Insert the coin tray
- Perform the steps explained in 2. Remove the coin tray in reverse order to insert the coin tray.
Change the bill tray layout <for units produced since March 2017>
By decreasing the type of bills (banknotes) that are stored, you can increase the number of bills that can be stored in a section separated with a divider.
It can be used with products that support layout changes of the bill tray.
1. Remove the drawer tray
- Refer to Remove the drawer tray for instructions on how to remove the drawer tray.
2. Remove the coin tray
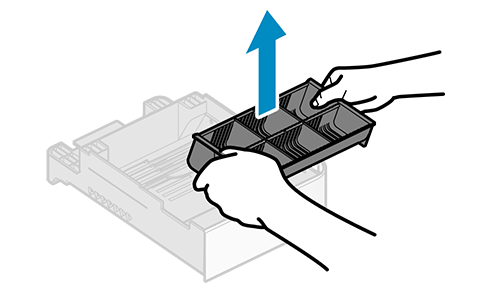
- Hold both sides of the coin tray when removing it.
If you hold the divider when removing the tray, the divider may come apart and the coin tray may fall.
3. Remove divider A
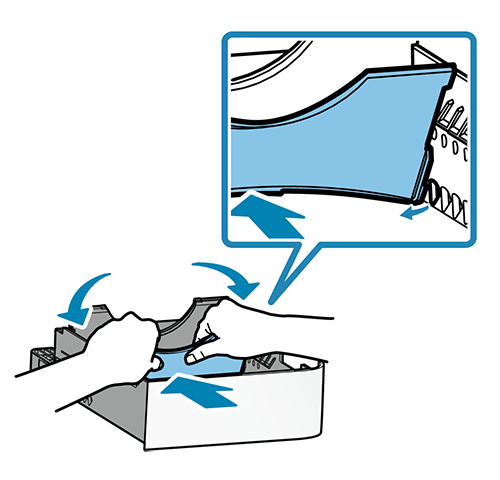
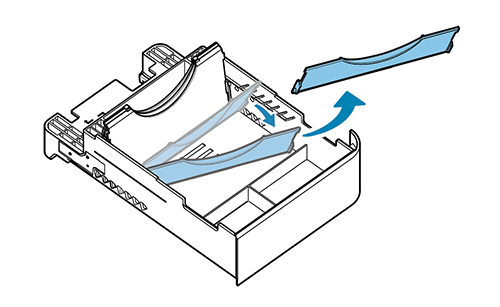
- Press the center of divider A to loosen the bottom of it, and then remove the left or right rib from the triangle hole of the drawer tray.
- After one of the ribs is removed, divider A can be removed from the drawer tray by pulling it forward.
4. Remove divider B
- Remove divider B according to the layout of your choice.
- Remove divider B by performing the same steps in 3. Remove divider A.
5. Install divider B
- Note the front/back of divider B, and insert one of the ribs into the triangle hole (
 to
to  ) of the drawer tray.
 - Press the center of divider B to loosen the bottom of it, and insert the other rib into the triangle hole in the same position.
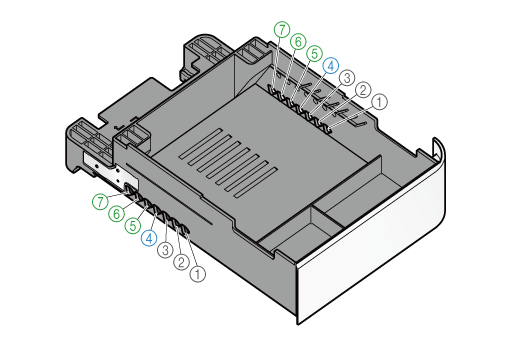
Note
 to
to  of the drawer tray cannot be used.
6. Install divider A
- Note the front/back of divider A, and insert one of the ribs into the triangle hole
 of the drawer tray.
 - Press the center of divider A to loosen the bottom of it, and insert the other rib into the triangle hole
 .
.

7. Insert the coin tray and drawer tray
- Perform the steps explained in 2. Remove the coin tray and 1. Remove the drawer tray in reverse order to insert the coin tray and drawer tray.
How to check if a bill tray layout change product is supported
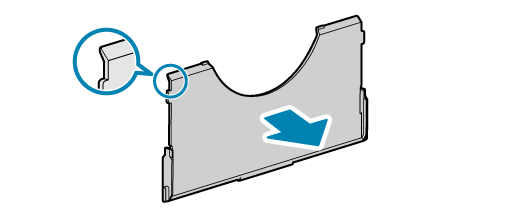
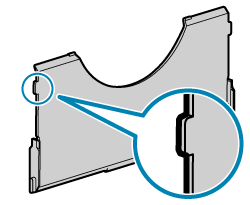
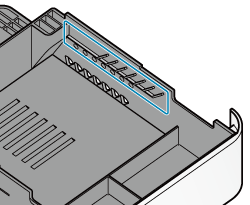
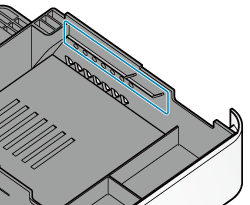
You can see if a product can be used to change the layout of the bill tray by checking configuration 1 and 2 explained below. In order to perform layout changes, divider B and the bill tray must both be a supported product.
1. Left/Right ribs of divider B
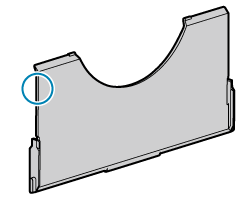
2. Number of left/right ribs of the bill tray
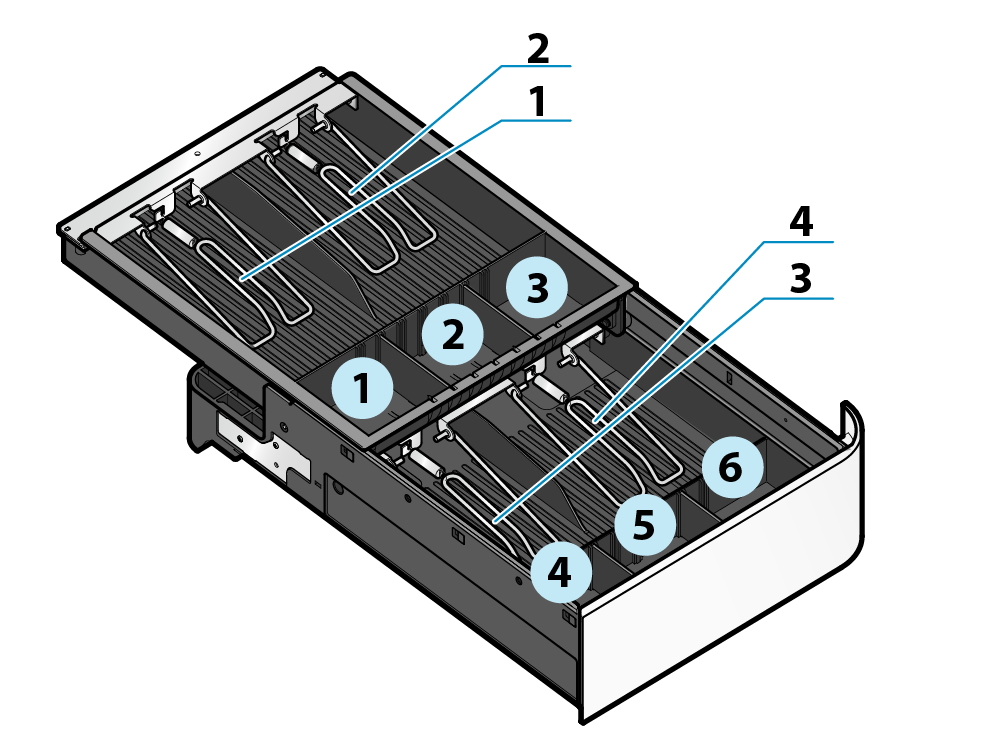
Up to 4 types of bills and 6 types of coins can be stored.
Use the 2 dividers available for the upper and lower drawer trays to divide the coin tray to what is suitable for your usage.
Also, up to about 100 bills* can be stored for each divider in the bill tray. (*In the case of new bills)
Change coin tray layout
Caution
When using this product to deal with cash, take full responsibility in its management. We will not be held responsible for any damages incurred in regard to money when using this product.
Place Bills/Coins
1. Open the cash drawer
- Open the cash drawer by using the application that you use.
Refer to When Cash Drawer does not open when opening the drawer without using an application.
2. Place bills/coins
Note
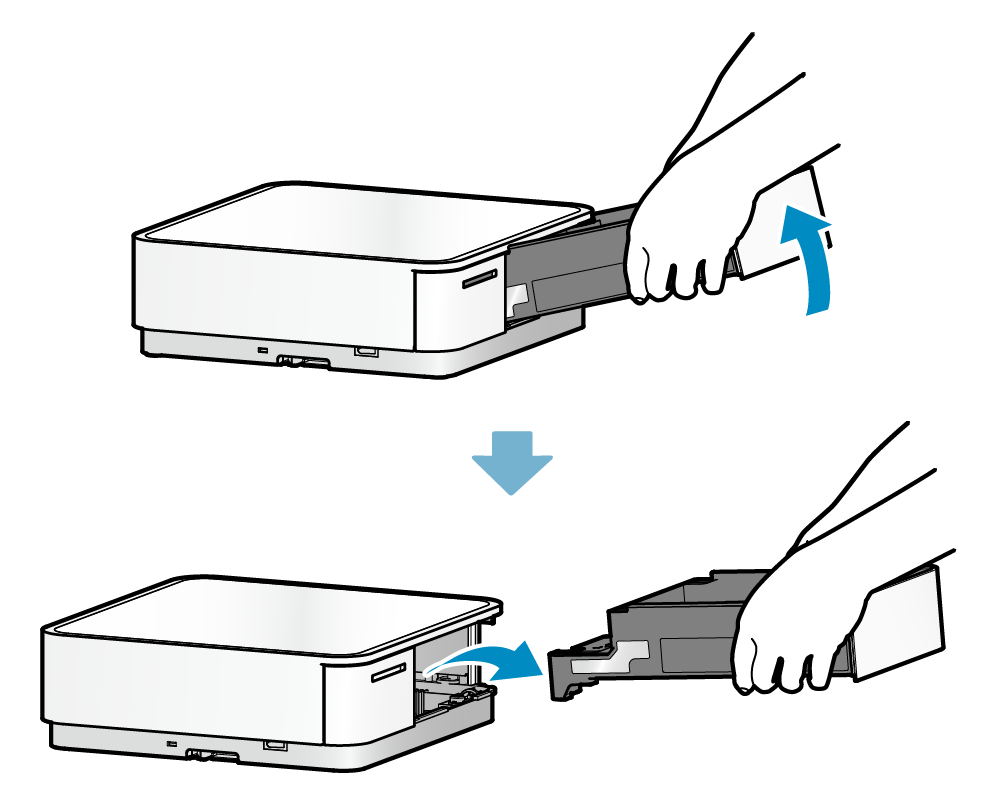
Remove the drawer tray
1. Open the cash drawer
- Open the cash drawer using an application.
Refer to When Cash Drawer Does Not Open when opening the drawer without using an application. - Open the upper and lower trays to the maximum.
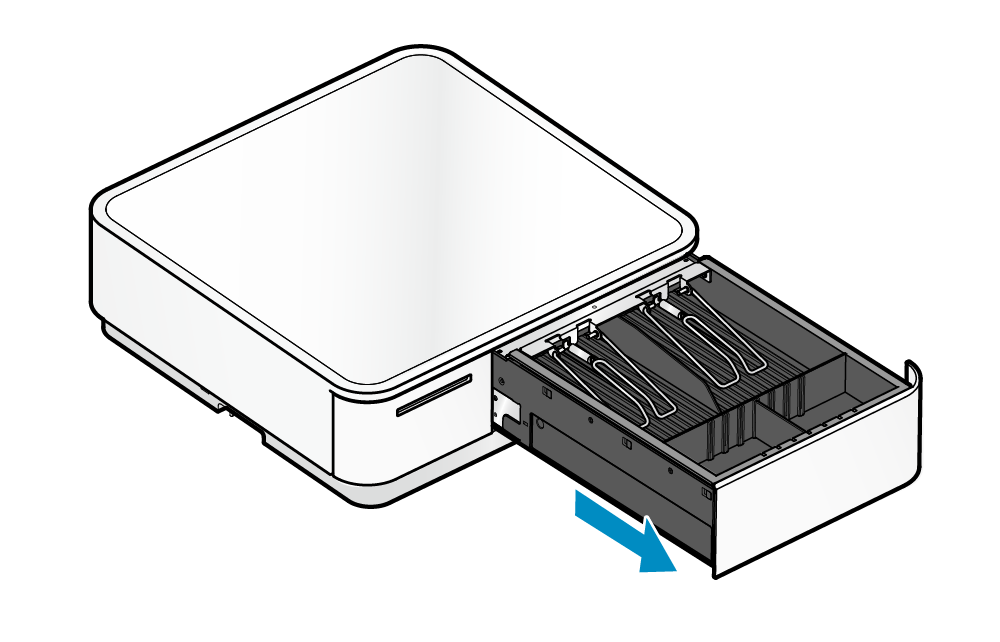
2. Remove the drawer tray
- Lift up the front side of the drawer tray and then the back side to remove.
- Do the opposite to place the drawer tray in its original position.
Change the coin tray layout
1. Open the cash drawer
- Open the cash drawer using an application.
Refer to When Cash Drawer Does Not Open when opening the drawer without using an application.
2. Remove the divider
- Release the hook A of the divider
 and raise the divider
 .
.
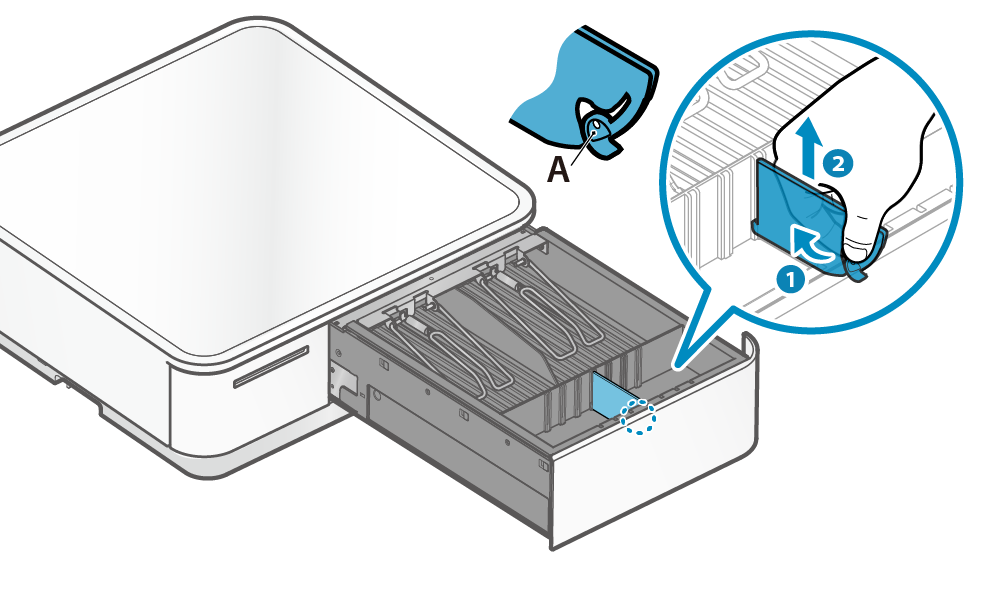
3. Install the divider
- Push the dividers along the grooves of the coin tray.
- Secure the divider hooks on the front and back side into the holes in the coin tray.
