FAQ
Check by support
Check by issue
Power does not turn on
Are the power cable and AC adapter connected correctly?
If the Power LED does not light up when the power is turned on, it may mean that the power cable or AC adapter is not correctly connected. Please check the connection. Check that the power connector is securely connected.
Connect AC AdapterCannot establish network communication
Are the power cable and AC adapter connected correctly?
Please check that the Power LED is turned on.
If the Power LED does not light up when the power is turned on, it may mean that the power cable or AC adapter is not correctly connected. Please check the connection. It may also mean that the power socket is loose. Check and make sure that the power socket is correctly connected.
Connect AC AdapterHas the Power LED lit up blue and has the Network LED lit up green?
Check that the Power LED has lit up blue and that the Network LED has lit up green.
Network LED is not illuminated
LED display shows "Link down: Physically disconnected". Check and make sure that the LAN cable is correctly connected.
- The connector may also be loose. Confirm that both the LAN connectors of the printer and network device (router, hub and such) are securely connected.
- The LAN cable may have been damaged. When the Network LED does not light up even if the LAN cable is reconnected, confirm by connecting a different LAN cable.
- Check and make sure that the network device to be connected is working correctly.
Network LED is blinking
The LED display shows "Link down: IP address cannot be obtained". When a DHCP server is provided, check whether it is available.
Was the network setting for the printer changed?
If the printer network setting has been changed using Web Configuration or Telnet and the printer has become unable to be connected, it may be possible for the printer to connect to the network when the network setting is initialized.
Perform "Initialize Communication Settings (Network)" once, and check the connection.
Initialize Communication Settings
Cannot connect to the Web Configuration
Is the following message displayed when you attempt to access Web Configuration?
"This web site can be used with Javascript activated.
Up to 2 devices can access at the same time. Please reload in 5 seconds."
To connect to the Web Configuration, please enable “JavaScript” setting in your web browser (Active Scripting in Internet Explorer).
Up to 2 devices can access Web Configuration at the same time.
If more than 3 devices need to access the site, please try after data of the previous 2 devices is completely read (after 5 seconds or longer).
Web Configuration is not displayed correctly
When you open Web Configuration, is "http://[Printer IP address]" (non-SSL/TLS communication) specified?
If "https://[Printer IP address]" (SSL/TLS communication) was specified when connecting to Web Configuration, Web Configuration may not be displayed correctly.
When opening Web Configuration, use "http:// [Printer IP address]" (non-SSL/TLS communication) .
In the Event of Wireless LAN Trouble Items to Be Checked First
Confirm that the LAN cable is disconnected.
The wireless LAN and wired LAN cannot be connected at the same time, and the wired LAN takes priority when the LAN cable is connected.
Disconnect the LAN cable from the printer when using the wireless LAN.
Are you using the wireless model (MCL21CWBI, MCL21CWBI LBL), which supports wireless LAN communication?
Wireless LAN communication is not supported when the wired model (MCL21CI, MCL21CI LBL) is used.
You can confirm the model of your printer in Check Model.
Check the Wi-Fi settings of the setting device.
Check the Wi-Fi settings of the setting device to be connected to the printer, such as the smartphone, tablet, or PC.
- Is the Wi-Fi setting turned on?
- Is the printer connected to the desired network when using the special app?
Also, try to restart the setting device.
Check the access point SSID.
Check that the access point SSID does not contain any characters which cannot be used.
Multibyte characters such as kana and kanji cannot be used for SSID.
Confirm the network to be connected is working correctly.
Check the network and network devices such as the access point and router to which the setting device is to be connected.
- Are other wireless network devices working correctly?
- Is the power turned on?
- Has the LED lit up correctly?
- Check the network devices for disconnection, looseness, or damage of the cable.
If problems in wireless connection cannot be solved even with the check and countermeasures mentioned above, contact your network administrator and try to restart the network devices.
Check the printer wireless function settings.
Check that the printer wireless function is set to "ON".
To configure the settings, select [Printer Settings] - [LAN Settings] on the dedicated app.
Use App
Wireless LAN Setting Problems
"Failed/(Fail)" is printed on the wireless network diagnosis result
When "failed/(Fail)" is printed on the wireless network diagnosis result (Wireless Network Diagnosis), the connection has failed. Refer to the following, and confirm the problem and take measures against it.
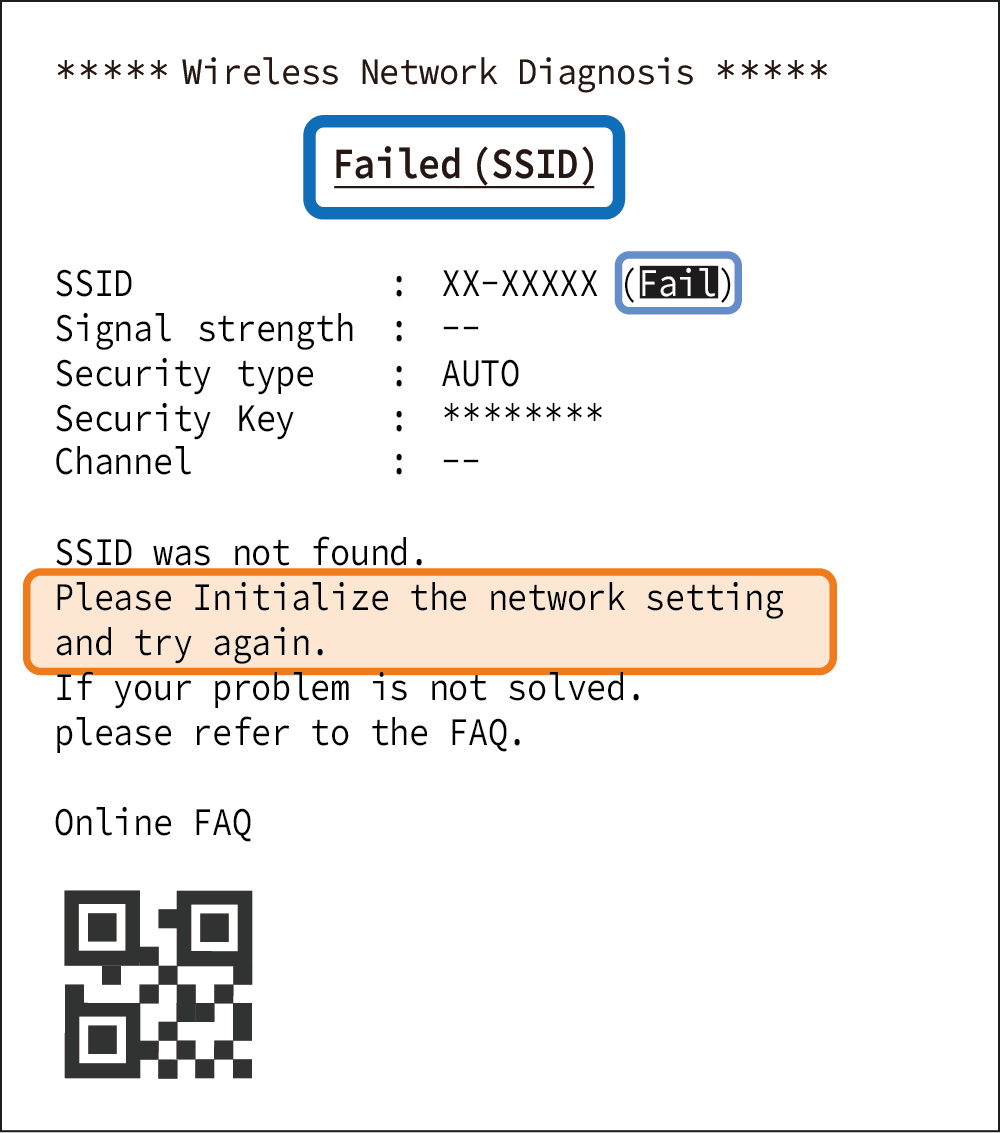
- Failed(SSID) is printed
-

The specified SSID (network) was not found.
Turn on the printer again to initialize the wireless settings. Check for the correct SSID and reconfigure the settings.
If you fail to connect correctly even after the reconfiguration, initialize the communication settings of the printer. Initialize Communication Settings
Connection may fail when there is an obstacle between the printer and the access point, or when they are far from each other. Check for such problems and reconfigure the settings.
- Failed(Security Type) is printed
-
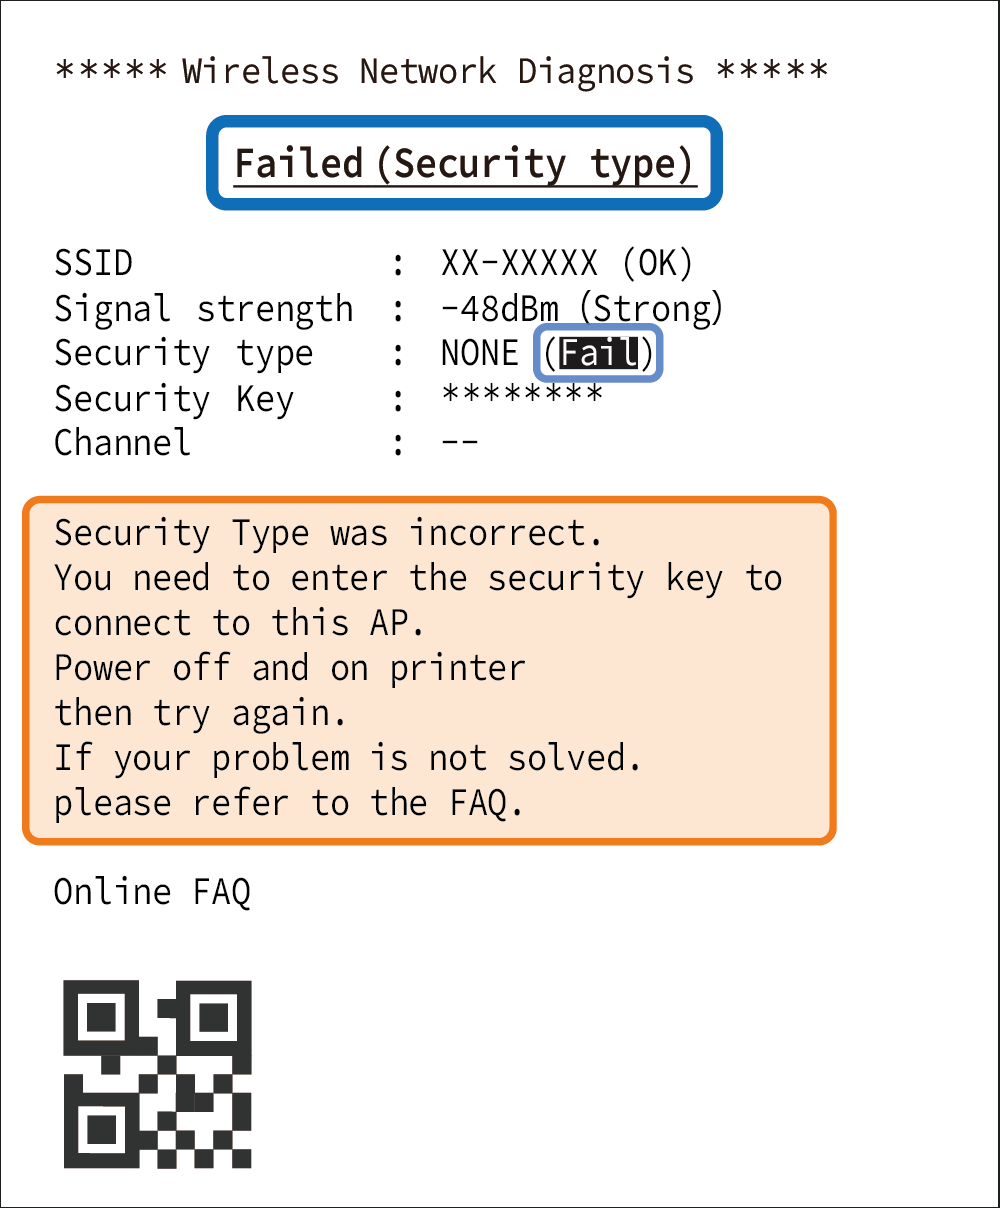
The Security Type that has been set does not match the Security Type of the access point to be connected.
Turn on the printer again to initialize the wireless settings. Check the Security Type of the access point to be connected, and reconfigure the settings. (Security Type supported: NONE, WPA, WPA2, WPA3)
If you fail to connect correctly even after the reconfiguration, initialize the communication settings of the printer and then reconfigure the settings. Initialize Communication Settings
"(Fail)" is also printed when the Security Key was not entered during the setting using the special app.
Check the settings of the access point, and enter the Security Key as necessary. After that, restart the printer and reconfigure the settings. - Failed(Security Key) is printed
-
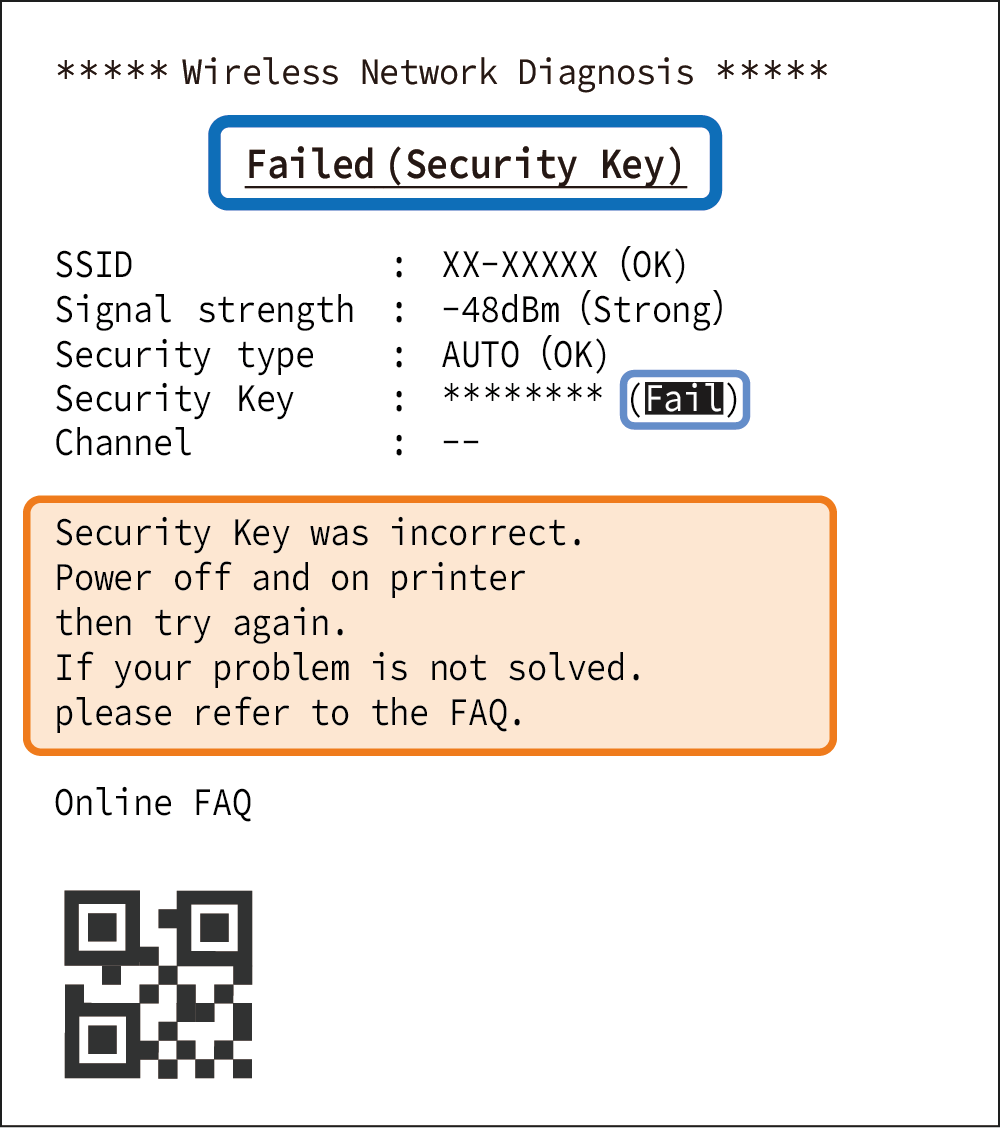
The password (Security Key) that has been set does not match the password of the access point to be connected.
Turn on the printer again to initialize the wireless settings. Check the password of the access point to be connected, and reconfigure the settings.
If you fail to connect correctly even after the reconfiguration, initialize the communication settings of the printer and then reconfigure the settings. Initialize Communication Settings
- The printer cannot be initialized even by turning on the printer again.
-
The auto reset function that initializes the wireless settings by turning on the power again does not work. (The auto reset function is enabled at the time of factory shipment.)
Initialize the communication settings of the printer, and then reconfigure the settings. Initialize Communication Settings
"(Didn't obtain)" is printed for "IP Address" on the wireless network diagnosis result.
If the settings are correct however an IP address cannot be acquired, the status of wireless LAN communication between the printer and access point may be unstable.

When "(Weak)" is printed for the Signal Strength in the wireless network diagnosis result, review the positions of the printer and access point, or install them in a place with fewer obstacles.
Also, check the access point settings and network environment for problems, such that the DHCP server is disabled or the maximum number of devices that can be connected is exceeded.
The Web Configuration setting screen does not appear during setting using the wireless communication setting QR code
Perform Self-Printing, and check the IP Address of "Current IP Parameters Status".
Enter the confirmed IP address in the address column of a web browser such as Google Chrome or Safari, and the printer is connected and the printer settings screen (Web Configuration) appears.
Connection cannot be established when setting multiple printers
Perform the following in addition to Items to Be Checked First.
Turn off all the printers except the one currently undergoing setting, and configure the printers one at a time.
Wireless LAN Trouble During Operation
Identify problems using the special app
The special app can be used to identify troubles occurring during operation and support the subsequent actions.
The following items can be checked using the special app.
- Network mode (access point)
- SSID (network)
- Connection status
- Security type
- Channel status
- Signal strength
For how to use the app, please refer to Wireless LAN Troubleshooting.
The printer LED is normally displayed but printing is impossible
The following factors are considered in addition to Items to Be Checked First.
- The setting devices and the printer are not set on the same network
- Printer defect
- Printing app setting failure
The destination network of the setting devices may be unintentionally changed.
Confirm that the printer and the devices are connected to the same network.
For printer defects such as paper feed trouble, refer to their corresponding topic items and take measures.
Connection is often cut off, and the communication speed is very low.
The following factors are considered.
- The printer is installed far from the access point, or there are obstacles between the printer and the access point.
- The printer is affected by a nearby powerful wireless device.
Consider taking the following measures.
- Install the printer in a place as close to the access point as possible with fewer obstacles.
- Install the printer in a place as far from devices causing radio interference as possible.
- Use a channel away from frequency bands that will cause radio interference.
- Use a frequency band of 2.4 GHz or 5 GHz, whichever is less likely to cause radio interference.
The problems may be solved by changing the installation place or orientation of the printer.
The special app also has a function that identifies problems and supports the subsequent actions.
For how to use the app, please refer to Wireless LAN Troubleshooting.
The Network LED does not light up or blink
The following factors are considered.
- The destination router uses a channel not supported by the printer.
Change the setting of the channel used by the parent router to correspond to the range supported by the printer.
| Model | Supported channel |
|---|---|
| US (C01) |
2.4 GHz 5 GHz |
| E+U (C02) |
2.4 GHz 5 GHz |
| JP (C03) |
2.4 GHz 5 GHz |
| SAUS / SAEU / SAUK / AS (C04) |
2.4 GHz 5 GHz |
*1 Outdoor use is prohibited (Canada)
*2 Outdoor use is prohibited (EU/UK)
*3 Outdoor use is prohibited (Japan)
*4 Outdoor use is prohibited (Australia/New Zealand)
*5 Outdoor use is prohibited (Australia)
* In the access point mode, W53 and W56 for 5 GHz are not supported.
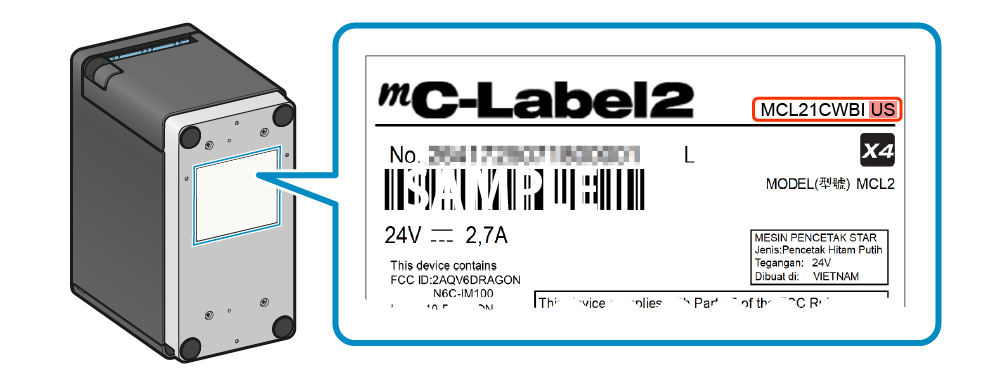
* You can confirm the model name of your printer in the red box (bottom of main unit) shown in the illustration below.
(For SAUS / SAEU / SAUK / AS C04, the red background is not printed but blank.)
The Network LED continues blinking and does not light up.
The DHCP server may not be working normally.
Check the router settings or the network environment.
Wireless LAN Other Questions
Communication Distance
This product has been verified to communicate within a distance of 30 m. However, since the communication distance varies depending on the surrounding reception environment, obstacles, installation environment, etc., an evaluation should be thoroughly performed at the time of installation.
Static IP address setting of Wireless model
A static IP address can be set to the wireless model printer using the dedicated app.
When using iOS or Android device
Configure the settings from [Printer Settings] - [Network Settings] in Star Quick Setup Utility.
About signal strength
Signal strength is used to check the communication status between the wireless model printer and the destination access point.
The closer the signal strength is to 0, the better the status of the radio waves. It becomes the maximum at -30 dBm, and wireless connection may become unstable at -70 dBm or less.
The signal strength is just a criterion and not available for checking radio interference and noise. Perform evaluation in an actual environment and make a comprehensive judgment.
You can check the signal strength in the wireless network diagnosis result, which is printed for the wireless LAN settings. Additionally, if you are using an iOS or Android device, you can confirm the signal strength using the special app.
For how to use the app, please refer to Wireless LAN Troubleshooting.
SteadyLAN cannot be used
Is the SteadyLAN setting enabled?
In order to use SteadyLAN, SteadyLAN needs to be “Enabled.”
Also, SteadyLAN is “Disabled” automatically when ThetherLAN is “Enabled” because TetherLAN cannot be used with SteadyLAN.
Use the special app and check the printer SteadyLAN settings.
Use Star SteadyLAN Use App
Is the LAN cable/USB cable connected properly?
In order to use SteadyLAN, the LAN cable and USB cable must be connected.
Check and make sure that the LAN cable is correctly connected to the printer and network device.
Also check that the USB cable is correctly connected to the printer USB-C port and host device.
When using a host device that does not support USB PD (USB Power Delivery), network connection is supported via the USB cable when the USB connection type supports communication. However power supply at the same time is not possible.
Has configuration of the printer network connection settings been completed?
In order to use SteadyLAN, it is necessary to configure the printer network settings. Check and make sure that the printer network communications are functioning correctly.
Connect Tablet/PC (LAN)
Is the host device Wi-Fi set to "OFF"?
In order to create a stable wired LAN connection, set the host device [Settings] - [Wi-Fi] to "OFF".
Use Star SteadyLAN
Cannot pair via Bluetooth (Cannot connect)
Are you using the wireless model (MCL21CWBI, MCL21CWBI LBL), which supports Bluetooth communication?
Bluetooth communication is not supported when the wired model (MCL21CI, MCL21CI LBL) is used.
Check the model of your printer, referring to Check Model.
Are the power cable and AC adapter connected correctly?
Please check that the Power LED is turned on.
If the Power LED does not light up when the power is turned on, it may mean that the power cable or AC adapter is not correctly connected. Please check the connection.
It may also mean that the power socket is loose. Check and make sure that the power socket is correctly connected.
The printer's power is on, but it cannot be detected. Alternatively, a pairing code is not printed even when the printer is selected.
Possible causes include the following. Check the applicable items.
The printer’s [New Pairing Permission] is set to OFF.
When [New Pairing Permission] is set to OFF, printer search or new pairing from devices other than the connected tablet is not available due to enhanced security.
To set [New Pairing Permission] back to ON, perform one of the following.
- Connect to the dedicated app using a non-Bluetooth interface, and change the setting from the menu shown below.
[Device Settings] > [Bluetooth Settings] - Initialize communication settings (Bluetooth) of the printer.
Initialize Communication Settings
Bluetooth on the printer is set to OFF.
Check that Bluetooth Classic or Bluetooth Low Energy on the printer is set to ON according to the Bluetooth type supported by the app you are using.
This can be checked and configured using the dedicated app.
[Device Settings] > [Bluetooth Settings]
Use App
Pairing (authentication steps) has failed five times.
When the pairing (authentication steps) has failed five times, no new pairing can be performed (this count includes failures on other host devices).
In such cases, turn the printer off and then back on, and retry pairing.
The device you are using has already been paired via a different Bluetooth type.
If the device has already been paired via Bluetooth Classic or Bluetooth LE, it may not appear in the device list on the OS Bluetooth settings screen, even when the printer is powered on.
Even if pairing succeeded using another type of Bluetooth, printing may fail due to an unstable connection.
Do not pair the printer with the same device using both Bluetooth Classic and Bluetooth LE.
If the device has already been paired using one of them, delete (unregister) the printer from the OS Bluetooth settings screen, and then pair it again.
Initialize Communication Settings (Unregister)
Cannot communicate via Bluetooth (Cannot print)
If the external app you are using supports Bluetooth LE, does your printer also support Bluetooth LE printing?
There are two types of Bluetooth: Bluetooth Classic and Bluetooth LE.
When the external app you are using supports printing via Bluetooth LE, use a printer that also supports Bluetooth LE printing.
You can check whether your printer supports Bluetooth LE printing by using the printer's self-printing.
When "Bluetooth LE printing supported" is printed in "Printer information" printed on the first sheet, the printer supports Bluetooth LE printing.
If "Bluetooth LE printing supported" is not printed, the printer supports only Bluetooth Classic printing.
In such cases, no Pairing Code is printed during Bluetooth pairing, and no authentication steps are required.
When using an iOS device, is it being charged from the printer USB-C port simultaneously?
When the iOS device connected via Bluetooth is connected to the printer USB-C port, Bluetooth connection may be released.
When charging on the USB-C port an iOS device connected to the printer via Bluetooth, set the USB-C function to “Power Supply Only Mode” in advance.
Switch the USB-C Function
Does the Bluetooth type supported by the app you are using match the Bluetooth settings on the printer and the host device?
The connection procedure varies depending on whether the app you are using supports Bluetooth Classic or Bluetooth LE. Check the following according to the app specifications.
When using a Bluetooth Classic-compatible app
The printer must be paired with the host device in advance.
When using an iOS device
Please check that the Power LED and Bluetooth LED have lit up blue.
If the LED display shows "Bluetooth not connected" (the Power LED lights up blue and the Bluetooth LED is turned off), Bluetooth is not connected.
Open the Bluetooth Setting of the host device, and check whether the connection with the target printer is established.
When using a non-iOS device (such as Android)
Please check that the Power LED has lit up blue.
The Bluetooth LED lights up blue only when printing or retrieving the printer status is performed via Bluetooth.
Open the Bluetooth Settings of the host device, and check whether the pairing with the target printer is complete.
Connect Tablet/PC (Bluetooth)
When using a Bluetooth LE-compatible app
Do not pair in advance in the OS Bluetooth settings screen.
For an app that requires a Bluetooth LE connection, start the connection from the app, check the displayed and printed code, and perform pairing.
With Bluetooth LE, the Bluetooth LED lights up only while communication is established via the app (for example, during printing or status retrieval), regardless of the device used.
If you paired the device using a different Bluetooth pairing method from the app you are using, delete (unregister) the device from the OS Bluetooth settings screen, and then pair it again.
Initialize Communication Settings (Unregister)
Are multiple tablets being used?
Also, is any iOS device (iPad, iPhone and such) being used?
Check whether the printer is already connected to another iOS device via Bluetooth.
If connected, then remove the connection to the connected iOS device, and then try to connect to the Bluetooth from another host device.
Connect Tablet/PC (Bluetooth)Bluetooth communication is not stable
Are there any nearby objects that may interfere with communication?
Is the distance between the printer and host device too great?
The communication status of the Bluetooth printer will depend on any nearby radio waves, presence of interference, and the environment in which it is installed. When installing this product, perform a thorough evaluation beforehand.
Take the necessary measures after referring to Precautions for Using Bluetooth Printer.
Precautions for Using Bluetooth PrinterIf the external app you are using supports Bluetooth LE printing
If pairing is performed in advance on the OS Bluetooth settings screen when using an external app that supports Bluetooth LE printing, printing may fail due to an unstable Bluetooth LE connection.
In such cases, perform the following and retry pairing.
- Delete (unregister) the target device from the OS Bluetooth settings screen.
- Initialize communication settings (Bluetooth) of the printer.
Initialize Communication Settings
Other Bluetooth connection issues
"Pairing Unsuccessful" is repeatedly displayed on the iOS Bluetooth settings screen. Alternatively, the printer repeatedly prints a pairing code.
On iOS devices, the "Pairing Unsuccessful" message may be repeatedly displayed on the iOS Bluetooth settings screen after the printer connected via Bluetooth is disconnected. Alternatively, a pairing code may be printed repeatedly from the printer.
To stop displaying and printing the code, perform one of the following.
- Set the printer’s [Auto Connection] to OFF.
- Initialize communication settings (Bluetooth) of the printer.
The [Auto Connection] setting can be changed from the following menu in the dedicated app.
[Device Settings] > [Bluetooth Settings]
Use App
Refer to the following for how to initialize communication settings (Bluetooth).
Initialize Communication Settings
A Pairing Code is printed unintentionally.
If this product is accidentally selected as the pairing target on the OS Bluetooth settings screen, a pairing code may be printed. To prevent unnecessary connections, set the printer’s [New Pairing Permission] to OFF.
The setting can be changed from the following menu in the dedicated app.
[Device Settings] > [Bluetooth Settings]
Use App
Cannot establish USB communication
Is the USB cable connected properly?
Connect USB-C for communication with the host device.
The USB cable to be used varies depending on the operating system of your PC, smartphone or tablet. Check whether the cable is correctly set to suit your environment.
- The connector may also be loose. Check that the USB cable is correctly connected to both the printer and the PC, smartphone, or tablet.
- Connect the cable slowly and securely. Also try to connect the cable again.
- The USB cable may have been damaged. If this error recurs after the cable is connected again, connect another cable, and check the status.
When using the Windows printer driver in a Windows device, did you install the Windows printer driver before connecting the USB cable?
If you connect the USB cable before installing the Windows printer driver to use the Windows printer driver in a Windows device, the printer is not correctly recognized by the operating system.
If you have failed to connect the USB cable and create a printer queue before installing the Windows printer driver, follow the steps below to erase or uninstall the device.
- Start Device Manager while the printer remains connected.
- Right-click "Other Device" - "StarMCL21 (STR-001)", and select "Uninstall Device (Windows 10)" or "Delete (Other than Windows 10)" from the pull-down menu.
- When "Check Device Uninstallation" is displayed, check the status, and execute uninstallation.
- Disconnect the USB cable from the printer or turn the printer off.
After installing the Windows printer driver, connect the USB cable and turn the printer on again.
Connect USB Cable
What kind of USB device are you using?
The USB-A provides communication with and supplies power to USB-connectable devices*. It only supplies power (0.5 A max.) to other USB devices.
Connect the cable slowly and securely. Also try to connect the cable again.
*USB-connectable product: SCD222U, BCR-POP1, USB HID devices(keyboard interface) and USB memory devices
Set Up External DevicesCannot print
Is the power turned on?
Are the power cable and AC adapter connected correctly?
Please check that the Power LED is turned on.
If the Power LED does not light up when the power is turned on, it may mean that the power cable or AC adapter is not correctly connected. Please check the connection.
It may also mean that the power socket is loose. Check and make sure that the power socket is correctly connected.
Is the printer cover closed securely?
Check that the Power LED has not lit up red.
If the printer cover is not closed securely, it causes a cover open error (the Power LED lights up red), which results in a printing failure.
When closing the printer cover, firmly press it so as not to close only one side.
Is the paper facing the correct direction?
If blank paper is being ejected, then the paper roll is set in the wrong direction.
Check the direction of the paper roll to make sure that the paper is set correctly.
Does the paper being used fit the specifications for the printer?
As this product is a thermal printer, it will not print on ordinary paper.
Also, if there are issues such as faint printing of words, the cause may be that the paper does not meet the specifications, or the paper has become old and deteriorated.
Check the appropriate paper roll specifications and use paper that meets the printer's specification.
Paper Roll SpecificationsIs the LED display in standby state (the Power LED lights up blue)?
If the Power LED is blinking or it has lit up or is blinking in a color other than blue, refer to the LED Display and check the product status.
LED DisplayDoes a paper jam occur?
If you can hear the printer operating but the paper is not being ejected, there is a possibility that a paper jam is occurring or the paper is being rolled onto the rubber roller.
If a paper jam occurs, remove the paper referring to "Paper Jam".
Does Self-Printing work correctly?
Check whether Self-Printing works correctly.
When Self-Printing works correctly, check whether the app, software, and printer settings are correctly configured.
Self-PrintingOut of paper error or paper setup error occurs (when die cut label paper or black mark paper is selected)
When using die cut label paper
A gap error occurs when a gap between labels (portion of release paper) is 24 mm or larger.
Use the die cut label paper with a gap of 23 mm or smaller.
When using black mark paper
A BM error occurs when the black mark length is 9 mm or longer if using the printer with the factory defaults.
Change the setting appropriately when using the label of which black mark length is 9 mm or longer.
The black mark length can be increased up to 24 mm by black mark correction of Star Quick Setup Utility.
When using the standard model printer with factory defaults
For the standard model, "Linerless label" is selected and the hold print control is "enabled" in the factory defaults of the printer. In this case, printing of the next label will not start until the printed label is removed from the paper exit of the printer.
The label type can be changed by Utility or operation of the printer.
Use App Media SettingsReceipt is not printed properly
When using the die cut label paper or black mark paper, paper feed is skipped for one label
When using die cut label paper
If the bottom margin from the end of the printing range to the edge of the label is not large enough, a gap between labels cannot be detected correctly and the next label may be skipped.
Secure the following and set the printing range.
- Bottom margin of (Label length + Gap) x 6% or larger under the printing range
When using black mark label paper
If the bottom margin from the end of the printing range to the black mark start position is not large enough, a black mark cannot be detected correctly and the next label may be skipped.
Secure the following and set the printing range.
- Bottom margin of Black mark pitch* x 6% or larger under the printing range
* Black mark pitch: Length from the black mark start position to the next black mark start position
Paper jams
Is the media setting configured to match the media you are using?
Configure the media setting to match the media you are using to ensure comfortable operation without causing failures such as paper jams. When changing the settings for the top margin or cutting method, refer to the following.
Media Setting : Linerless label
The following setting is recommended to avoid paper jams.
- Select partial cut for the cutting method.
When full cut is performed for linerless label paper, a label may stick to the paper exit of the printer, resulting in paper jams. - Enable hold print control.
When printing multiple labels in series using linerless label paper, a label may stick to the paper exit of the printer, resulting in paper jams.
Media Setting : Die cut label or Continuous label
It is recommended that the top margin setting be changed to "10 mm" if paper jams or folded label paper occurs.
Media Setting : Receipt paper
A top margin setting of "3 mm" and a cutting method setting of "Partial cut" are not recommended as there is the possibility of paper jams occurring.
Consider reviewing the top margin setting or cutting method setting.
The printer setting can be changed by Utility or by operating the printer.
Use App Media Settings
Are you using linerless label paper or continuous label paper?
Is the printer information LED lit orange?
Are internal parts of the printer sticky due to label paper?
When using linerless label paper or continuous label paper, it is recommended to perform cleaning periodically. The information LED of the printer that lights up orange shows the cleaning notification. In addition, clean parts in the printer when these are sticky.
Cleaning (When Using Label Paper)Has the paper being printed been touched while the paper is being discharged, or is the outlet blocked off?
Do not touch the paper or block the outlet while the paper is being discharged.
Prevent Paper JamDoes the paper being used fit the specifications for the printer?
When the width, thickness, or other details do not meet the required specifications, it may easily cause paper jams.
Check the appropriate paper roll specifications and use paper that meets the printer's specification.
Paper Roll SpecificationsThe printer cover does not close
Is any foreign matter other than the paper roll in the paper roll holder?
To set paper, check whether any foreign matter such as a paper core is in the paper roll holder and remove it if there is any.
Paper SetupCannot open the printer cover
Is paper jammed?
If the printer cover does not open even when you pull the opening lever, it is likely that a paper jam has occurred, and the cutter has locked. In such a case, refer to If the printer cover cannot be opened to unlock the cutter.
The tablet cannot be charged
Is the power of the main unit turned on?
Check that the Power LED of the main unit has lit up.
USB peripherals such as tablets can only be charged while the power of the main unit is on.
Turn On PowerIs the USB cable for the tablet connected correctly to the USB-C port?
Confirm that the USB cable for the tablet is connected to the USB-C of the main unit.
Set Up External DevicesDoes the power supply capacity of the printer satisfy the electric energy required to charge your tablet?
The maximum amount of power supplied from USB-C is up to 20 W. Check whether this is sufficient power needed to charge your tablet.
Set Up External DevicesOther questions
To check printer settings
The printer settings information can be checked easily by using the dedicated app.
You can also check settings using the Self-Printing function.
Use AppSelf-Printing
To use a macOS or Linux device
To use a macOS or Linux device, you need to install the dedicated driver.
For details on the connection procedure and how to install the driver, refer to the following.
The cutter blade has discolored
The spotted discoloration on the cutter blade is not rust but is caused by heat treatment during manufacturing.
Rest assured that the discoloration will not deteriorate and affect blade performance.