Part Names and Functions
This section explains the names and functions of parts that are related to the basic operations of the main unit.
Front of main unit
Inside of main unit
Back of main unit
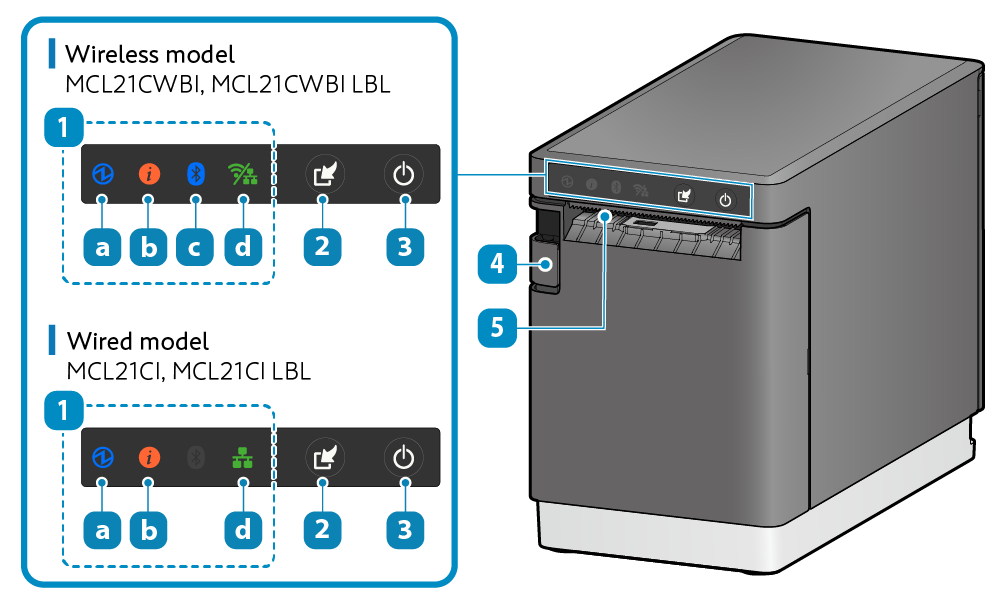
 LED
LED- Indicates the printer status.
 Power LED
- When the power is turned on, this LED lights up or flashes according to the printer status.
 Information LED <Standard model>
- This LED lights up red or orange to indicate the timing of cleaning and parts replacement. This LED also flashes light blue when there is data waiting for printing.
 Bluetooth LED <Wireless model>
- This LED lights up blue according to the Bluetooth connection status.
 Network LED
- This LED lights up green according to the network connection status.
 Multi-Function button
- Press this button to feed paper.
Also, use this button for One Touch Label and Self-Printing.
Self-Printing
Use One Touch Label  Power button
- Use this button to turn power ON/OFF and to restart the printer.
Turn On/Off Power  Cover opening lever
- Pull this lever to open the printer cover when setting the paper roll.
 Paper exit/Tear bar
- The printed paper is ejected from here.
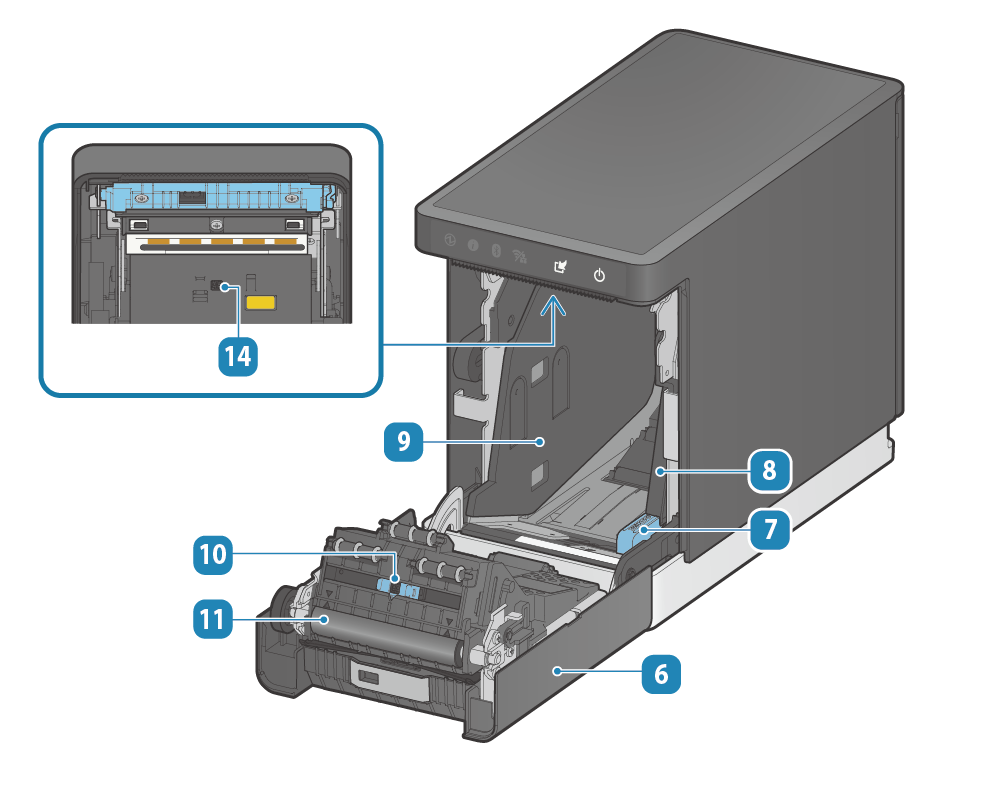
Use the tear bar to cut the paper manually.  Printer cover
- Opens/Closes when setting the paper roll.
Remove the resin cover part when cleaning the auto cutter.
Paper Setup  Paper guide lever
- Push and hold the lever down and move the paper guide right and left when adjusting the width of the paper guide.
Paper Setup  Paper guide (R)
 Paper guide (L)
 PE/BM sensor
- Detects the end of the paper or a black mark on the back side of paper.
When using label paper with black marks, move this sensor to an appropriate position according to the utility guide. In other cases, align this sensor with the center mark.
Check Media > Available black mark paper specifications  Platen roller unit
- The non-adhesive roller allows support for all label paper types, including linerless label paper.
There is no need to prepare tools and parts can be replaced easily.
Parts Replacement  Auto cutter unit
- The auto cutter cuts the paper automatically.
There is no need to prepare tools and parts can be replaced easily.
Parts Replacement  Hold print sensor
- A sensor that detects a printed label is removed from the paper exit.
 GAP sensor
- Detects border lines on the die cut label paper.
Check Media > Available black mark paper specifications  Stationary knife unit
- This is equipped with a paper cut blade.
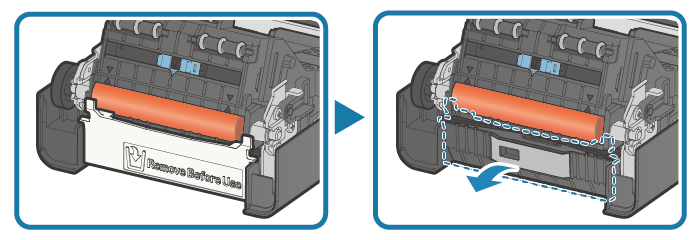
 Protection parts
- Protection parts for transport of the printer.
This is attached near the paper exit. Remove and dispose it before using the printer.
- Printer cover
- Opens/Closes when setting the paper roll.
Paper Setup - Paper guide lever
- 用紙ガイドの幅を調整するときに、レバーを下に押しながら用紙ガイドを左右に動かします。
Paper Setup - Paper guide (R)
- Paper guide (L)
- PE/BM sensor
- Detects the end of the paper or a black mark on the back side of paper.
When using label paper with black marks, move this sensor to an appropriate position according to the utility guide. In other cases, align this sensor with the center mark.
Check Media > Available black mark paper specifications - Platen roller unit
- The LBL model supports die cut label and receipt paper.
- GAP sensor
- Detects border lines on the die cut label paper.
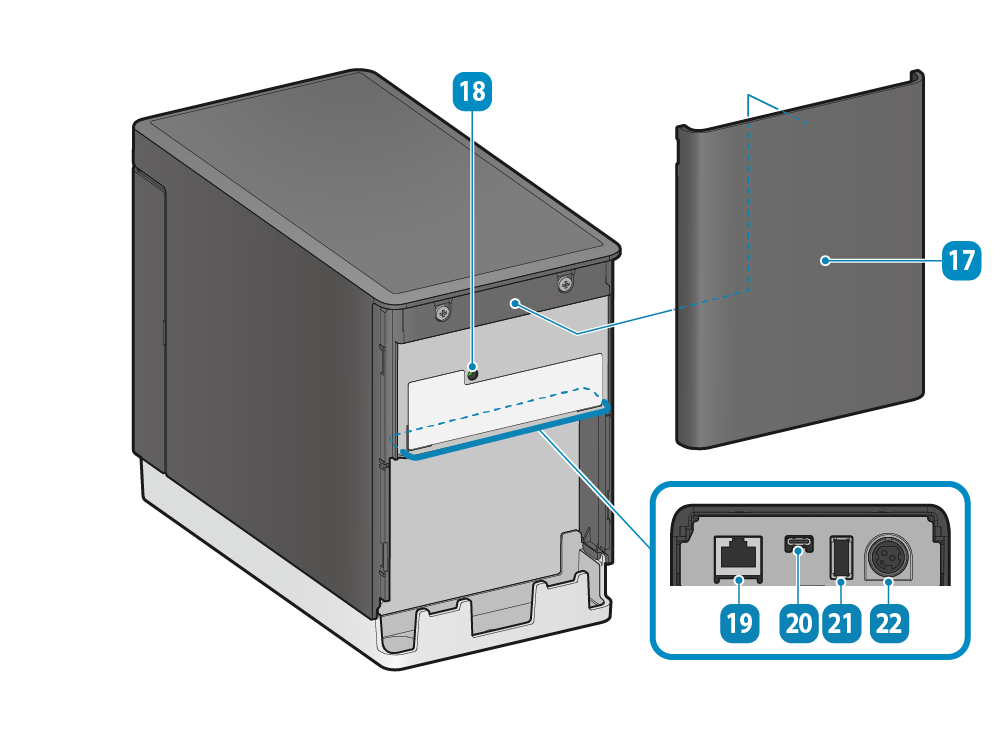
Check Media > Available black mark paper specifications  Rear cover
- It protects the terminals and cables. Be sure to attach it before using the printer.
Remove/Mount Rear Cover  RESET switch
- Initializes the communication settings of the main unit.
Initialize Communication Settings  LAN port
- Connect to the network via LAN cable.
Connect LAN Cable  USB-C port
- Connect to an iOS, Android, or Windows device via USB cable. This enables both data communication and power supply (up to 20 W).
Connect USB Cable
Set Up External Devices - USB-C Port  USB-A port
 - Connect USB-connectable products* specified by Star Micronics to establish communication.
This product supports USB HID class (keyboard mode)*.
In addition, this port can also be used to supply power (0.5 A max.) to USB peripherals.
* There are restrictions if you use USB-connectable products or USB HID class (keyboard mode).
Use Peripherals
For details, see Use USB Device.
Set Up External Devices - USB-A Port
Use Third-party External Devices  Power connector
- Connect the power adapter cable that comes with the main unit.
Connect AC Adapter  Silica gel
- This is placed inside the rear cover. Remove and dispose of it before using the printer.
- Rear cover
- It protects the terminals and cables. Be sure to attach it before using the printer.
Remove/Mount Rear Cover - RESET switch
- Initializes the communication settings of the main unit.
Initialize Communication Settings - LAN port
- Connect the network with the LAN cable that comes with the main unit.
Connect LAN Cable - USB-C port
- Connect your iOS, Android, or Windows device using a USB cable. This enables both data communication and power supply (up to 20 W).
Connect USB Cable
Set Up External Devices - USB-C Port - USB-A port
- Connect USB-connectable products* specified by Star Micronics to establish communication.
This product supports USB HID class (keyboard mode)*.
In addition, this port can also be used to supply power (0.5 A max.) to USB peripherals.
* There are restrictions if you use USB-connectable products or USB HID class (keyboard mode).
Use Peripherals
For details, see Use USB Device.
Set Up External Devices - USB-A Port
Use Third-party External Devices - Power connector
- Connect the power adapter cable that comes with the main unit.
Connect AC Adapter - Information for general users
- The device can be connected by USB to mC-Label2 and used only if the application (or system) which is used supports the above USB devices. For the support status, check with the application (or system) provider.
- These devices cannot be used with general-purpose applications (such as Excel or Notepad).
- Information for developers
The operation of all commercially available USB HID class (keyboard mode) devices is not guaranteed.
Star Micronics does not check the operation of every kind of device. Therefore be sure to fully verify operation with the actual equipment before actually beginning use. Some commercially available devices cannot communicate correctly with this product.


Use USB Device
Pay attention to the following points when connecting using the USB-connectable products or USB HID class (keyboard mode) device with the mC-Label2.
Only one device of either our designated barcode reader or USB HID class (keyboard mode) can be connected.
Please direct any inquiries regarding support for USB HID class devices to here.