FAQ
Browse by Supported Features
Find by Support Topic
Power does not turn on
Is the USB cable connected correctly to the power source?
If the LED does not light up after you connect the USB cable, please check that the USB power adapter or the device is correctly connected to this product with a USB cable. Check that the power source can supply power.
Turn ON/Off PowerConnected to an output port with 0.5 A or more?
This product consumes 0.5 A. Connect to a port with 0.5 A or more for use.
Cannot establish network communication
Is the USB cable connected correctly to the power source?
Please check that the LED is turned on.
If the LED does not light up after you connect the USB cable, please check that the USB power adapter or the device is correctly connected to this product with a USB cable. Check and make sure that the USB cable is correctly connected.
Turn ON/Off PowerHas the LED lit up green?
Check that the LED has lit up green.
LED has lit up blue
LED display shows "Link down: Physically disconnected." Check and make sure that the LAN cable is correctly connected.
- The connector may also be loose. Confirm that both the LAN ports of the product and network device (router, hub and such) are securely connected.
- The LAN cable may have been damaged. When the LED does not light up green even if the LAN cable is reconnected, confirm by connecting a different LAN cable.
- Check and make sure that the network device to be connected is working correctly.
LED is blinking green
The LED display shows "Link down: IP address cannot be obtained." When a DHCP server is provided, check whether it is available.
LED Display
Was the network setting for the product changed?
If the product network setting has been changed using Star Quick Setup Utility (iOS, Android) or Star Windows Software (Windows) and the product has become unable to be connected, it may be possible for the product to connect to the network when the communication setting is initialized. Perform "Initialize Communication Settings" once, and check the connection.
When You Cannot Connect (Initialization Procedure)Items to be checked first in the event of wireless LAN trouble
Check that the LAN cable is disconnected.
The wireless LAN and wired LAN cannot be connected at the same time, and the wired LAN takes priority when the LAN cable is connected.
Disconnect the LAN cable from the product when using the wireless LAN.
Check the Wireless LAN settings on your device.
Check the Wireless LAN settings on the device you are using to configure this product (PC, tablet, etc.).
- Is the Wireless LAN setting turned on?
-
If the device is connected to a different band, switch to 2.4 GHz. Common 2.4 GHz SSID names include "XX-2G" and "XX-G-YY".
You may also be able to check the connected band in your device’s network settings.
If the issue continues, restart the device and try again.
Check the access point SSID.
Check that the access point SSID does not contain any characters which cannot be used.
Multibyte characters such as kana and kanji cannot be used for SSID.
Check the network to be connected is working correctly.
Check the network and network devices such as the access point and router to which the setting device is to be connected.
- Are other wireless network devices working correctly?
- Is the power turned on?
- Has the LED lit up correctly?
- Check the network devices for disconnection, looseness, or damage of the cable.
If problems in wireless connection cannot be solved even with the check and countermeasures mentioned above, contact your network administrator and try to restart the network devices.
Check the product wireless function settings.
Check that the product wireless function is set to "ON".
Settings can be configured from the following menu in the dedicated app.
- For iOS, Android
Star Quick Setup Utility - [Device Settings] - [Network Settings] - For Windows
Star Windows Software - [Printer Utility] - [Network Settings]
Wireless LAN Setting Problems
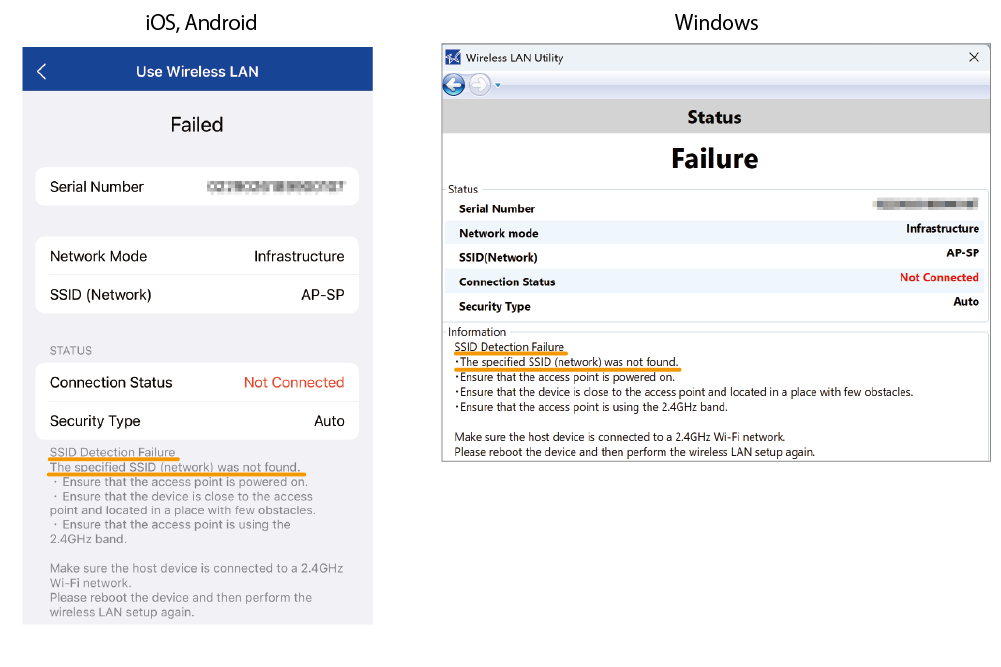
"Failed" is displayed during wireless network setup.
If the dedicated app displays "Failed" during wireless network setup, the connection attempt was unsuccessful.
Follow the message underlined in orange in the app to identify the issue and take the appropriate action.
-
- SSID Detection Failure
The specified SSID (network) was not found.Check the following.
・Check that the access point is powered on.
・Check that this product is located close to the access point and in a place with few obstacles.
・Check the access point operates on 2.4 GHz band.After confirming that the host device is connected to the 2.4 GHz network, restart this product and then configure settings again.
If the problem persists, reset the product’s communication settings and run the setup again.
When You Cannot Connect (Initialization Procedure)
- SSID Detection Failure
-
- Authentication Failure (Security Type)
The Security Type that has been set does not match the Security Type of the access point to be connected.The security type does not match the access point.
This product supports the following security types: WPA3 / WPA2 / WPA / Open.
1. Check the security type configured on the access point.
2. Restart the product, then run the setup again.
"Failed" may also appear if you did not enter the security key in the dedicated app. Check the access point settings, enter the security key if required, restart the product, and run the setup again.
If the problem persists, reset the product’s communication settings and run the setup again.
When You Cannot Connect (Initialization Procedure)
- Authentication Failure (Security Type)
-
- Authentication Failure (Password)
The password does not match that of the access point.The password (security key) you entered does not match the access point password.
Check the access point password, restart the product, and run the setup again.
If the problem persists, reset the product’s communication settings and run the setup again.
When You Cannot Connect (Initialization Procedure)
- Authentication Failure (Password)
-
- IP Address Acquisition Failure
Successfully connected to the access point, but failed to obtain an IP address.The wireless connection between the product and the access point may be unstable.
Reposition the product and the access point, or move them to a location with fewer obstacles.
Also check the access point settings and network environment.
For example:
・DHCP server is disabled.
・The maximum number of connected devices has been reached.
- IP Address Acquisition Failure
Cannot connect when configuring multiple pieces of this product
Check Items to Be Checked First, and perform the following.
Set up the products one at a time. During setup, turn off the other units.
Place the products apart, and keep your device close to the product you are setting up.
Wireless LAN Trouble During Operation
Identify problems using the dedicated app
The dedicated app can be used to identify troubles occurring during operation and support the subsequent actions.
The following items can be checked using the dedicated app.
- Network mode (access point)
- SSID (network)
- Connection status
- Security type
- Channel status
- Signal strength
For how to use the app, please refer to Wireless LAN Troubleshooting.
The LED is normally displayed but the product does not work
In addition to the items in Items to Be Checked First, the following may be causing the issue:
- The device used for setup and the product are not connected to the same network.
- Product defect
- The dedicated app setting failure
The network your setup device is connected to may have changed unintentionally. Make sure the product and your device are connected to the same network.
The connection frequently drops or the communication speed is very slow
Possible causes:
- The product is too far from the access point, or there are obstacles between them.
- A strong wireless device nearby may be causing interference.
Try the following:
- Place the product as close to the access point as possible, with fewer obstacles.
- Move the product away from devices that may cause wireless interference.
- Use a Wireless LAN channel that is less affected by interference.
Changing the product’s location or orientation may improve the connection.
The dedicated app also includes features to help identify the cause and guide you on what to do next.
For details, see Wireless LAN Troubleshooting.
The LED does not light up green
Possible causes:
-
The router (access point) is using a Wireless LAN channel that is not supported by this product.
Change the router’s Wireless LAN channel to a supported channel.
- Supported frequency bandwidth 2.4GHz
- Supported channel 1 ~ 11 ch
The LED continues blinking green and does not light up.
The DHCP server may not be working normally.
Check the router settings or the network environment.
Wireless LAN Other Information
Communication Distance
This product has been verified to communicate within a distance of 30 m. However, since the communication distance varies depending on the surrounding reception environment, obstacles, installation environment, etc., an evaluation should be thoroughly performed at the time of installation.
Static IP address setting
A static IP address can be configured from the following menu in the dedicated app.
- For iOS, Android
Star Quick Setup Utility - [Device Settings] - [Network Settings] - For Windows
Star Windows Software - [Printer Utility] - [Network Settings]
About signal strength
Signal strength is used to check the communication status between the product and the destination access point.
The signal strength can be checked using Wireless LAN Troubleshooting in the dedicated app.
The signal strength is just a criterion and not available for checking radio interference and noise. Perform evaluation in an actual environment and make a comprehensive judgment.
To disable the wireless LAN
When you do not use the wireless LAN, you can disable the wireless LAN function of this product from the dedicated app.
The setting can be configured from the following menu in the dedicated app.
- For iOS, Android
Star Quick Setup Utility - [Device Settings] - [Network Settings] - "Wireless LAN". - For Windows
Star Windows Software - [Printer Utility] - [Network Settings] - "Enable Wireless LAN".
Cannot establish Bluetooth LE communication
Is the USB cable and power source connected correctly?
Check that the LED on this product is lit.
If the LED does not light up after you connect the USB cable, make sure the USB cable and the power source (a USB power adapter or a device such as a PC or tablet) is connected correctly.
If you do not know the passkey
The default passkey for Bluetooth LE is the last six digits of the product serial number.
The product serial number can be checked on the Product Information Label temporarily attached to the bottom of the product or on the ID label.
Connect with Bluetooth LE
After changing the default passkey, if you forget the passkey, you can reset it to the default passkey by initializing the communication settings.
When You Cannot Connect (Initialization Procedure)
Are multiple PCs or tablets being used?
Check whether this product has not been connected to another device via Bluetooth LE.
If the LED on this product is flashing blue, Bluetooth LE communication is in progress.
If it is connected, disconnect it from the currently connected device, then try connecting from another device.
Is [New Pairing Permission] of the product set to "OFF"?
If [New Pairing Permission] is set to OFF (disabled), security is enhanced and the product cannot be found or newly paired from any device other than the already connected device.
To set [New Pairing Permission] to ON (enabled), initialize the communication settings.
Use AppConnect with Bluetooth LE
When You Cannot Connect (Initialization Procedure)
Has the pairing with this product you use been completed?
Check that the LED is lighting blue.
The LED is flashing blue only during communication via Bluetooth LE connection or when acquiring the status.
From the Bluetooth settings of the device, check whether the pairing with this product you use has been completed.
Check the product Bluetooth LE function settings.
Check that the Bluetooth LE function of this product is set to "ON."
The setting can be configured from the following menu in the dedicated app.
- For iOS, Android
Star Quick Setup Utility - [Device Settings]-[Bluetooth Settings] - For Windows
StarWindowsSoftware - [Bluetooth Utility]
Does the device support Bluetooth 4.2 or later?
This product supports Bluetooth 4.2 or later. Use a device supporting Bluetooth 4.2 or later.
Is a Bluetooth USB adapter used in the Windows device?
When using a Bluetooth USB adapter in the Windows device, you may need to install the driver supplied with the adapter. After installing the driver, try pairing with this product.
Bluetooth LE communication is not stable
Are there any obstacles or sources of interference nearby?
Is the product too far from the host device?
Bluetooth LE communication performance depends on the surrounding wireless environment, obstacles, and the installation conditions. Before installing this product, evaluate the actual environment thoroughly.
Also refer to Precautions for Using Bluetooth LE and take any necessary measures.
Bluetooth LE Other Information
To disable the Bluetooth LE
When you do not use the Bluetooth LE, you can disable the Bluetooth LE function of this product from the dedicated app.
However, Bluetooth LE is required to set up a wireless LAN connection. Do not disable Bluetooth LE when performing wireless LAN setup.
The setting can be configured from the following menu in the dedicated app.
- For iOS, Android
Star Quick Setup Utility - [Device Settings] - [Bluetooth Settings] - "Bluetooth Low Energy" - For Windows
Star Windows Software - [Bluetooth Utility] - "Bluetooth Low Energy"
To change the passkey
You can change the passkey used for Bluetooth LE pairing in the dedicated app.
The default passkey is the last six digits of the product serial number.
The setting can be configured from the following menu in the dedicated app.
- For iOS, Android
Star Quick Setup Utility - [Device Settings] - [Bluetooth Settings] -"Pass Key Setting" - For Windows
Star Windows Softwareの [Bluetooth Utility] - "Bluetooth Low Energy Passkey Pairing"
Cannot establish USB communication
Are you using an OS that supports USB communication?
USB communication supports Android, Windows, macOS, and Linux.
Is the USB cable connected properly?
The USB cable to be used varies depending on the operating system of your PC, smartphone or tablet. Check whether the cable is correctly set to suit your environment.
- The connector may also be loose. Check that the USB cable is correctly connected to both the product and the PC, smartphone, or tablet
- Connect the cable slowly and securely. Also try to connect the cable again.
- The USB cable may be damaged. If communication still does not work after reconnecting the cable, try using a different cable.
If it is used in Windows, has a USB port been created?
Check that a USB serial device (COM X, where X is any number) has been created at "Bluetooth & devices" in Windows.
If not, try connecting the cable again.
Connect with USBAre you using JavaPOS drivers on macOS or Linux devices?
If you are using JavaPOS drivers on macOS or Linux devices, installation of the JavaPOS drivers is required before connecting the USB cable.
After installing the JavaPOS drivers, please reconnect the cable.
Cash drawer does not operate
Is the cash drawer cable connected properly?
The connector may be loose. Check that the cash drawer cable is correctly connected to both the product and the cash drawer.
Connect the cable slowly and securely. Also try to connect the cable again.
The cash drawer cable may be damaged. If the cash drawer still does not operate after reconnecting the cable, try using a different cable.
Is the cable connected to the correct port for driving external devices?
This product has two ports for driving external devices.
Check that the cable is connected to the correct port according to the software you are using.
Other Information
How can I find the MAC address and product serial number?
You can find the MAC address on the Product Information Label temporarily attached to the product.
You can find the product serial number on the Product Information Label, or on the ID Label attached to the bottom of the product.
To check the product settings