Use Star SteadyLAN
The SteadyLAN function was added starting from printer firmware version 2.3 and later.
With MCP31LB, MCP31L, MCP31LBNH and MCP31LNH this function is supported only in an iOS environment. Use the dedicated app (Star Quick Setup Utility / Star Windows Software) to enable SteadyLAN before use.
About SteadyLAN for iOS
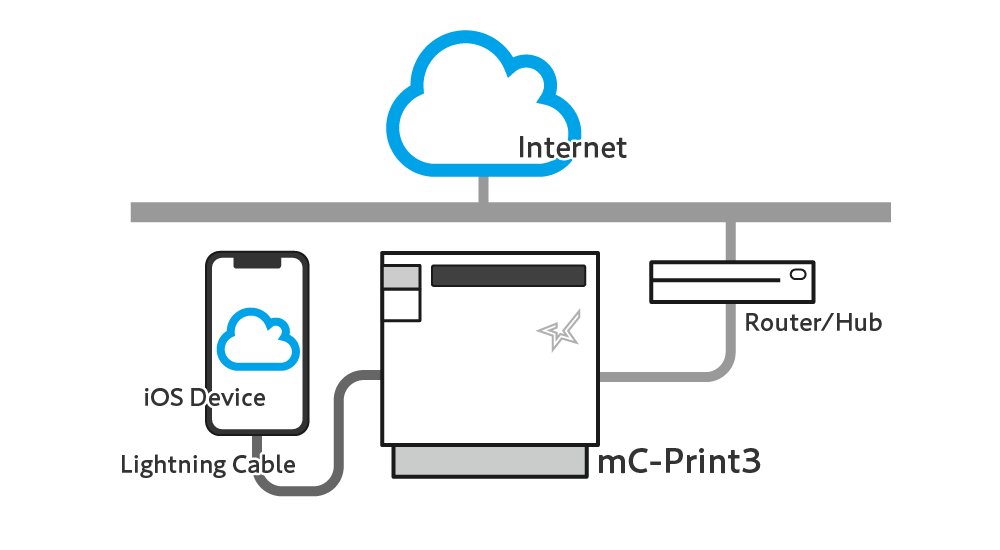
By using a USB cable to connect an iPhone, iPad, or other iOS device to an mC-Print3 that is connected to a network, it is possible to use the Internet from the iOS device without using Wi-Fi communications.
At the same time, the device can communicate with the printer via USB communication or LAN communication, and is also charged from the printer.
This not only simplifies the wiring, but because all parts of the solution are wired, more stable network connections are possible.
<MCP31LB, MCP31L, MCP31LBNH, MCP31LNH>Check Model
This function has been tested with iOS 10.1.1 and later.
There are some restrictions related to simultaneous connection (communication) of multiple devices to a single printer. Make appropriate connections to suit your environment.
Precautions for Using Multi-interface
Before and after connecting the cable to the rear panel, remove and mount the rear cover respectively.
Remove/Mount Rear Cover
Caution
- If SteadyLAN is set to "ON", when an iOS device is connected to USB-A (2.4A) on a mC-Print3 that is wired to a network, iOS device network communication takes priority over the wireless LAN connection,
and the device switches to a wired LAN connection via USB-A (2.4A).
The SteadyLAN function wired LAN connection via USB-A (2.4A) provides stable communication, however the communication speed is approximately 1 Mbps and may be slower than the wireless LAN.
Note
The mC-Print3 firmware version must be Ver. 2.3 or later in order to use the this function with mC-Print3. Check the firmware version of the mC-Print3 that you are using.
The firmware version is shown in the title section of the printer information (page 1) that is printed using the Self-Printing function.
The firmware can be updated from [Printer Settings] - [Firmware Update] in Star Quick Setup Utility.
Self-Printing Use App
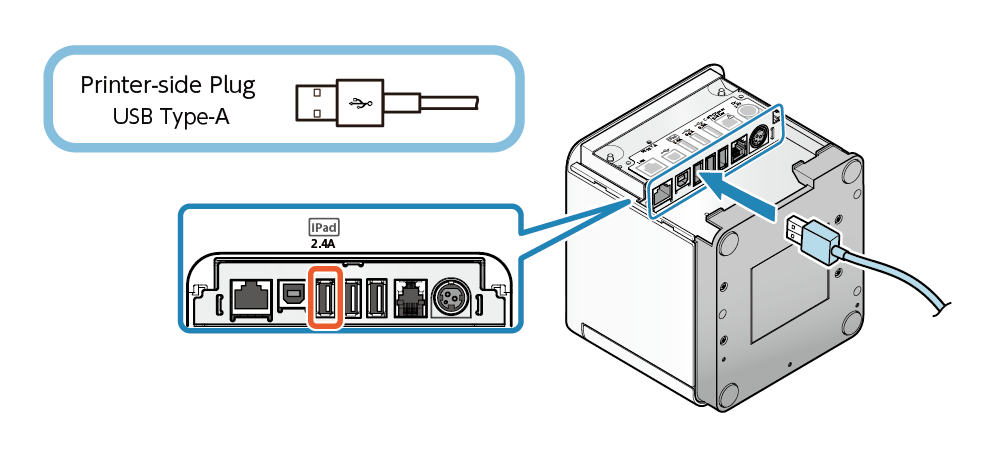
1. Connect the USB cable to the printer
- Connect a commercially available USB cable or the USB cable that was provided with the smartphone or tablet to the USB Port (2.4A) on the printer.
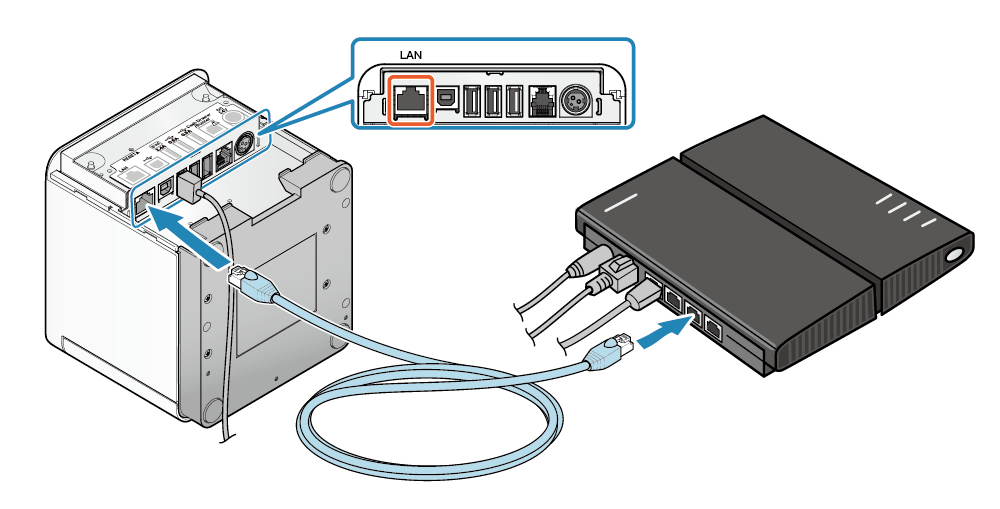
2. Connect the printer to the network
- Connect the LAN cable to the printer LAN connector, and connect the plug on the other end to the hub, router, or other network device.
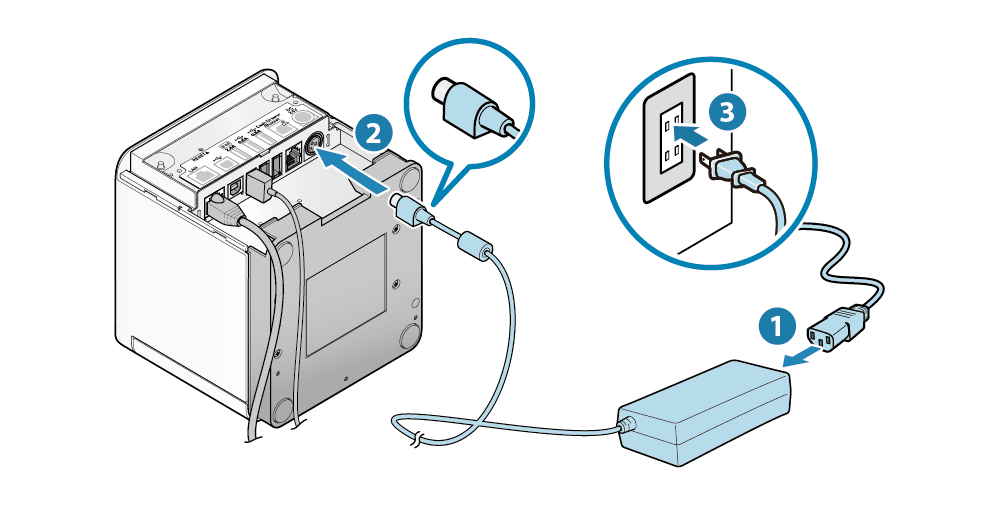
3. Connect the AC adapter to the printer
- Connect the power cable to the AC adapter
 and connect the AC adapter plug to the printer
 . Then insert the power cable plug into the outlet
 .
.
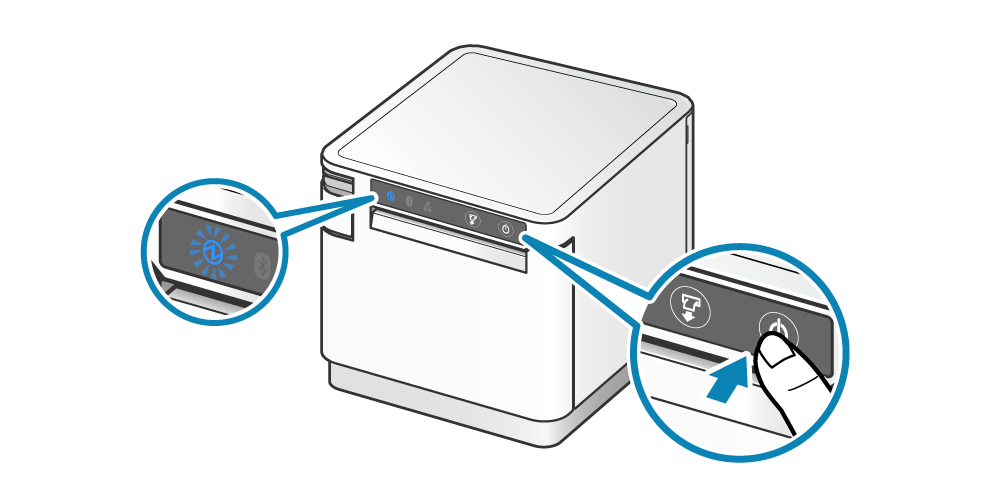
4. Turn ON the printer power
- Press the Power button on the right side of the operation panel on the front of the main unit. When the Power LED lights up, release the Power button.
5. Enable SteadyLAN
- Use the dedicated app to check the printer network and SteadyLAN settings. Download and install Star Quick Setup Utility. Use App
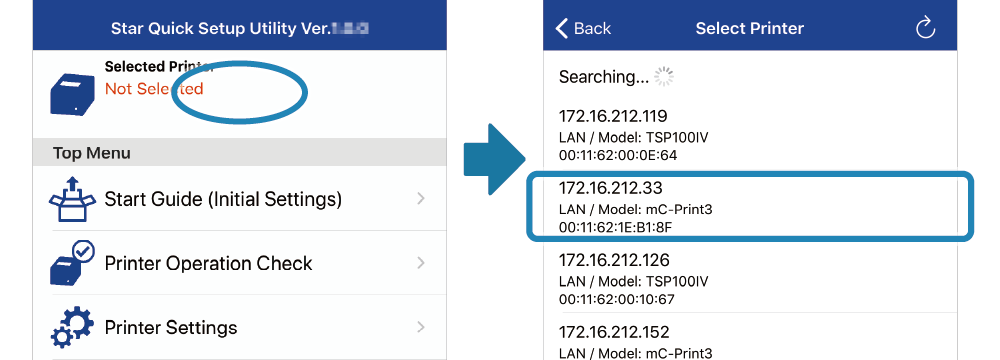
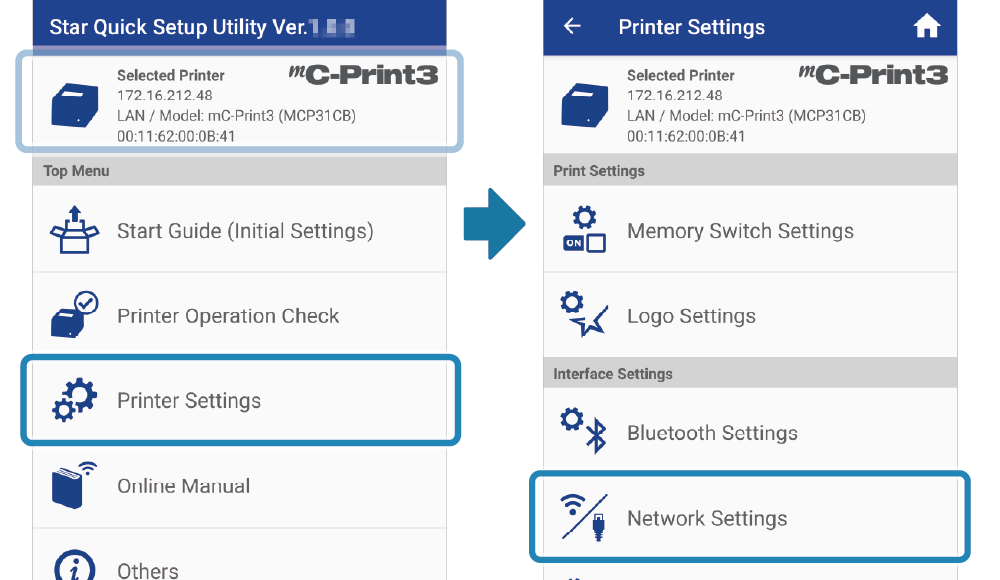
- Start Star Quick Setup Utility and select the printer that is connected.
- The connected printer is displayed.
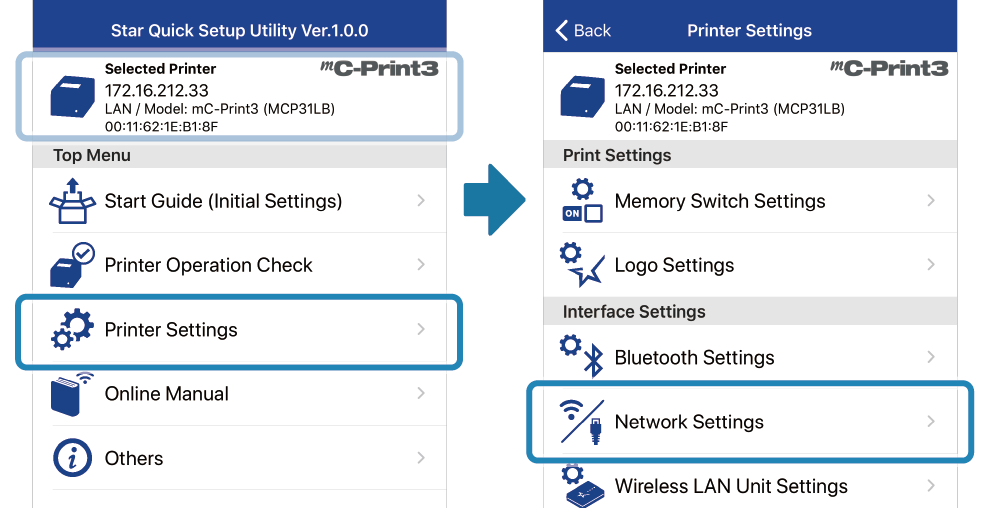
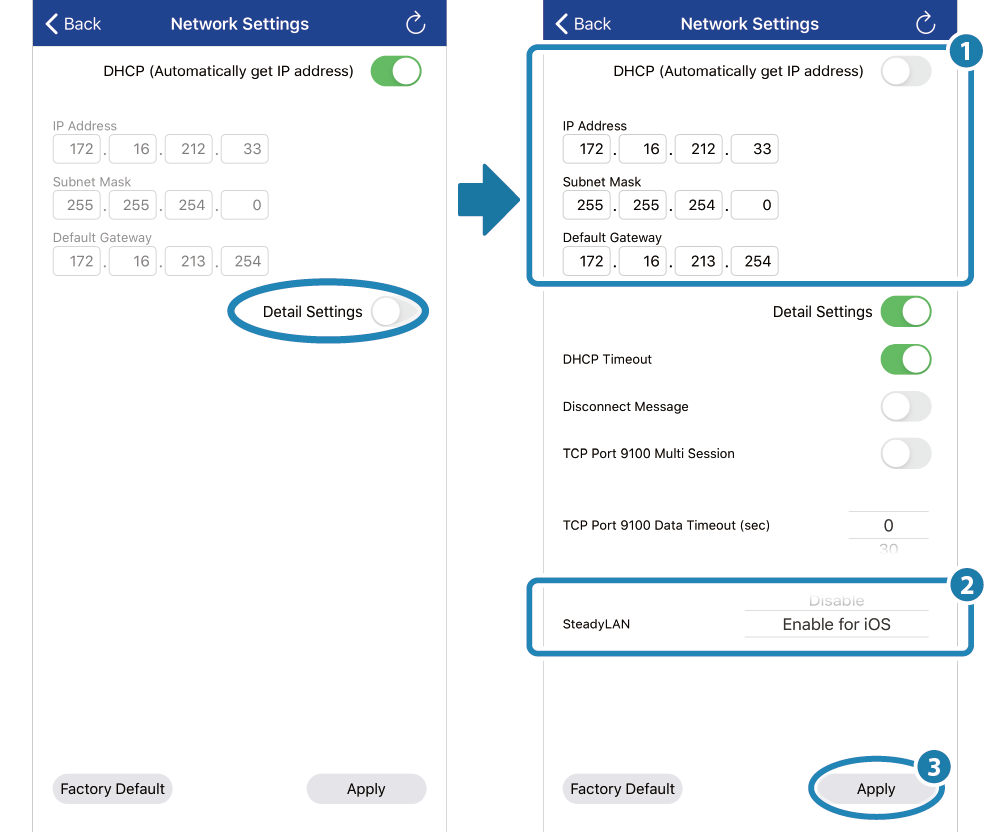
Open [Printer Settings] - [Network Settings]. - Display the Detail Settings, set up the network (static IP address of the printer) and set SteadyLAN to “Enable for iOS”
, and tap [Apply].
Note
“SteadyLAN” is not displayed if the mC-Print3 firmware does not support SteadyLAN.
In order to use SteadyLAN with mC-Print3, the mC-Print3 firmware must be Ver. 2.3 or later. Check the firmware version of the mC-Print3 that you are using.
The firmware version is printed in the title section of the printer information (1st page) that is printed in a printer test print (self-printing).
Firmware update can be performed from [Printer Settings]-[Firmware Update] of Star Quick Setup Utility.
Self-Printing Use App
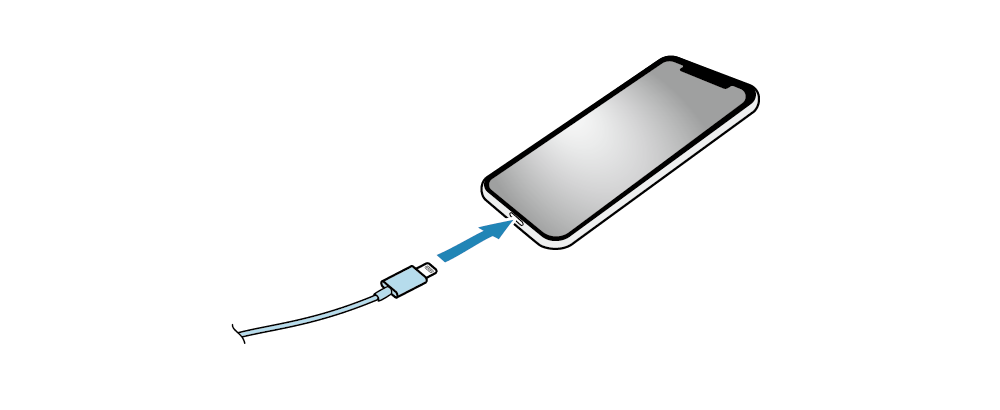
6. Connect the iOS device to the printer
- Take the plug on the other end of the USB cable that was connected to the printer in Step 2, and connect it to the iOS device.
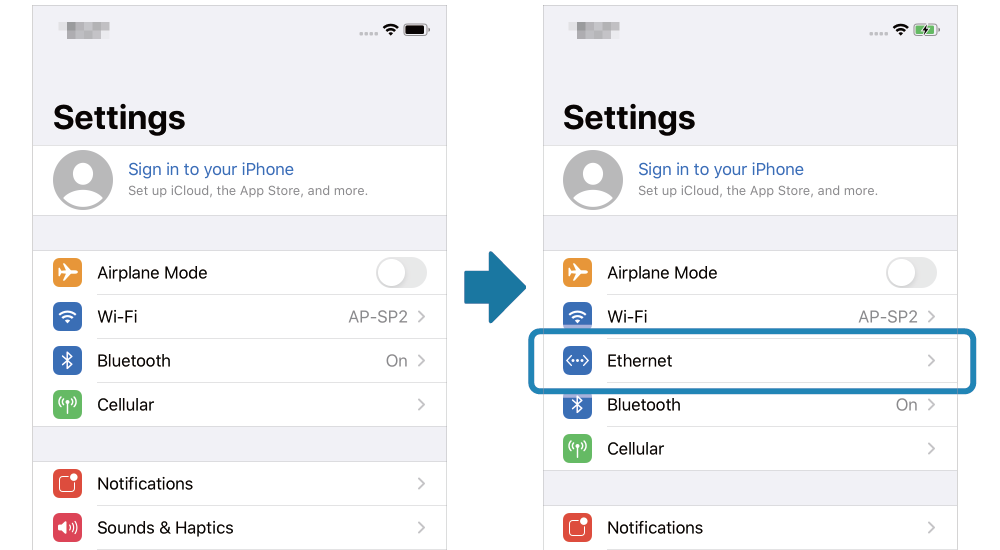
- When the iOS device is connected to the printer, “Ethernet” is displayed in the iOS device settings.
Note
When using in an environment where a DHCP server is not installed, configure the network settings from [Settings] - [Ethernet] on the iOS device.
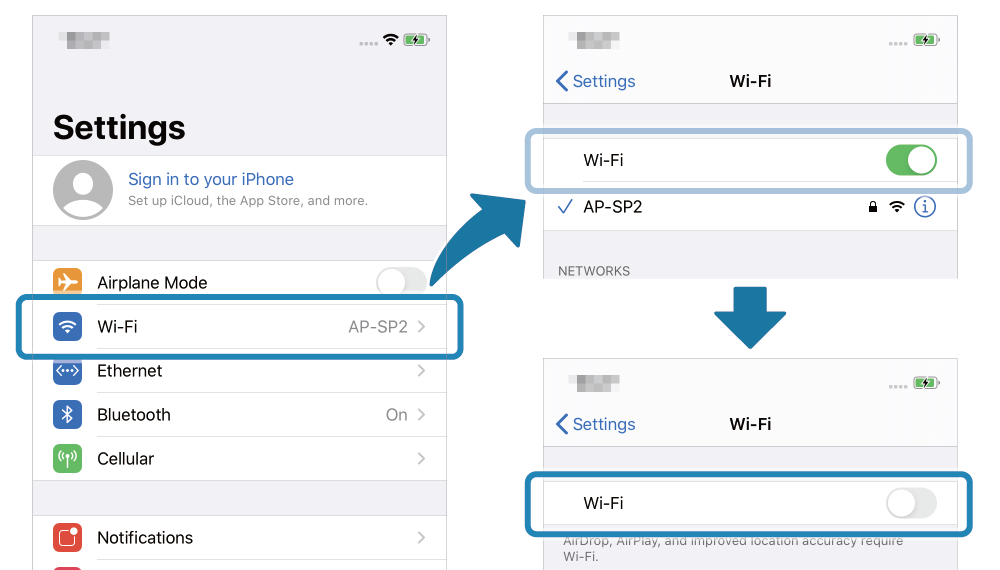
7. Turn OFF the iOS Device Wi-Fi.
- Set Wi-Fi to “OFF” from [Settings] - [Wi-Fi] on the iOS device.
Note
The IP address and MAC address used differ between Wi-Fi and wired LAN. Configure the wired LAN network settings if necessary.
With MCP31CB and MCP31C, the SteadyLAN function is supported only in an Android or Windows environment.
Use the dedicated app (Star Quick Setup Utility / Star Windows Software) to enable SteadyLAN before use.
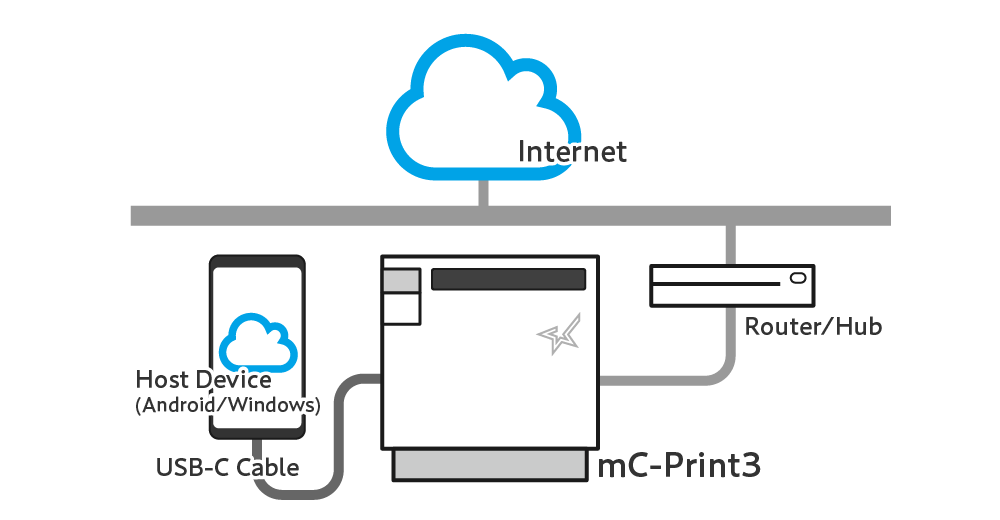
About SteadyLAN for Android/Windows
By using a USB-C cable to connect a host device such as a tablet, smartphone, or other device that supports USB PD (USB Power Delivery *1) to an mC-Print3 that is connected to a network, it is possible to use the Internet from the host device without using Wi-Fi communications.
At the same time, the device can communicate with the printer via USB communication or LAN communication, and is also charged from the printer.
This not only simplifies the wiring, but because all parts of the solution are wired, more stable network connections are possible.
<MCP31CB, MCP31C>Check Model
*1: USB PD (USB Power Delivery):
USB PD (USB Power Delivery) is a standard for power supply using USB. You can check whether or not the device you are using supports USB PD by using the dedicated app from an Android device. For details, refer to Use App.
This function has been tested with Android 5.0 and later and with Windows10 and later.
Even when using a host device that does not support USB PD, network connection is possible via the USB cable when the USB connection type supports communication. (However power supply is not performed.)
Before and after connecting the cable to the rear panel, remove and mount the rear cover respectively.
Remove/Mount Rear Cover
Caution
- With many Android devices, when the SteadyLAN function is set to “Enable for Android” and the host device is connected to USB-C on an mC-Print3 that is connected by cable to a network,
host device network communication takes priority over the wireless LAN, and the device switches to a wired LAN connection via USB-C.
The SteadyLAN function wired LAN connection via USB-C provides stable communication, however the communication speed is approximately 1 Mbps and may be slower than the wireless LAN.
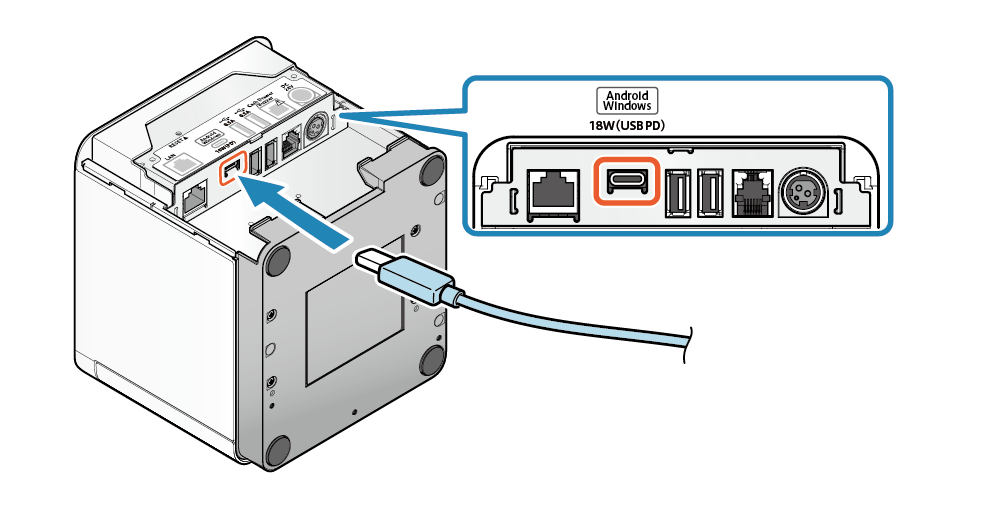
1. Connect the USB cable to the printer
- Connect the USB cable (C-C) provided with the printer to the printer USB-C port.
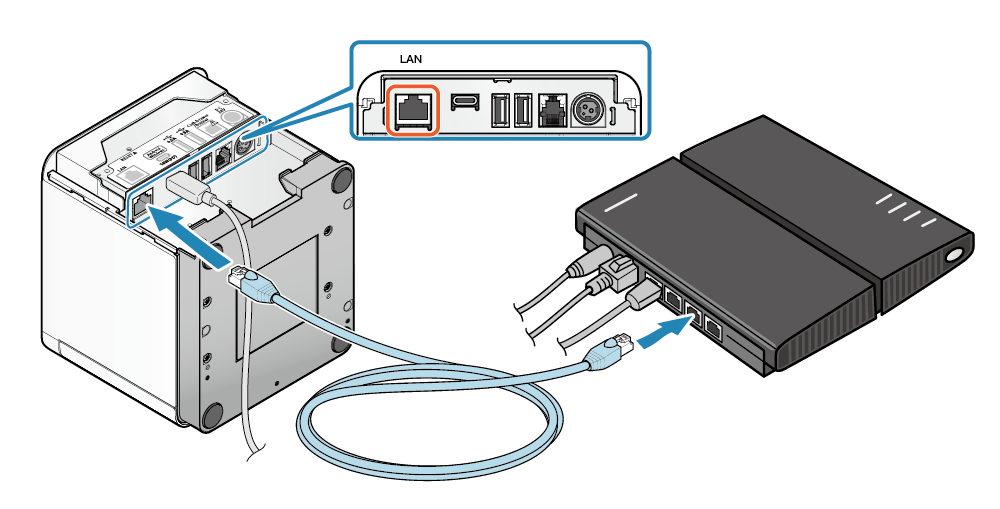
2. Connect the printer to the network
- Connect the LAN cable to the printer LAN connector, and connect the plug on the other end to the hub, router, or other network device.
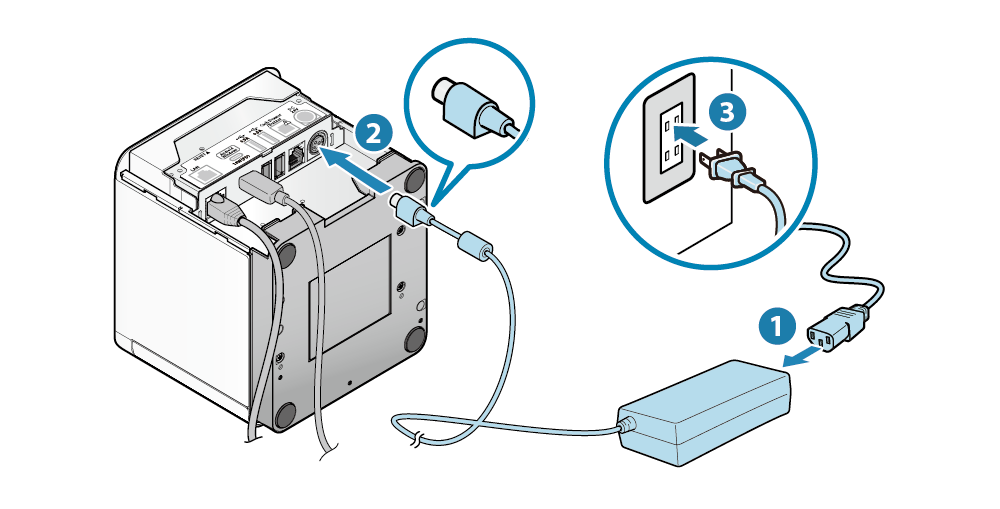
3. Connect the AC adapter to the printer
- Connect the power cable to the AC adapter and connect the AC adapter plug to the printer. Then insert the power cable plug into the outlet.
4. Turn ON the printer power
- Press the Power button on the right side of the operation panel on the front of the main unit. When the Power LED lights up, release the Power button.
5. Enable SteadyLAN
- Use the dedicated app (Star Quick Setup Utility / Star Windows Software) to configure the printer network and SteadyLAN.
Android
- Download and install Star Quick setup Utility onto the host device to be used. Use App
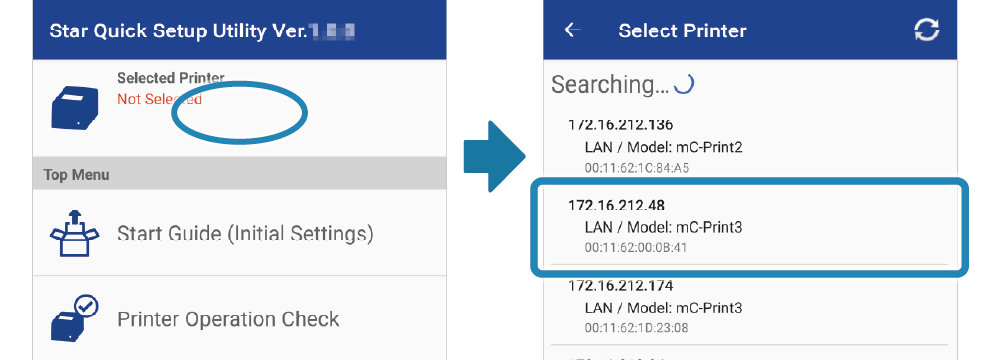
- Start Star Quick Setup Utility and select the printer that is connected.
- The connected printer is displayed.
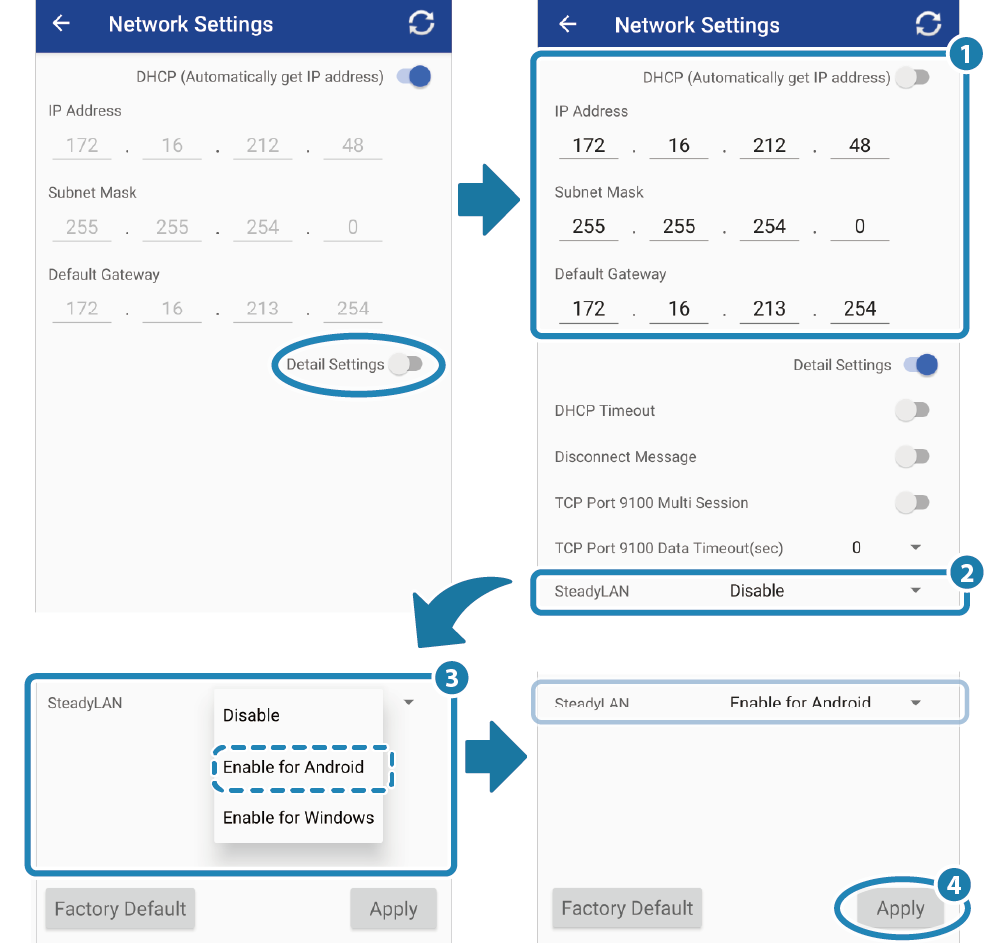
Open [Printer Settings] - [Network Settings]. - Display the Detail Settings, set up the network (static IP address of the printer) and set SteadyLAN to “Enable for Android”, then tap [Apply]
 .
.
Windows
- Download and install Star Windows Software onto the host device to be used. Use App
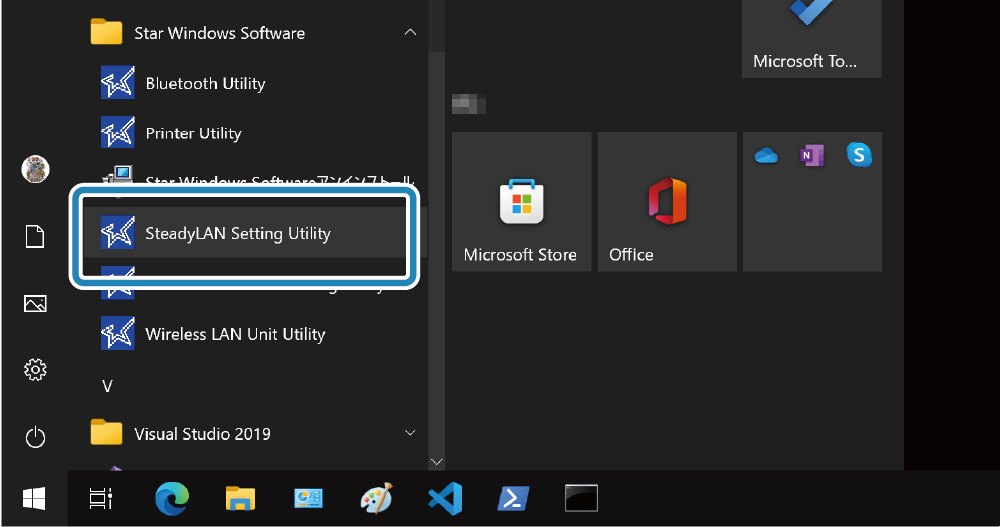
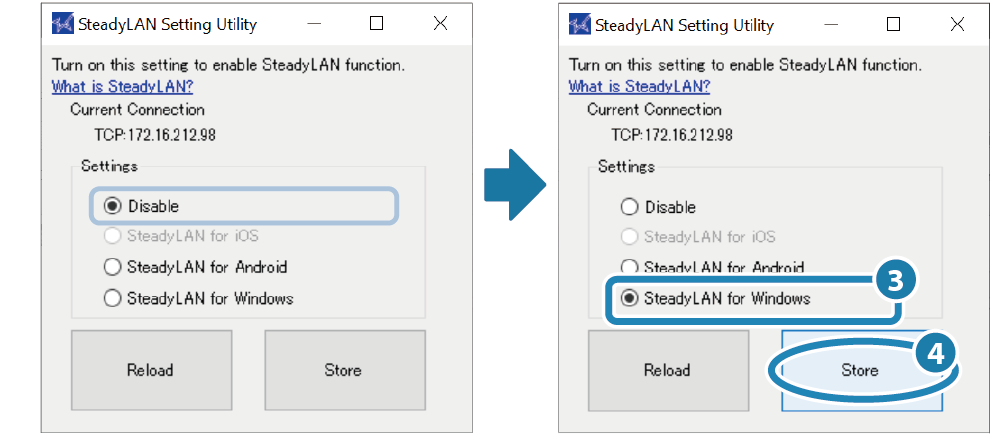
- From the Start menu, start [Star Windows Software] - [SteadyLAN Setting Utility].
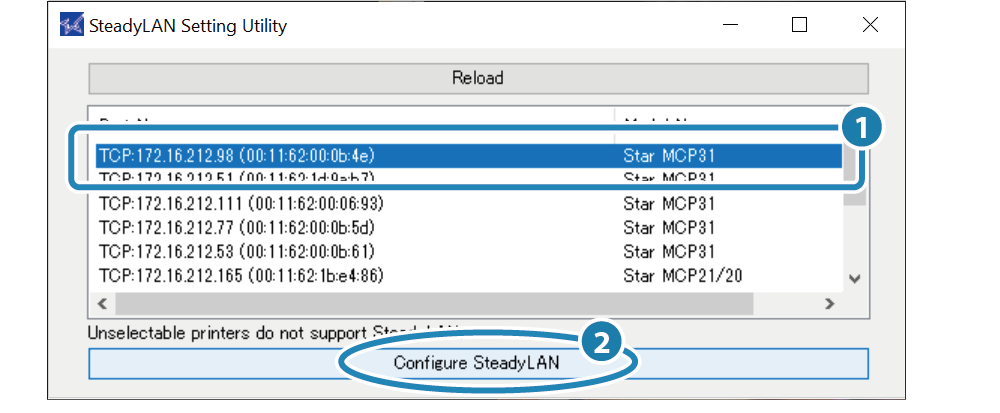
- Select the connected printer and tap [Configure SteadyLAN] .
- Select “Steady LAN for Windows” and tap [Store] .
- A “Note” dialog box appears. Check the contents. If there are no problems, tap [OK].
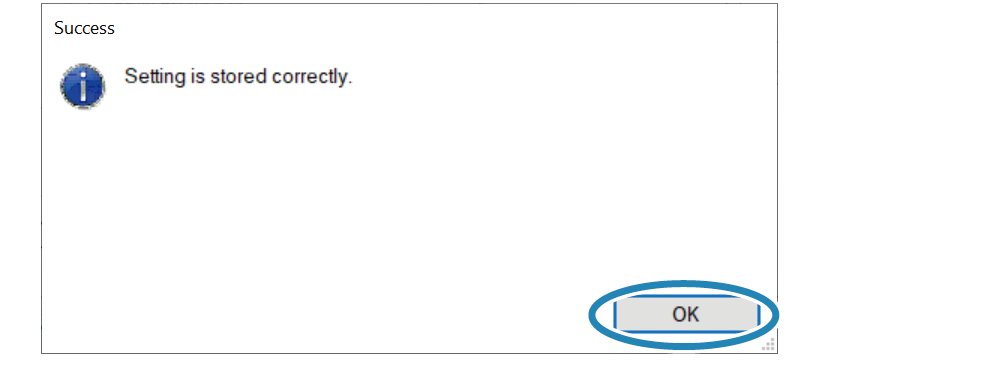
- When the “Success” dialog box appears, SteadyLAN setting is completed. Tap [OK] to exit SteadyLAN Setting Utility.
- From Open Printer's Setting Screen(Web Configuration), set the printer static IP address. Open Printer's Setting Screen(Web Configuration)

Note
When the SteadyLAN setting is changed during use with the USB interface, a new printer queue is created and the printer queue is changed. If not needed, delete the original printer queue.
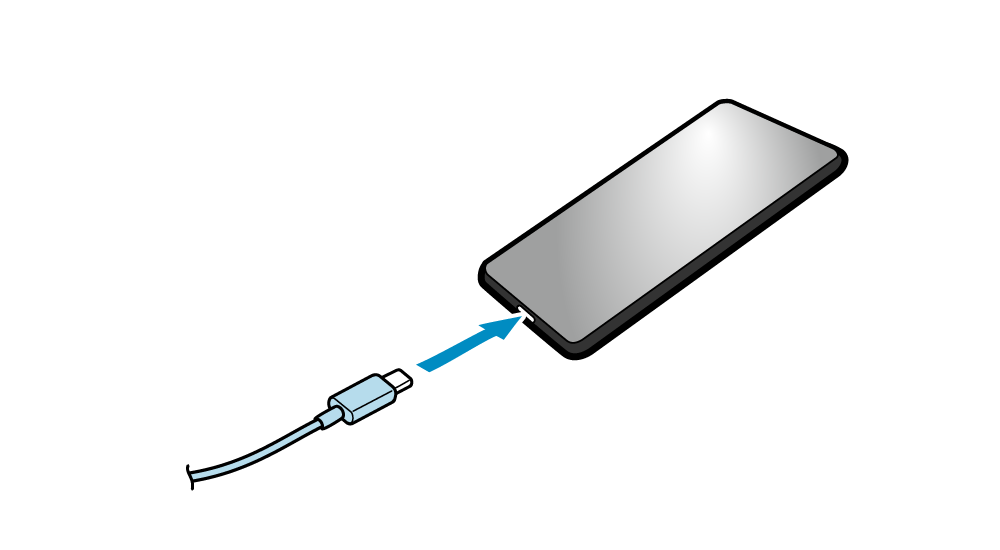
6. Connect the host device to the printer
- Take the plug on the other end of the USB-C cable that was connected to the printer in Step 2, and connect it to the host device.
Reference information
With many models, when host device communication is changed from wireless LAN to wired LAN, the Wi-Fi icon changes to the Ethernet icon.
Android (Google Pixel3)

Windows10 (Surface Go)

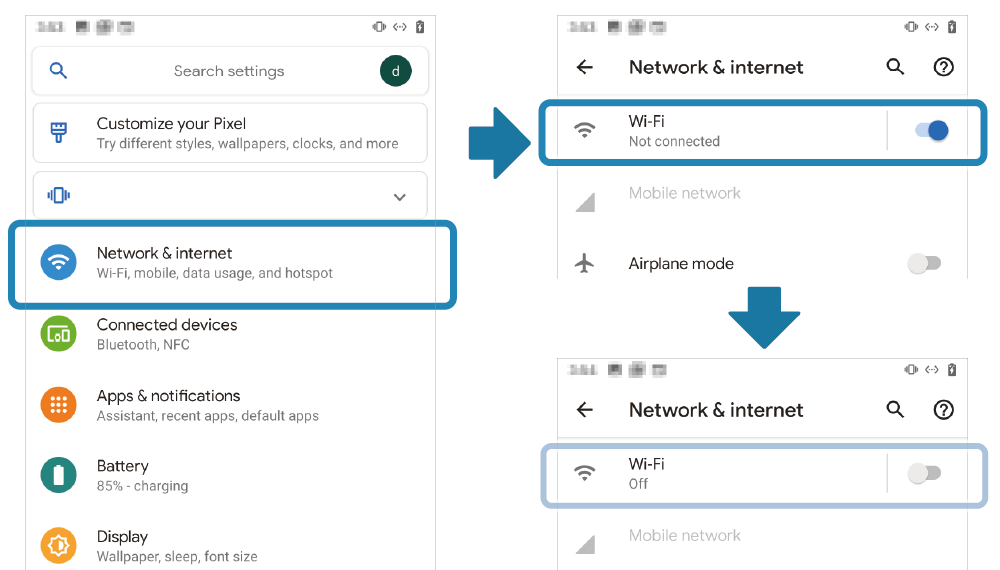
7. Turn OFF the host Device Wi-Fi
Android
- Open [Settings] - [Network & Internet], and set Wi-Fi to “OFF”.
Note
The IP address and MAC address that to be used are different with Wi-Fi and wired LAN (Ethernet). Configure the wired LAN network settings if necessary.
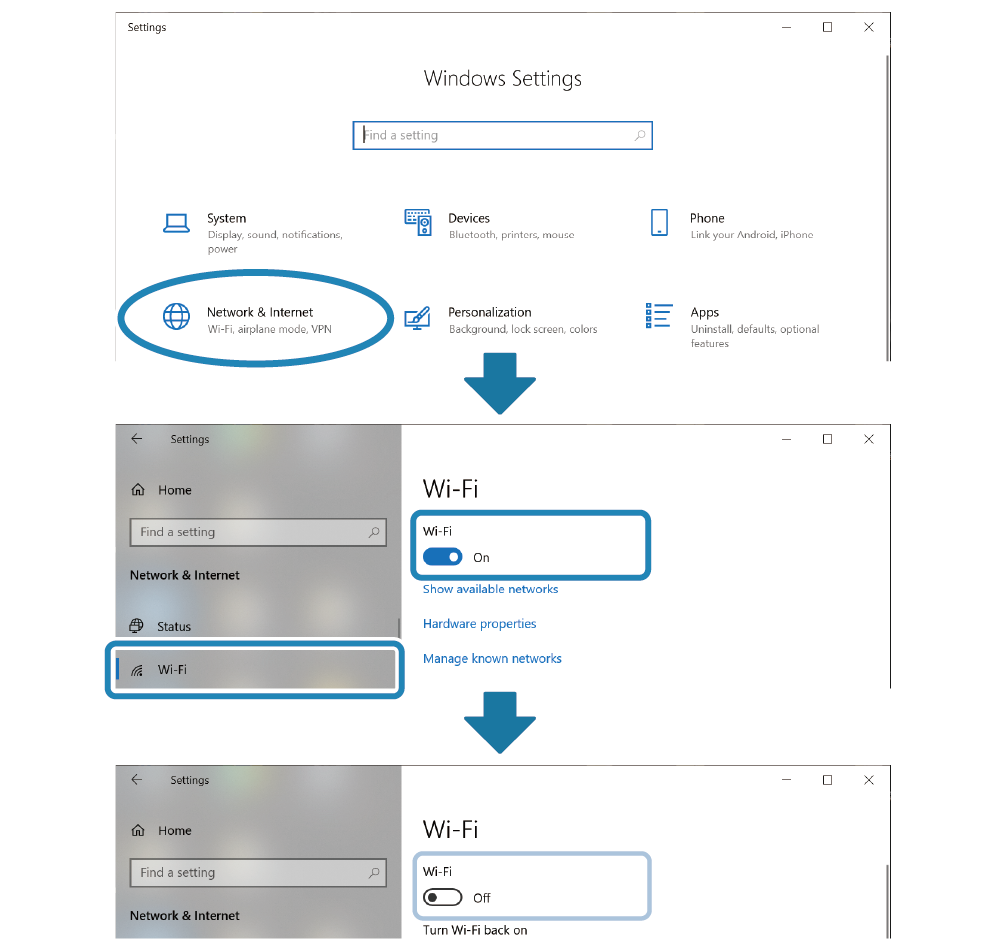
Windows
- Open [Settings] - [Network & Internet], and set Wi-Fi to “OFF”.
Note
The IP address and MAC address that to be used are different with Wi-Fi and wired LAN (Ethernet). Configure the wired LAN network settings if necessary.