Step 2 Send Printing Data: Spooler Function
The spooler function makes print requests from upper level terminals always receivable by the printer and prints them in the order they are received.
The printer manages each print request as a job.
* With the conventional method, if a new print request is made before the previous printing is completed, the transmission of the request is held up or cause a communication error, and a new print request was not accepted until the previous printing completed.
Four Major Useful Features of Spooler Function
1. Multiple pieces of printing data can be sent before the printing is completed.
The printer can put print jobs from upper level terminals in the queue and print them in the order they are received. The print job can be sent to MCL32CI/MCL32CBI even when the taken paper sensor is detecting paper.

2. Multiple terminals can use the printer.
Even when print requests are made from multiple upper level terminals, they are received without a communication error.

3. Automatic reprinting
Even if printing fails due to an error such as no paper, performing error recovery (replacing the paper in the case of no paper) will allow automatic reprinting.
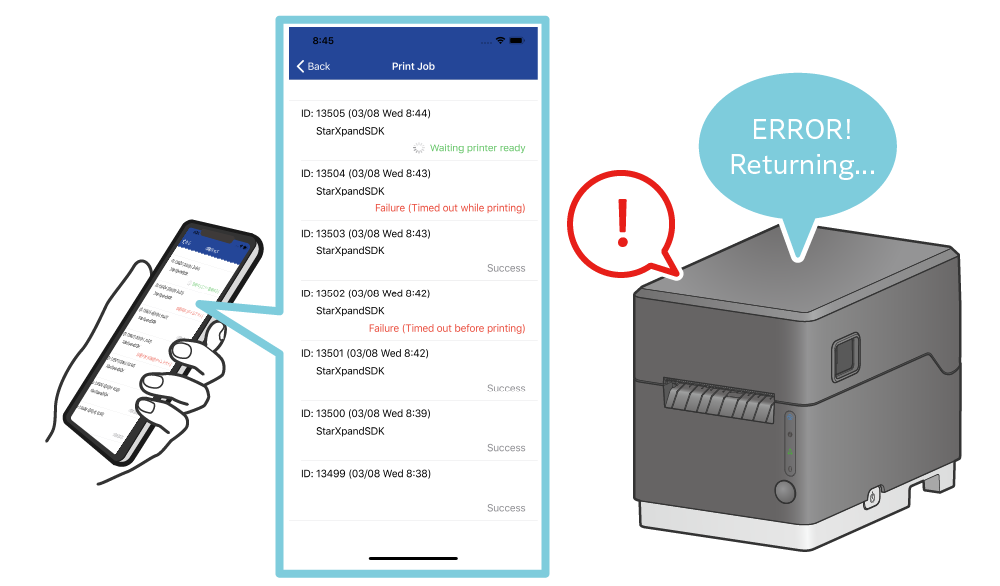
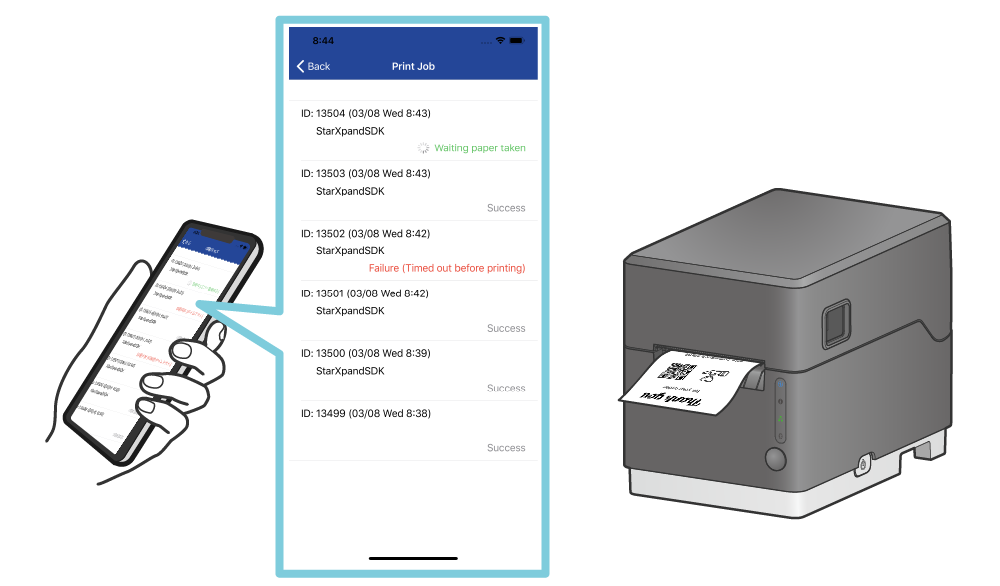
4. The status and history of print jobs can be checked anytime.
You can check print results (success and failure) and reception status.
Up to 2000 pieces of latest job information are available.
Note:
There are the following restrictions regarding simultaneously connecting multiple host devices or interfaces.
For details, see Precautions for Using Multi-interface.
To use the spooler function
To use the spooler function, set the printer's spooler function to enable. (Default: Disabled)
Also, use the print (command: string, jobSettings: StarSpoolJobSettings) method, which includes print job settings, instead of the print(commad: string) method used to send print data in Sending Printing Data: Standard Function.
Other features include the ability to check the status of print jobs.
Please refer to the Implement Printing Process Using Spooler Function.
Spooler Function Supported Model
Models that allow the use of the print (command: string, jobSettings: StarSpoolJobSettings) method support the spooler function.
Please click this link to check supported model.
To use the spooler function
To use the spooler function, set the printer's spooler function to enable. (Default: Disabled)
Also, use the printAsync(command: String, starSpoolJobSettings: StarSpoolJobSettings) method, which includes print job settings, instead of the printAsync(command: String) method used to send print data in Sending Printing Data: Standard Function.
Other features include the ability to check the status of print jobs.
Please refer to the Implement Printing Process Using Spooler Function.
Spooler Function Supported Model
Models that allow the use of the printAsync (command: string, jobSettings: StarSpoolJobSettings) method support the spooler function.
Please click this link to check supported model.
Implement Printing Process Using Spooler Function
You will send the printing data created in Step 1 to the printer to print.
To use the spooler function by using the StarPrinter class, call the print (command: string, jobSettings: StarSpoolJobSetttings) method to send the printing data.
The following description is based on the sample code. Send the printing data using the procedure below.
The sample code is available at the bottom of the page. Also, refer to the sample application in the SDK.
1 Create the printer destination information.
Set interfaceType, which is used for communication, and identifier, which specifies the destination.
If the destination printer has already been searched for in Search for Printer, this setting is unnecessary.
Set the StarPrinter instance acquired with the manager (_ manager: StarDeviceDiscoveryManager, didFind printer: StarPrinter) method in the printer variable in Step2.
let starConnectionSettings = StarConnectionSettings(interfaceType: .lan, identifier: "00:11:62:00:00:01")
2 Provide the printer destination information to acquire the StarPrinter instance.
let printer = StarPrinter(starConnectionSettings)
3 Set the printing data created in Step 1 in the commands variable.
Task {
    do {
        let command = ...
4 Call the open method to connect to the printer.
try await printer.open()
5 Call the close method with the defer block to disconnect from the printer after sending the printing data.
defer {
    Task {
        await printer.close()
    }
}
6 Use the StarSpoolJobSettings class to set the print job.
In the following setting example, retry on printer error is enabled, print job timeout is 30 seconds, and information added to print jobs is "Print from iOS".
let jobSettings = StarSpoolJobSettings(isRetryEnabled: true, timeout: 30, note: "Print from iOS")
7 Call the print method to send the printing data to the printer.
Acquire the job ID with the return value.
let jobId = try await printer.print(command: command, starSpoolJobSettings: jobSettings)
8 There are the following two methods to check the print job status.
Call the getSpoolJobStatus method to acquire the status of the specified job ID.
let jobStatus = try await printer.getSpoolJobStatus(jobId: jobId)
Call the getSpoolJobStatusList method to acquire the status list of as many jobs as specified in order of newest job received first.
If 10 is set in the argument, the status list of 10 jobs in order from newest to oldest is acquired.
let jobStatusList = try await printer.getSpoolJobStatusList(size: 10)
9 Implement the process for when an error occurs. You can identify the error cause based on the error instance type.
Possible errors are described in the API reference of the open method, print method, getSpoolJobStatus method, and getSpoolJobStatusList method of the StarPrinter class.
} catch StarIO10Error.unprintable(message: let message, errorCode: let errorCode) {
    if errorCode == StarIO10ErrorCode.spoolerIsDisabled {
        // The spooler function is set to disabled.
        // Please set the printer's spooler function to enable.
    }
} catch let error {
    print("Error: \(error)")
}
}
Sample code
let starConnectionSettings = StarConnectionSettings(interfaceType: .lan, identifier: "00:11:62:00:00:01")

let printer = StarPrinter(starConnectionSettings)

Task {
    do {
        // Set the print data created in Step 1 to the commands variable.
        let command = ...

        try await printer.open()

        defer {
            Task {
                await printer.close()
            }
        }

        let jobSettings = StarSpoolJobSettings(isRetryEnabled: true, timeout: 30, note: "Print from iOS")

        let jobId = try await printer.print(command: command, starSpoolJobSettings: jobSettings)

        let jobStatus = try await printer.getSpoolJobStatus(jobId: jobId)

        // let jobStatusList = try await printer.getSpoolJobStatusList(size: 10)

    } catch StarIO10Error.unprintable(message: let message, errorCode: let errorCode) {
        if errorCode == StarIO10ErrorCode.spoolerIsDisabled {
            // The spooler function is set to disabled.
            // Please set the printer's spooler function to enable.
        }
    } catch let error {
        print("Error: \(error)")
    }
}
You will send the printing data created in Step 1 to the printer and print it.
To use the spooler function by using the StarPrinter class, call the printAsync (command: String, jobSettings: StarSpoolJobSettings) method to send the printing data.
The following description is based on the sample code. Send the printing data using the procedure below.
The sample code is available at the bottom of the page. Also, refer to the sample application in the SDK.
1 Create the printer destination information.
Set interfaceType, which is used for communication, and identifier, which specifies the destination.
If the destination printer has already been searched for in Search for Printer, this setting is unnecessary.
Set the StarPrinter instance acquired with the onPrinterFound method in the printer variable in Step2.
val settings = StarConnectionSettings(InterfaceType.Lan, "00:11:62:00:00:01")
2 Provide the printer destination information to acquire the StarPrinter instance.
val printer = StarPrinter(settings, applicationContext)
3 Set the printing data created in Step 1 in the commands variable.
val job = SupervisorJob()
val scope = CoroutineScope(Dispatchers.Default + job)

scope.launch {
    try {
        val commands = ...
4 Use the StarSpoolJobSettings class to set the print job.
In the following setting example, retry on printer error is enabled, print job timeout is 30 seconds, and information added to print jobs is "Print from Android".
val jobSettings = StarSpoolJobSettings(true, 30, "Print from Android")
5 Call the openAsync method to connect to the printer.
printer.openAsync().await()
6 Call the printAsync method to send the printing data to the printer.
val jobId = printer.printAsync(commands, jobSettings).await()
7 There are the following two methods to check the print job status.
Call the getSpoolJobStatusAsync method to acquire the status of the specified job ID.
var jobStatus = printer.getSpoolJobStatusAsync(jobId).await()
Call the getSpoolJobStatusListAsync method to acquire the status list of as many jobs as specified in order of newest job received first.
If 10 is set in the argument, the status list of 10 jobs in order from newest to oldest is acquired.
var jobStatusList = printer.getSpoolJobStatusListAsync(10).await()
8 Implement the process for when an error occurs. You can identify the error cause based on the error type.
Possible errors are described in the API reference of the openAsync method, printAsync method, getSpoolJobStatusAsync method, and getSpoolJobStatusListAsync method of the StarPrinter class.
} catch (e: StarIO10UnprintableException) {
    if (e.errorCode == StarIO10ErrorCode.SpoolerIsDisabled) {
        // The spooler function is set to disabled.
        // Please set the printer's spooler function to enable.
    }
} catch (e: Exception) {
    Log.d("Printing", "Error: ${e}")
9 Call the closeAsync method to disconnect from the printer.
} finally {
    printer.closeAsync().await()
}
}
Sample code
val settings = StarConnectionSettings(InterfaceType.Lan, "00:11:62:00:00:01")
val printer = StarPrinter(settings, applicationContext)

val job = SupervisorJob()
val scope = CoroutineScope(Dispatchers.Default + job)

scope.launch {
    try {
        // Set the print data created in Step 1 to the commands variable.
        val commands = ...

        printer.openAsync().await()

        val jobSettings = StarSpoolJobSettings(true, 30, "Print from Android")

        val jobId = printer.printAsync(commands, jobSettings).await()

        var jobStatus = printer.getSpoolJobStatusAsync(jobId).await()

        // var jobStatusList = printer.getSpoolJobStatusListAsync(10).await()

    } catch (e: StarIO10UnprintableException) {
        if (e.errorCode == StarIO10ErrorCode.SpoolerIsDisabled) {
            // The spooler function is set to disabled.
            // Please set the printer's spooler function to enable.
        }
    } catch (e: Exception) {
        Log.d("Printing", "Error: ${e}")
    } finally {
        printer.closeAsync().await()
    }
}
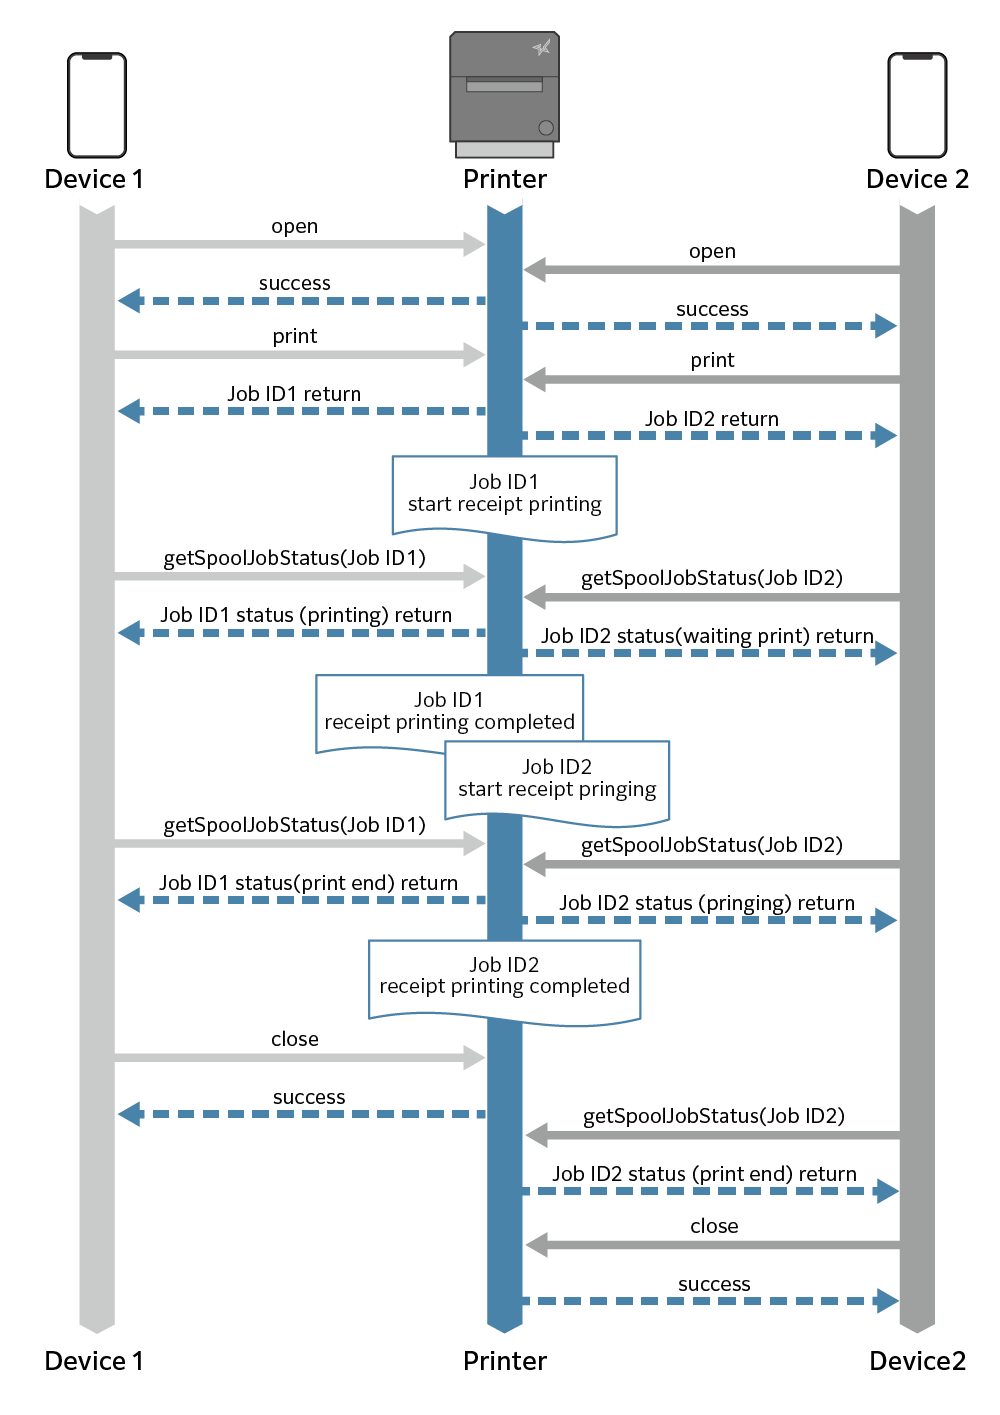
Spooler Function Sequence Figure
This is a sequence figure showing a process of checking the print jobs until all the printing is completed after two upper level terminals make print requests to one printer.