FAQ
Check by supports
Check by problems
Power does not turn on
Are the power cable and AC adapter connected correctly?
If the Power LED does not light up when the power is turned on, it may mean that the power cable or AC adapter is not correctly connected. Please check the connection. And make sure that the power socket is correctly connected.
Connect AC AdapterDoes the Power button remain pressed?
To turn the power on, press the Power button. When the Power LED lights up, release the Power button.
Turn On/Off PowerCannot establish network communication
Are the power cable and AC adapter connected correctly?
Please check that the Power LED is turned on.
If the Power LED does not light up when the power is turned on, it may mean that the power cable or AC adapter is not correctly connected. Please check the connection. It may also mean that the power socket is loose. Check and make sure that the power socket is correctly connected.
Connect AC AdapterHas the Power LED lit up blue and has the Network LED lit up green?
Check that the Power LED has lit up blue and that the Network LED has lit up green.
The Network LED is turned off.
The LED display shows "Link down: Physically disconnected". Check and make sure that the LAN cable is correctly connected.
- It may also mean that the connector is loose. Confirm that both the LAN connectors of the printer and network device (router, hub and such) are securely connected.
- The LAN cable may have been damaged. When the Network LED does not light up even if the LAN cable is reconnected, confirm by connecting a different LAN cable.
- Check and make sure that the network device to be connected is working correctly.
The Network LED is flashing.
The LED display shows "Link down: IP address cannot be obtained". When a DHCP server is provided, check whether it is available.
Was the network setting for the printer changed?
If the printer network setting has been changed using Web Configuration or Telnet and the printer has become unable to be connected, it may be possible for the printer to connect to the network when the network setting is initialized.
Perform "Initialize Communication Settings (Network)" once, and check the connection.
Initialize Communication SettingsAre you using SteadyLAN?
Depending on the type of device, when using the SteadyLAN function in a closed network environment (environment not connected to the Internet), if the device power was turned OFF and then turned ON while the device was connected to the printer, network communication may not be possible. If this occurs, try disconnecting and reconnecting the USB cable that connects the printer and device.
Cannot connect to the printer settings screen (Web Configuration)
Is the following message displayed when you attempt to access Web Configuration?
"This web site can be used with Javascript activated.
Up to 2 devices can access at the same time. Please reload in 5 seconds."
To connect to Web Configuration, please enable the JavaScript setting in your web browser (Active Scripting in Internet Explorer).
Up to 2 devices can access Web Configuration at the same time.
If more than 2 devices need to access the site, please try after data of the previous 2 devices is completely read (after more than 5 seconds)
The printer settings screen (Web Configuration) does not display correctly
Is ”http://[Printer IP address]” (No SSL/TLS encryption) used when opening the printer settings screen (Web Configuration)?
The Web Configuration may display incorrectly if connecting with "https://[Printer IP address]" (SSL/TLS encryption).
Use "http://[Printer IP address]" (No SSL/TLS encryption) when opening the Web Configuration.
SteadyLAN cannot be used
Is the SteadyLAN setting enabled?
In order to use SteadyLAN, it is necessary to set SteadyLAN to “Enable”.
Use the dedicated app to check the printer SteadyLAN setting.
Use Star SteadyLAN Use App
Are the LAN cable and USB cable or Lightning cable connected correctly?
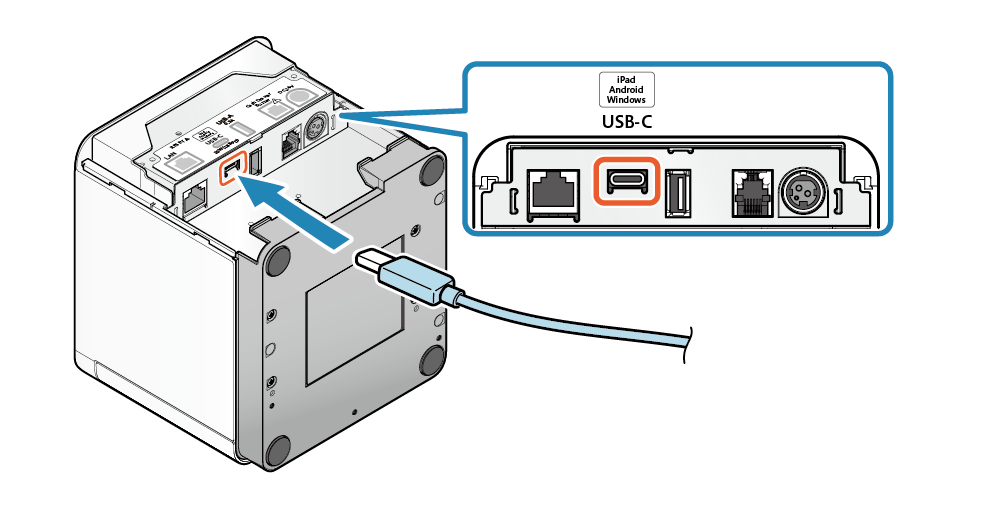
In order to use SteadyLAN, the LAN cable and USB cable (C-C), Lightning cable (C-Lightning) or USB cable(C-A) must be connected.
Check and make sure that the LAN cable is correctly connected to the printer and network device. Also check that the USB cable (C-C), Lightning cable (C-Lightning) or USB cable (C-A) is correctly connected to the printer USB-C port and the host device.
When using Windows device
When using a host device that does not support the USB cable (C-A) or USB PD (USB Power Delivery), network connection is supported via the USB cable.
However power supply at the same time is not possible.
Has configuration of the printer network connection settings been completed?
In order to use SteadyLAN, it is necessary to configure the printer network settings.
Check and make sure that the printer network communications are functioning correctly.
Connect Tablet/PC (LAN)
Is the host device Wi-Fi set to "OFF"?
In order to create a stable wired LAN connection, set the host device [Settings] - [Wi-Fi] to "OFF".
Use Star SteadyLAN
Tablet network communications are slow
Are you using SteadyLAN?
When SteadyLAN is set to “Enable” and a host device that supports SteadyLAN is connected to the USB-C port of the mC-Print3 that is connected by a cable to the network, then the host device network communication takes priority over the wireless LAN and communication switches to a wired LAN connection via the USB port.
The SteadyLAN wired LAN connection via the USB port provides stable communication, however the communication speed is approximately 1 Mbps and may be slower than the wireless LAN.
Use App
Cannot establish Bluetooth communication
Are the power cable and AC adapter connected correctly?
Please check that the Power LED is turned on.
If the Power LED does not light up when the power is turned on, it may mean that the power cable or AC adapter is not correctly connected. Please check the connection.
It may also mean that the power socket is loose. Check and make sure that the power socket is correctly connected.
Are you using a MCP31CBI model that supports Bluetooth communication?
Bluetooth communication is not supported when a MCP31CI model is used.
To check the model name of your printer, refer to Check Model.
Is the pairing with the target printer completed?
When an iOS device such as an iPad or iPhone is used, do the Power LED and Bluetooth LED light up blue?
iOS devices
Please check that the Power LED and Bluetooth LED light up blue.
If the LED display shows "Bluetooth not connected" (the Power LED lights up blue and the Bluetooth LED is turned off), Bluetooth connection is disabled.
Open the Bluetooth Setting of the host device, and check whether the connection with the desired printer is completed.
Other than iOS devices (Android, etc.)
Please check that the Power LED has lit up blue.
The Bluetooth LED only lights up blue when printing or status acquisition is performed via Bluetooth.
Open the Bluetooth Setting of the host device, and check whether the pairing with the desired printer is completed.
Connect Tablet/PC (Bluetooth)
Are multiple tablets being used?
Or is an iOS device (iPad, iPhone and such) being used?
Check whether the printer is already connected to another iOS device via Bluetooth.
If connected, then remove the connection to the connected iOS device, and then try to connect to the Bluetooth from another host device.
Connect Tablet/PC (Bluetooth)Is the iOS device (iPad, iPhone, etc.) which you want to connect by Bluetooth already connected to USB-C for charging?
A single iOS device (iPad, iPhone, etc.) cannot be connected simultaneously via Bluetooth and USB-C.
When the iOS device connected via Bluetooth is connected to USB-C, communication and power supply are established for the device connected to USB-C, and the Bluetooth connection is released.
When charging on the USB-C port on the printer an iOS device is connected to via Bluetooth, set the USB-C function to "Power Supply Only Mode" in advance.
Switch USB-C Function (Power supply/Communication)Is [New Pairing Permission] of the printer set to "OFF"?
When [New Pairing Permission], in which you can check or change the setting with the dedicated app, is set to OFF (disable), a printer search or new pairing from a device other than the connected tablet is not available due to enhanced security.
To set [New Pairing Permission] to ON (enable), initialize the network settings (Bluetooth).
Use AppConnect Tablet/PC (Bluetooth)
Initialize Communication Settings
Bluetooth communication is not stable
Are there any nearby objects that may interfere with communication?
Is the distance between the printer and host device too great?
The communication status of the Bluetooth printer will depend on any nearby radio waves, presence of interference, and the environment in which it is installed. When installing this product, perform a thorough evaluation beforehand.
Take the necessary measures after referring to Precautions on Bluetooth printer use.
Precautions for Using Bluetooth PrinterCannot establish USB communication
Are the USB cable and Lightning cable connected correctly?
The USB cable connection method varies depending on the operating system of your PC, smartphone, or tablet. Check whether the cable is correctly set to suit your environment.
- It may also mean that the connector is loose. Check that the USB cable or Lightning cable is correctly connected between the printer and the PC, smartphone, or tablet.
- The USB cable or Lightning cable may have been damaged. If this error recurs after the cable is connected again, connect another cable, and check the status.
When using the Windows printer driver in a Windows device, did you install the Windows printer driver before connecting the USB cable?
If you connect the USB cable before installing the Windows printer driver to use the Windows printer driver in a Windows device, the printer is not correctly recognized by the operating system.
If you have failed to connect the USB cable and create a printer queue before installing the Windows printer driver, follow the steps below to erase or uninstall the device.
- Start Device Manager while the printer remains connected.
- Right-click "Other Device" - "StarMCP31(STR-001)", and select "Uninstall Device (Windows 10)" or "Delete (Other than Windows 10)" from the pull-down menu.
- When "Check Device Uninstallation" is displayed, check the status, and execute uninstallation.
- Disconnect the USB cable from the printer or turn the printer off.
After installing the Windows printer driver, connect the USB cable and turn the printer on again.
Setup - Install DriverConnect USB Cable
Are you using a USB cable that supports communication?
The method of connecting the USB cable used for communication varies depending on the host device and interface that are used.
Check that you are using a correct cable for the host device and interface that are used.
For details, refer to Connect USB Cable.
When using a Windows or macOS device
If your device does not respond to communication with USB cable (C-C) connection, set the printer USB-C function to "Communication Only" to communicate with the device.
For details, referefer to Switch USB-C Function (Power supply/Communication)
What kind of USB device are you using?
USB-A (0.5A) only provides communication with USB-connectable devices*; it only supplies power (0.5A max.) to other USB devices.
*USB-connectable devices : BSH-20U, BSH-20B, BSD-40U, BSH-32B, SCD222U, BCP-POP1, USB HID (Keyboard) class Devices, USB memory device and USB HUB
USB-C perform communication with iOS, Android, Windows, macOS and Linux devices. They do not support connection with other USB devices.
For details of the connection method, refer to Connect USB Cable or Set Up External Devices.
Receipt is not printed properly
Is the power turned on?
Are the power cable and AC adapter connected correctly?
Please check that the Power LED is turned on.
If the Power LED does not light up when the power is turned on, it may mean that the power cable or AC adapter is not correctly connected. Please check the connection. It may also mean that the power socket is loose.
Check and make sure that the power socket is correctly connected.
Is the printer cover closed securely?
Check that the Power LED has not lit up red.
If the printer cover is not closed securely, it causes a cover open error (the Power LED lights up red), which results in a printing failure.
To close the printer cover, push both of its sides.
Is the sheet facing the correct direction?
If a white sheet is being ejected, then it may be possible that the paper roll is set in the opposite direction. Check the direction of the paper roll to make sure that the paper is set correctly.
Paper SetupDoes the paper being used fit the specifications for the printer?
As this product is a thermal printer, it will not print on ordinary paper. Also, if there are issues such as faint printing of words, the cause may be that the paper does not meet the specifications, or the paper has become old and deteriorated.
Additionally, when the width, thickness, or other details do not meet the required specifications, it may easily cause paper jams.
Check the appropriate paper roll specifications and use paper that meets the printer's specification.
Paper Roll SpecificationsIs the LED display in standby state (the Power LED lights up blue and the Error LED is turned off)?
If the Power LED is blinking or it has lit up or is blinking in a color other than blue, refer to the LED Display and check the product status.
LED DisplayDoes a paper jam occur?
If you can hear the printer operating but the paper is not being ejected, there is a possibility that a paper jam is occurring or the paper is being rolled onto the rubber roller. If a paper jam occurs, remove the paper in question, referring to "Paper Jam".
Paper JamDoes Self-Printing work correctly?
Check whether Self-Printing works correctly.
When Self-Printing works correctly, check whether the app, software, and printer settings are correctly configured.
Self-PrintingPaper jams
Is the paper being printed touched while the paper is being discharged, or is the outlet blocked off?
The printer cover does not close
Is the diameter of the paper roll being used too big?
If the printer cover does not close, confirm that the diameter of the paper roll is 83mm or smaller.
Check the appropriate paper roll specifications and use paper that meets the printer's specification.
Paper Roll SpecificationsIs any foreign matter other than the paper roll in the paper roll holder?
To set paper, check whether any foreign matter such as a paper core is in the paper roll holder.
Paper SetupCannot open the printer cover
Is the cutter locked?
If the printer cover does not open even when you pull the opening lever, it is likely that a paper jam has occurred, and the cutter has locked. Do not force the printer cover to open or pull on the paper.
First turn off the power and then turn the power back on again. This will automatically release the lock.
If the cutter is not unlocked even after the power is turned on again, contact the seller.
Turn On/Off PowerThe tablet cannot be charged
Is the power of the main unit turned on?
Check that the Power LED of the main unit has lit up.
USB peripherals such as tablets can only be charged while the power of the main unit is on.
Turn On PowerIs the USB cable or Lightning cable of the tablet correctly connected to the USB-C port?
Check that the USB cable or Lightning cable of the tablet is securely connected to USB-C.
 Connect USB Cable
Set Up External Devices - USB-C Port
Does the power supply capacity of the printer satisfy the electric energy required to charge your tablet?
The amount of power supplied from USB-C varies depending on the interface of the device used.
When charging is not possible, please use the charger included with the USB device.
Set External Devices - USB-C portThe tablet does not start.
Are you using SteadyLAN?
Depending on the type of device, when using the SteadyLAN function in a closed network environment (environment not connected to the Internet), if the device power was turned OFF and then turned ON while the device was connected to the printer, network communication may not be possible. If this occurs, try disconnecting and reconnecting the USB cable that connects the printer and device.
Turn On PowerThe melody speaker mC-Sound does not operate
Is the mC-Sound cable connected properly?
Check that the mC-Sound cable is securely connected to the external device drive connector on the printer.
Set Up External Devices - External device drive connector
Was the mC-Sound cable connected before turning the printer power ON?
Connect the mC-Sound cable before turning the printer power ON.
If mC-Sound was connected after the printer power was turned ON, mC-Sound will not operate correctly.
Also, if mC-Sound was disconnected and reconnected after the printer power was turned ON, turn the printer power OFF and then back ON.
Has the volume been set correctly?
If the mC-Sound volume is set to “Mute”, no sound will occur.
Check the application you are using or the settings of the DIP switches on mC-Sound.
When the volume is set with both the application and DIP switches, the instructions and commands from the application take priority.
Did mC-Sound operate when the printer power was turned ON?
If the mC-Sound DIP switch is operated when the printer power is turned ON, it may be impossible for the printer to recognize mC-Sound.
If the printer becomes unable to recognize mC-Sound after it starts, turn the printer power OFF and then back ON.
Other questions
To check printer settings
Using the dedicated app, you can easily check the printer configuration information.
You can also check settings using the self-printing function.
Use AppSelf-Printing
To use a macOS or Linux device
To use a macOS or Linux device, you need to install the dedicated driver.
For details on the connection procedure and how to install the driver, refer to here.
De-curl function
This machine provides the de-curl function to correct curls generated in thermal paper roll. The de-curl mechanism is always running during paper feeding.
- However, this function cannot remove curls completely.
- A receipt may be slightly folded near the top depending on the time in which receipt paper is left during the period from when a receipt is printed until the next one.
- The de-curl effect varies depending on the paper you use or your environment.
- Depending on the type or remaining amount of thermal paper roll, a receipt may be warped in a direction opposite to the normal direction by the de-curl function.
Regarding malfunction of the cash drawer
If the cash drawer that is used by connecting it to the printer opens unintentionally at the time the printer power is turned ON, this can be avoided by changing the printer settings. Follow the procedure below and change the settings.
- Use an iOS or Android tablet or smartphone to install Star Quick Setup Utility.Use App
- Start Star Quick Setup Utility.
- Connect to the desired printer.
- Tap [Printer Settings], [Memory Switch Settings].
- Set the mode switch at the top to [Bit] and select “Memory Switch 7” from the picker at the bottom, then set “Bit 1” in the Number field to "OFF".
- Tap [Apply].