Step 1 Generate Printing Data: Page Mode Function
The page mode function allows you to draw a text or image while specifying the position in the area (page area) of a size specified in advance.
You can generate printing data that has a layout with a higher degree of freedom, such as placing a character string in the same line as the QR code or using a horizontal writing layout.
Three Major Useful Features of Page Mode Function
* When you move the cursor over an item, the illustration changes.
 1. Print in Free Position
You can lay out data while specifying the position of each printing element. For example, you can place a character string in the same line as the QR code.
2. Set Print Direction
You can lay out data while specifying the print direction of each printing element.
3. Print Frames and Borders
You can print frames and borders. This allows finer adjustment to the length and line width than using line-drawing characters.
Page Mode Function Supported Model
Models that allow the use of the addPageMode method of the PrinterBuilder class support the page mode function.
See Supported Model.
Implement Printing Data Generation Process Using Page Mode Function
Use PageModeBuilder to generate printing data using the page mode function.
The following describes a print sample using the page mode. Create printing data using the procedure below.

Created printing data will be sent to the printer in Step 2.
The sample code is available at the bottom of the page.
1 Generate the StarXpandCommandBuilder instance, which is used to generate printing data.
Call the addPageMode method of the PrinterBuilder class to generate printing data using the page mode function.
Specify the page area in the first argument PageModeAreaParameter.
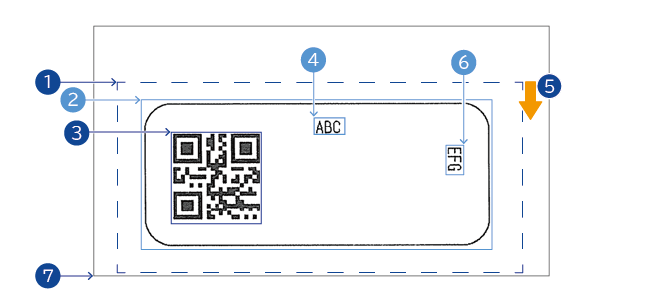
In this example, a page area with a width of 72 mm and a height of 30 mm at a position 3 mm below the following print start position is set.
Pass the PageModeBuilder instance to the second argument.
Then, call the PageModeBuilder methods to generate printing data using the page mode function.
var builder = new StarXpandCommand.StarXpandCommandBuilder();

builder.addDocument(
    new StarXpandCommand.DocumentBuilder()
        .addPrinter(
            new StarXpandCommand.PrinterBuilder()
            .addPageMode(
                new PageModeAreaParameter(72.0, 30.0),
                new StarXpandCommand.PageModeBuilder()
2 Call the actionPrintRectangle method to instruct the printing of the square frame.
You can set the square frame in PageModeRectangleParameter.
In this example, a square frame (rounded with each vertex of radius 5 mm) with a width of 62 mm and a height of 26 mm at a position 5 mm horizontally and 2 mm vertically away from the upper left corner of the page area is set.
.actionPrintRectangle(
    new PageModeRectangleParameter(5.0, 2.0, 62.0, 26.0)
        .setRoundCorner(true)
        .setCornerRadius(5.0)
        )
3 Call the styleVerticalPositionTo method and the styleHorizontalPositionTo method to specify the following QR code print start position at an absolute position from the upper left corner of the page area.
Call the actionPrintQRCode method to instruct the printing of the QR code. You can set the QR code in QRCodeParameter.
.styleVerticalPositionTo(5.0)
.styleHorizontalPositionTo(10.0)
.actionPrintQRCode(
    new StarXpandCommand.Printer.QRCodeParameter('Hello World.\n')
        .setLevel(StarXpandCommand.Printer.QRCodeLevel.L)
        .setCellSize(6)
        )
4 Call the styleHorizontalPositionBy method to specify the following character string print start position at a relative position from the previous print end position.
.styleHorizontalPositionBy(10.0)
.actionPrintText("ABC")
5 Call the stylePrintDirection method to set the print direction for the rest of printing to TopToBottom.
.stylePrintDirection(PageModePrintDirection.TopToBottom)
6 Call the styleVerticalPositionTo method and the styleHorizontalPositionTo method to specify the following character string print start position at an absolute position from the upper right corner of the page area.
.styleVerticalPositionTo(10.0)
.styleHorizontalPositionTo(10.0)
.actionPrintText("EFG")
7 Call the actionCut method to instruct the paper cut while leaving one central point.
.actionCut(CutType.Partial)
8 Call the getCommands method to acquire the printing data.
var commands = await builder.getCommands();
Sample code
var builder = new StarXpandCommand.StarXpandCommandBuilder();

builder.addDocument(
    new StarXpandCommand.DocumentBuilder()
        .addPrinter(
            new StarXpandCommand.PrinterBuilder()
            .addPageMode(
                new PageModeAreaParameter(72.0, 30.0),
                new StarXpandCommand.PageModeBuilder()
                    .actionPrintRectangle(
                        new PageModeRectangleParameter(5.0, 2.0, 62.0, 26.0)
                            .setRoundCorner(true)
                            .setCornerRadius(5.0)
                            )
                    .styleVerticalPositionTo(5.0)
                    .styleHorizontalPositionTo(10.0)
                    .actionPrintQRCode(
                        new StarXpandCommand.Printer.QRCodeParameter('Hello World.\n')
                            .setLevel(StarXpandCommand.Printer.QRCodeLevel.L)
                            .setCellSize(6)
                            )
                    .styleHorizontalPositionBy(10.0)
                    .actionPrintText("ABC")
                    .stylePrintDirection(PageModePrintDirection.TopToBottom)
                    .styleVerticalPositionTo(10.0)
                    .styleHorizontalPositionTo(10.0)
                    .actionPrintText("EFG")
            )
            .actionCut(CutType.Partial)
        )
);

var commands = await builder.getCommands();

