Quick Start
Describes how to build a CloudPRNT system and how to test printing using a sample server program implemented in a PHP language.
Memo
Please refer to the links for downloading the Developer support tool : CPUtil and PHP sample server program.
The procedure and the reference vary depending on the OS. Select the OS for display.
About the PHP Sample Server Program
The PHP sample server program is available to verify the CloudPRNT operation.
Build a sample server, connect a CloudPRNT-compatible printer to it, and print a sample receipt.
Download the PHP sample server program from here.
Download the PHP sample server program from here.
Using a PHP module, this sample program mainly consists of an Apache web server. It is based on a PHP language environment, but a CloudPRNT-specific code is so generic that it can be also referenced for non-PHP server-side scripting solutions.
Note:
This sample program is intentionally basic, so it does not take into consideration security, customer notification, and other matters required in actual operation.
PHP Sample Server Setup Flow
This section describes how to set up the PHP sample server program in a Windows (x64) server system.
Let's build a CloudPRNT server in a local area network and print data using the procedure below:
Memo
Step 4 and Step 5 are for trial operation of CloudPRNT Version MQTT.
To verify the operation, a CloudPRNT Version MQTT-compatible printer is required.
Step 1. Building the Sample Server : Setup Apache / PHP / SQLite
Setup Apache
1 Install the Apache HTTP server.
Download it from Apache.
This example uses httpd-2.4.57-win64-VS17.zip.
Download vc_redist_x64 and install the server (double-click VC_redist.x64.exe).
2 Extract the downloaded pre-built package to any location.
In this example, place the folders under Apache24 in C:\Apache.
3 Register the path (C:\Apache\Apache24\bin) of Apache24\bin in the variable name (PATH) of the system environment variable.
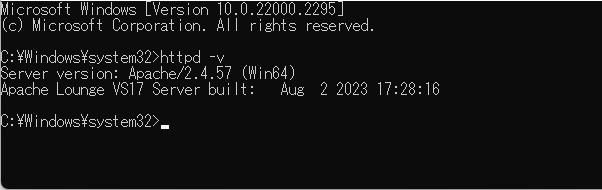
4 Open the command prompt and execute the httpd -v command. If the version is displayed, it means that the installation has succeeded.
5 Open C:\Apache\Apache24\conf\httpd.conf in a text editor.
Modify Define SRVROOT "c:/Apache24" according to your environment.
 Modify
 #ServerName www.example.com:80 to ServerName localhost:80.
Save C:\Apache\Apache24\conf\httpd.conf. If it is not saved correctly, copy httpd.conf to the desktop, make the above modification and save it, and then overwrite save to C:\Apache\Apache24\conf\httpd.conf.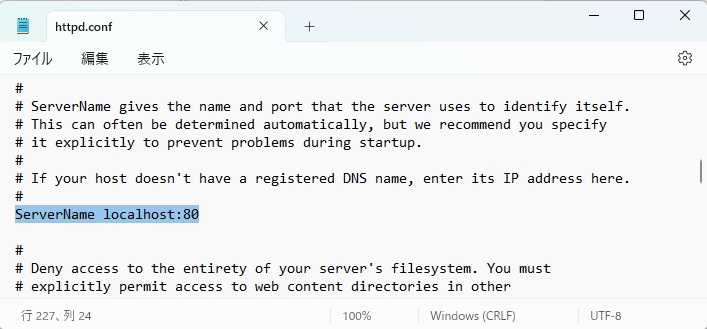 Reference: httpd.conf
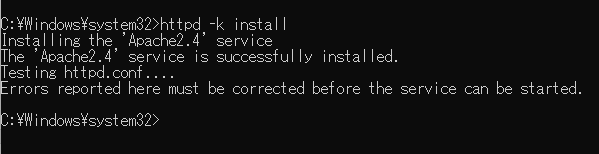
6 Open the command prompt with administrator privileges and execute the httpd -k install command.
 In this example, place the folders under Apache24 in C:\Apache.
7 Enter localhost in the URL field of the web browser. If It works is displayed, it means that the settings have been successfully completed.
If it is not displayed correctly, open the command prompt with administrator privileges and execute the httpd -k restart command.
Setup PHP / SQLite
1 Download the Windows Thread Safe zip file from PHP Windows Downloads.
This example uses the PHP8.2.10 VS16 x64 Thread Safe (2023-Aug-29 22:33:56) zip file.
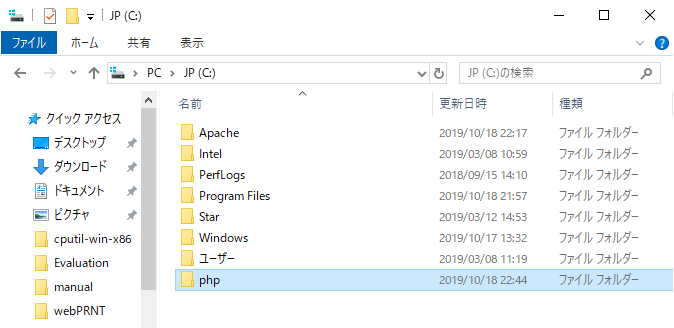
2 Decompress the downloaded zip file, rename it to php, and copy it to the C: drive.
3 Open C:\Apache\Apache24\conf\httpd.conf in a text editor and save it with the following text added to the end:
Reference: httpd.conf
# Secure (SSL/TLS) connections
#Include conf/extra/httpd-ssl.conf
#
# Note: The following must must be present to support
# starting without SSL on platforms with no /dev/random equivalent
# but a statically compiled-in mod_ssl.
#
<IfModule ssl_module>
SSLRandomSeed startup builtin
SSLRandomSeed connect builtin
</IfModule>
LoadFile "C:/php/php8ts.dll"
LoadFile "C:/php/libsqlite3.dll"
LoadModule php_module "C:/php/php8apache2_4.dll"
AddType application/x-httpd-php .php
# configure the path to php.ini
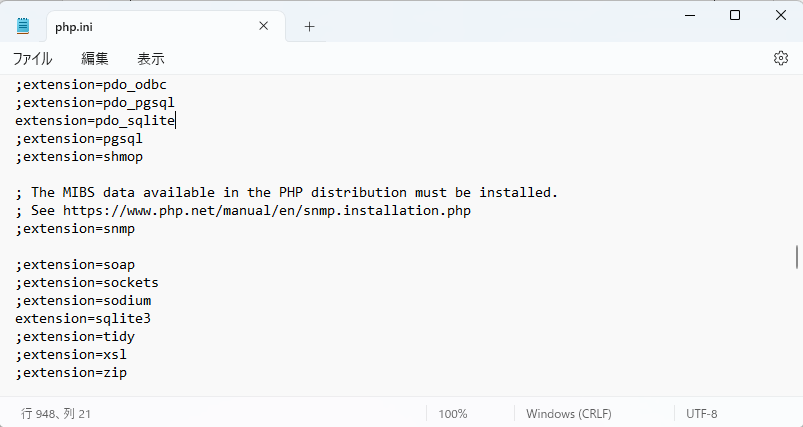
PHPIniDir "C:/php”4 Copy C:\php\php.ini-development, save it with the name "php.ini" in the same location, and open it in a text editor. Reference: Php.ini
Modify ;extension_dir to extension_dir = "c:\php\ext".
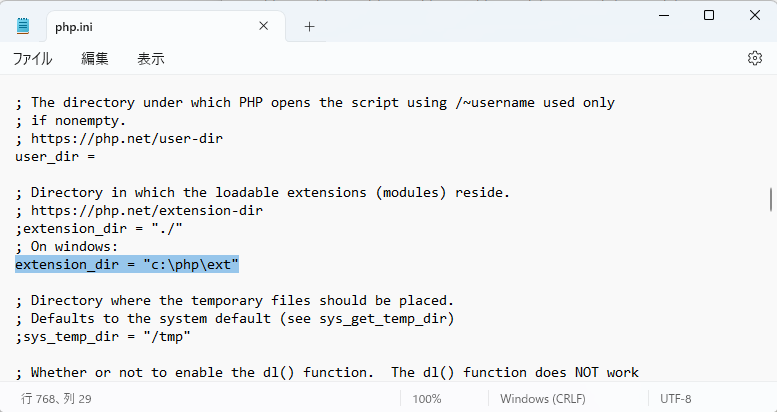
Modify ;extension=pdo_sqlite to extension=pdo_sqlite and ;extension=sqlite3 to extension=sqlite3.
Placing the PHP sample server program
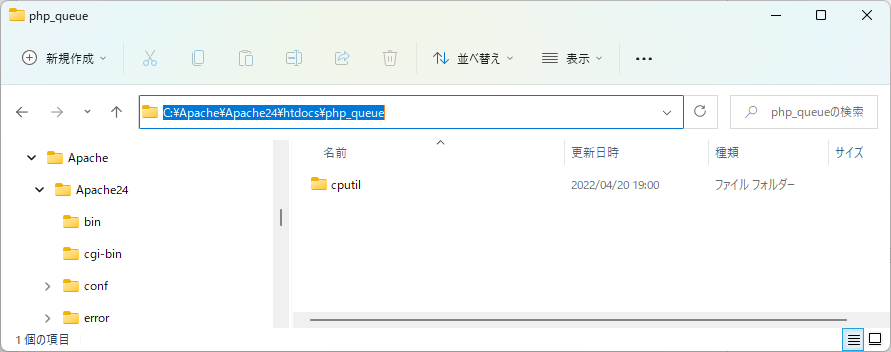
1 Download the PHP sample server program php_queue.tar.gz.
Decompress the file and copy the php_queue folder to C:\Apache\Apache24\htdocs\.
2 Open the command prompt with administrator privileges and execute the httpd -k restart command.
Step 2. Setup the Developer support tool: Setup CPUtil
Setup CPUtil
1 Download CPUtil and set it to be launched directly by any user.
Create the C:\Apache\Apache24\htdocs\php_queue\cputil folder under C:\Apache\Apache24\htdocs\php_queue and copy the content of cputil-win-x64.
Memo
One of the following operations makes CPUtil directly launchable by any user:
- Extract CPUtil to any location and register it so that it is globally executable.
- Place CPUtil in the same folder as the web services.
Step 3. Printing Using CloudPRNT Version HTTP
Checking the installation of the PHP sample server
1 Open http://<serverIP>/php_queue/management.html in a web browser to see if the server has been successfully installed.
If any problem occurs, check error.log (the file may vary depending on the Apache configuration option).

Note:
Note that some paths are hardcoded to simplify the source code.
For example, if the database is not found in <document_root>\php_queue\simplequeue.sqlite, change the $dbname file path of cloudprnt.php, devices.php, print.php, and queues.php.
PHP Sample Server Setup Flow
This section describes how to set up the PHP sample server program in a Linux Ubuntu 22.04 LTS server system.
Let's build a CloudPRNT server in a local area network and print data using the procedure below:
Memo
Step 4 and Step 5 are for trial operation of CloudPRNT Version MQTT. To verify the operation, a CloudPRNT Version MQTT-compatible printer is required.
Step 1. Building the Sample Server : Setup Apache / PHP / SQLite
Setup Apache / PHP / SQLite
1 Install the Apache HTTP server.
sudo apt-get install apache22 Install the PHP module.
sudo apt-get install php3 Install the PHP-SQLite module.
sudo apt-get install php-sqlite34 Enable the use of PHP in Apache (this example uses PHP version 8.1.2).
sudo a2enmod php8.15 Restart the web server.
sudo systemctl restart apache2Placing the PHP sample server program
1 Download the PHP sample server program php_queue.tar.gz.
Extract the downloaded file to /var/www/html/.
sudo tar -xvf php_queue_v200.tar.gz -C /var/www/html/Make sure that the owner of a new file of the PHP sample is a www-data user.
This is because a www-data user must have the privileges to write to the database and create a locked file in the php_queue folder for database updates.
sudo chown -R www-data:www-data /var/www/html/php_queueStep 2. Setup the Developer support tool: Setup CPUtil
Setup CPUtil
1 Download CPUtil and set it to be launched directly by any user.
Extract CPUtil to a global location (example: /opt/starmicronics/cputil) and create the symbolic link /usr/local/bin/cputil, which represents /opt/starmicronics/cputil/.
mkdir -p /opt/starmicronics/cputil
 tar -zxvf ~/Downloads/cputil-linux-x64_v200.tar.gz -C /opt/starmicronics/cputil/
 sudo chmod 755 /opt/starmicronics/cputil/cputil-linux-x64/cputil
 ln -s /opt/starmicronics/cputil/cputil-linux-x64/cputil /usr/local/bin/cputil
Step 3. Printing Using CloudPRNT Version HTTP
Checking the installation of the PHP sample server
1 Open http://<serverIP>/php_queue/management.html in a web browser to see if the server has been successfully installed.
If any problem occurs, check /var/log/apache2/error.log (the file may vary depending on the Apache configuration option).
Note:
Note that some paths are hardcoded to simplify the source code.
For example, if the database is not found in <document_root>/php_queue/simplequeue.sqlite, change the $dbname file path of cloudprnt.php, devices.php, print.php, and queues.php.
How to use
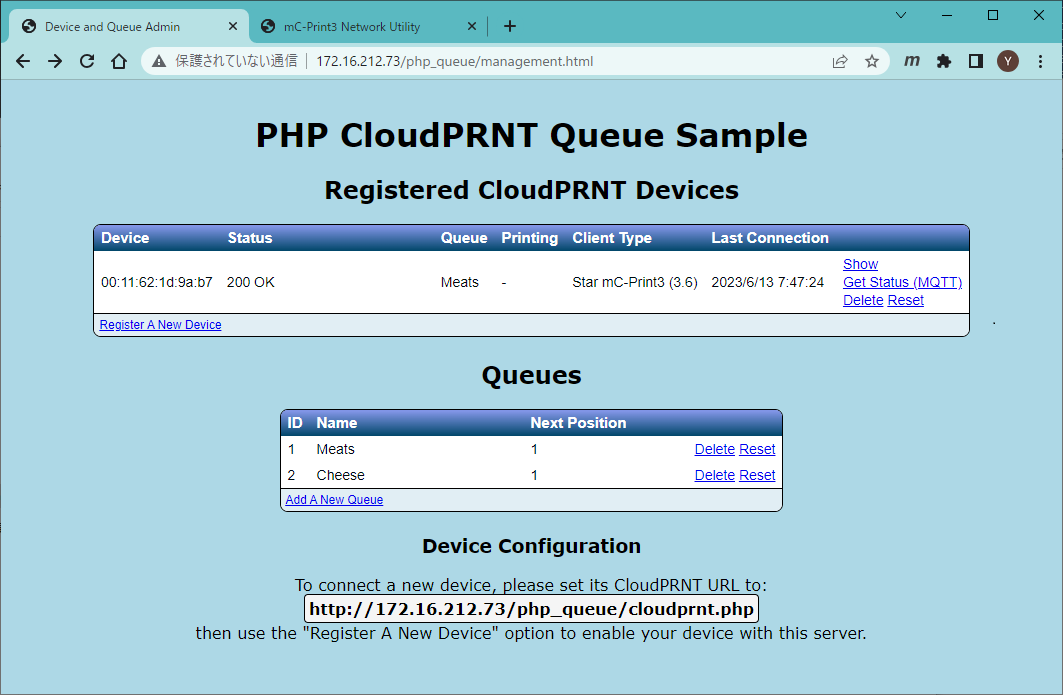
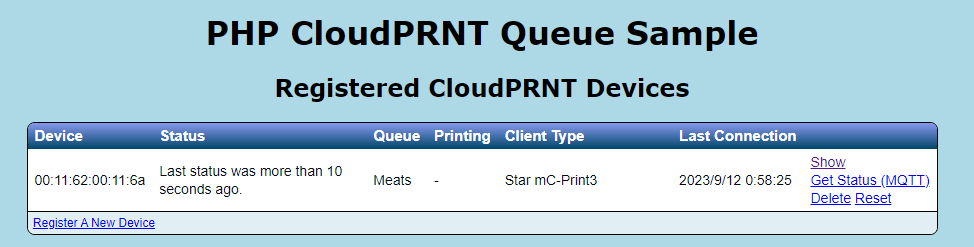
To use this sample server program, log in to the management page (http://<serverIP>/php_queue/management.html) first.
This server manages a list of customer queues in the Sqlite3 database. Some queue examples are defined in the default database.
A list of registered printers is stored in the database, and each printer is assigned to a specific queue.
An unregistered CloudPRNT printer is ignored by the server even if you try to connect it to the server.
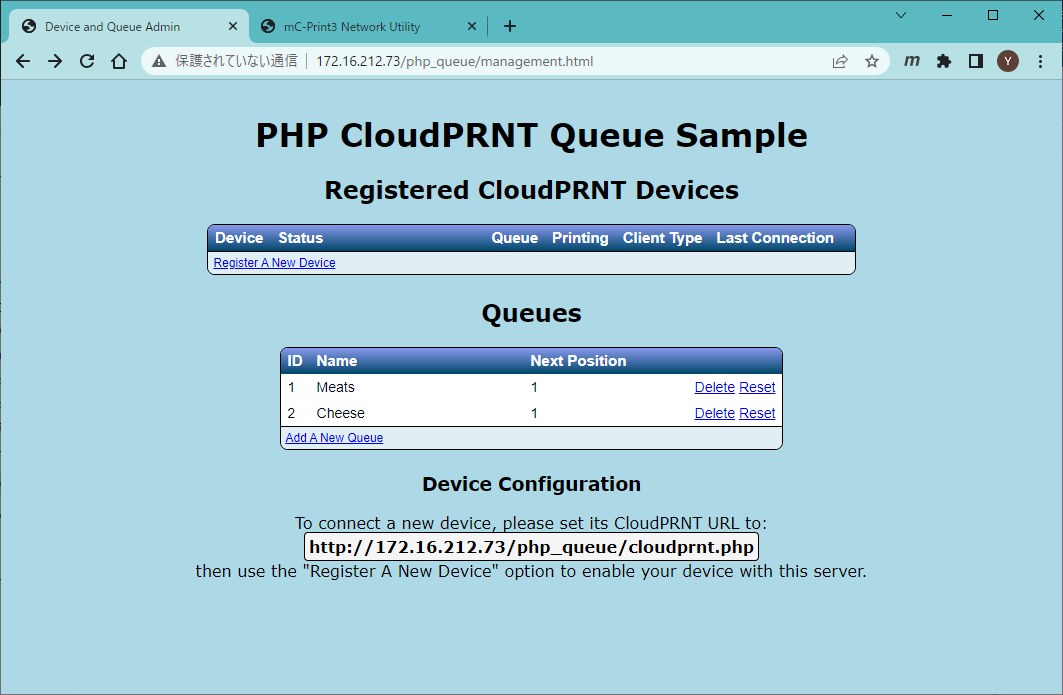
Registering a printer
"Device Configuration" at the bottom of the management.html page displays a URL that implements the CloudPRNT service of this server, which is required to register a new printer (the URL may vary depending on the server setup method).
Open the printer's CloudPRNT settings screen according to Client Settings.
In the settings screen, set "CloudPRNT Service" to ENABLE and set the previously checked URL in "Server URL."
After configuring the above settings, perform the following on the management.html page:
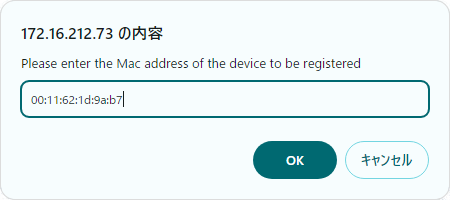
1 Click the [Register A New Device] link. When the dialog box appears, enter the Ethernet LAN MAC address(*) of a device to register in lowercase.
The MAC address of the printer can be checked in the Network Configuration field of self-printing or a web-based user interface.
(*)The CloudPRNT procotol uses the MAC address of the printer's Ethernet LAN port, even when connected over a wireless LAN.
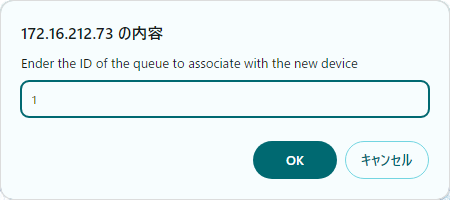
2 When you are prompted to enter the ID (a number such as 1, 2, 3...) of the queue to link to the new printer, enter the appropriate number.
You can link multiple printers to a single queue.
The printer has now been registered, and the server retrieves the detailed information, such as the device type and print/paper size, from the printer.
Displaying the user interface of the end user
The newly registered printer is displayed in a new row of the printer list on the management.html page.
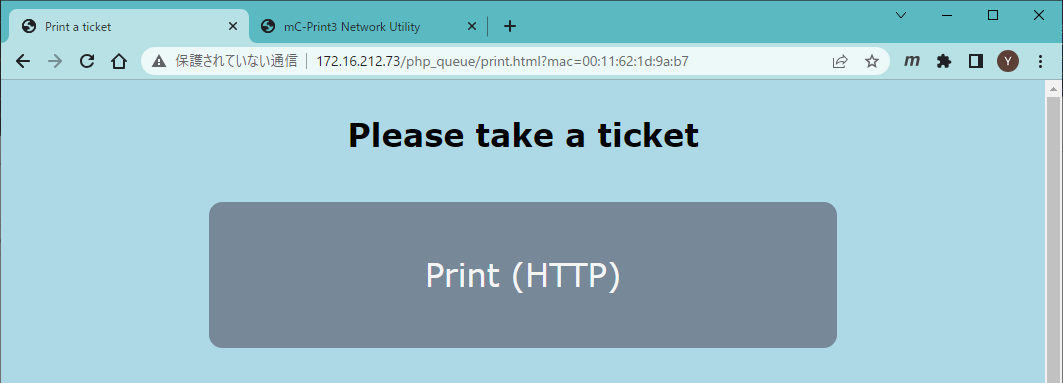
When you click "Show" in the right-most column, the user page of this printer appears.
This page is assumed to be displayed on a tablet for the end customer to print a ticket.
Click the [Print (HTTP)] button to print a new queue ticket.
Deleting a printer
When you click the "Delete" button in the right-most column in the "Registered CloudPRNT Devices" table on the management.html page, the corresponding printer is deleted.
This sample server program has no function to change the queue ID associated with the printer.
To change the queue ID associated with the printer, delete the printer and re-register it or directly change the sqlite database.
Adding a queue
Click the "Add A New Queue" link in the bottom row of the ”Queues” table on the management.html page. You are prompted to enter a new queue name.
Deleting a queue
When you click the "Delete" link of the target queue in the ”Queues” table on the management.html page, the corresponding queue is deleted.
Setting a queue
When you click the "Reset" link of the target queue in the ”Queues” table on the management.html page, the corresponding queue number is reset to "1." This number is printed when this queue is printed next time.
In this sample, you can make an additional configuration for each queue, such as defining Star Document Markup, which is used to change the top or bottom logo or generate a ticket. This is feasible only by directly changing the sqlite database while preventing any complexity from being applied to the sample.
Step 4. Building the MQTT Server : Setup MQTT / Mosquitto
CloudPRNT Version MQTT uses the MQTT protocol for communications between the CloudPRNT server and the printer, delivering lower-latency printing.
To verify the operation, a CloudPRNT Version MQTT-compatible printer is required.
In this sample program, verify the operation of CloudPRNT Version MQTT by Setup Eclipse Mosquitto in the CloudPRNT server.
Installing Mosquitto
1 Download the Windows x64 installer from Eclipse Mosquitto and install Mosquitto.
This example uses mosquitto-2.0.17-install-windows-x64.exe.
Setup the MQTT broker
In this sample, configure the following settings to make it easy to connect the MQTT broker to the printer:
1 Open C:\Program Files\mosquitto\mosquitto.conf in a text editor.
Modify #allow_anonymous false to allow_anonymous true.
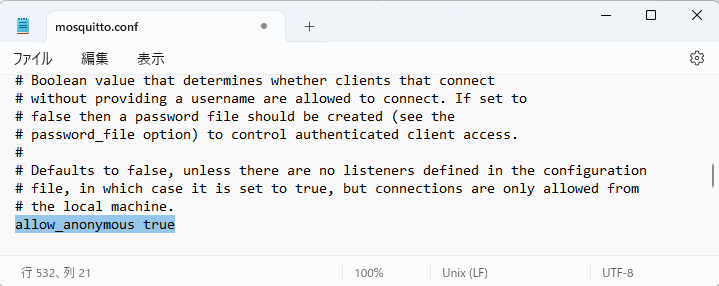
Modify #listener to listener 1883.
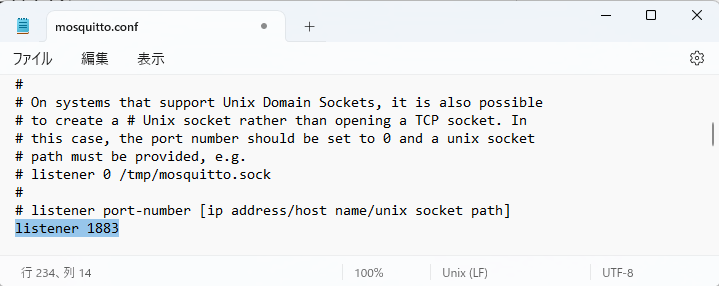
The above settings allow the MQTT broker, which runs on the server PC, to accept connections from all MQTT clients.
After changing the settings, restart the "Mosquitto Broker" service.
For details on mosquitto.conf, refer to here.
Verifying the operation of the MQTT broker
1 Register the path (C:\Program Files\mosquitto) of mosquitto_sub.exe and mosquitto_pub.exe in the variable name (PATH) of the system environment variable.
2 Open PowerShell or the command prompt and make sure that the following commands work:
mosquitto_sub
mosquitto_pub
3 Use the following commands to make sure that an MQTT message can be transmitted.
Terminal 1:mosquitto_sub -h YourLocalIpAddress -p 1883 -t test/mqtt
Terminal 2:mosquitto_pub -h YourLocalIpAddress -p 1883 -t test/mqtt -m "Hello, MQTT."
If Terminal 1 receives the message "Hello, MQTT.," it means that the settings have been successfully completed.
Step 5. Printing Using CloudPRNT Version MQTT
Trigger POST
Verify the operation of Trigger POST, which is executed by the CloudPRNT server at a specific timing in response to a POST request from the printer.
1. Prepare the server setting information file.
Write the settings in the cloudprnt-setting.json file under the C:\Apache\Apache24\htdocs\php_queue directory.
This file is a response body (JSON file) with which the CloudPRNT server responds to a server setting information GET request executed by a CloudPRNT Version MQTT-compatible printer at a specific timing, such as power-on.
1 Copy the content of cloudprnt-setting_mqtt_triggerpost.json in the php_queue\cloudprnt-setting_Sample directory to the cloudprnt-setting.json file.
Specify the URL of the MQTT broker in the settingForMQTT.mqttConnectionSetting.hostName key value in the above JSON file. In this example, specify the IP address of the server PC.
{
    "title":"star_cloudprnt_server_setting",
    "version":"1.0.0",
    "serverSupportProtocol":["HTTP", "MQTT"],
    "settingForMQTT":{
        "useTriggerPOST":true,
        "mqttConnectionSetting":{
            "hostName":"172.16.212.228",
            "portNumber":1883,
            "useTls" : false,
            "authenticationSetting":{
                "username":"user",
                "password":"pass"
            }
        }
    }
}
See that the settingForMQTT. useTriggerPOST key value is true. It indicates that this value uses Trigger POST.
2. Register a printer and start operating it using CloudPRNT Version MQTT: Trigger POST.
When the server setting information file is ready, register a CloudPRNT Version MQTT-compatible printer to the CloudPRNT sample server.
Use the management.html page (http://<serverIP>/php_queue/management.html) of the sample server program. For details, refer to 3-2. How to use.
After the registration, turn the printer power on. The printer sends a server setting information GET request to the CloudPRNT server, and the server returns a server setting information file (JSON) to the CloudPRNT server as a response.
The printer starts running on CloudPRNT Version MQTT: Trigger POST according to the response.
3. Have the printer send a POST request.
Click "Get Status (MQTT)" in the right-most column on the management.html page.

If the following dialog box appears, it means that an MQTT message has been successfully issued from the CloudPRNT server.
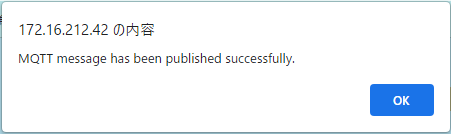
The [request-post] message is issued by the CloudPRNT server to the printer.
When receiving the MQTT message, the printer sends a POST request.
If Status on the management.html page is updated, it means that the server has communicated appropriately with the printer.
4. Print data.
Click "Show" in the right-most column on the management.html page and then click "Print (MQTT: Trigger POST)" on the page that appears.
You will see that this protocol ensures lower-latency printing than CloudPRNT Version HTTP.
Full MQTT / Pass URL
Verify the operation of Full MQTT / Pass URL, which enables lower-latency communications than Trigger POST.
1. Prepare the server setting information file.
Write the settings in the cloudprnt-setting.json file under the C:\Apache\Apache24\htdocs\php_queue directory.
1 Copy the content of cloudprnt-setting_mqtt_triggerpost.json in the php_queue\cloudprnt-setting_Sample directory to the cloudprnt-setting.json file.
Specify the URL of the MQTT broker in the settingForMQTT.mqttConnectionSetting.hostName key value in the above JSON file. In this example, specify the IP address of the server PC.
{
    "title":"star_cloudprnt_server_setting",
    "version":"1.0.0",
    "serverSupportProtocol":["HTTP", "MQTT"],
    "settingForMQTT":{
        "useTriggerPOST":false,
        "mqttConnectionSetting":{
            "hostName":"172.16.212.228",
            "portNumber":1883,
            "useTls" : false,
            "authenticationSetting":{
                "username":"user",
                "password":"pass"
            }
        }
    }
}
See that the settingForMQTT. useTriggerPOST key value is false. It indicates that this value uses Full MQTT / Pass URL.
2. Prepare the MQTT message receive program for the CloudPRNT server.
Set the MQTT message receive program for the CloudPRNT server.
Open mqtt_subscribe.ps1 in the C:\Apache\Apache24\htdocs\php_queue directory in a text editor.
Modify the broker address specified with -h as shown in the line below according to your environment.
& 'C:\Program Files\mosquitto\mosquitto_sub.exe' -h 172.16.212.228 -p 1883 -u user -P pass -t star/cloudprnt/to-server/# -v -V 311 | ForEach-Object {In this example, specify the same IP address as the above server setting information file.
3. Register a printer and start operating it using CloudPRNT Version MQTT: Full MQTT / Pass URL.
When the above settings are completed, register a CloudPRNT Version MQTT-compatible printer to the CloudPRNT sample server.
Use the management.html page (http://<serverIP>/php_queue/management.html) of the sample server program. For details, refer to 3-2. How to use.
After the registration, turn the printer power on. The printer sends a server setting information GET request to the CloudPRNT server, and the server returns a server setting information file (JSON) to the CloudPRNT server as a response.
The printer starts running on CloudPRNT Version MQTT: Full MQTT / Pass URL according to the response.
4. Acquire the printer status.
Click "Get Status (MQTT)" in the right-most column on the management.html page.
If the following dialog box appears, it means that an MQTT message has been successfully issued from the CloudPRNT server.

The [request-client-status] message is issued by the CloudPRNT server to the printer.
In Full MQTT / Pass URL, a printer status notification is made through a [client-status] message from the printer, instead of a POST request.
The printer that receives the [request-client-status] message issues a [client-status] message to notify of the status.
If Status on the management.html page is updated, it means that the CloudPRNT server has successfully received the message issued by the printer.
5. Print data.
Click "Show" in the right-most column on the management.html page and then click "Print (MQTT: Pass URL)" or "Print (MQTT: Full MQTT)" on the page that appears to verify the corresponding print operation.
For Pass URL, the payload JSON of a print-job message issued by the CloudPRNT server contains the URL of the server that stores the print data.
After receiving the message, the printer executes a print job request (GET), and when receiving print data, it starts printing.
For Full MQTT, the payload JSON of a print-job message issued by the CloudPRNT server contains the print data itself.
When receiving the message, the printer starts printing the print data described in the payload JSON.
After the printing, the printer issues a print-result message to notify the CloudPRNT server of the print result.
Step 4. Building the MQTT Server: Setup MQTT / Mosquitto
CloudPRNT Version MQTT uses the MQTT protocol for communications between the CloudPRNT server and the printer, delivering lower-latency printing.
To verify the operation, a CloudPRNT Version MQTT-compatible printer is required.
In this sample program, verify the operation of CloudPRNT Version MQTT by Setup Eclipse Mosquitto in the CloudPRNT server.
Installing Mosquitto
1 Execute the following command to install the Mosquitto broker and the Mosquitto client.
sudo apt-get install mosquitto
 sudo apt-get install mosquitto-clients
Setup the MQTT broker
In this sample, configure the following settings to make it easy to connect the MQTT broker to the printer:
1 Open /etc/mosquitto/mosquitto.conf in a text editor and add the following line:
allow_anonymous true
 listener 1883
The above settings allow the MQTT broker, which runs on the server PC, to accept connections from all MQTT clients.
After changing the settings, restart the "Mosquitto Broker" service with the following command:
sudo systemctl restart mosquittoFor details on mosquitto.conf, refer to here.
Verifying the operation of the MQTT broker
1 Open the terminal and make sure that the following command works:
mosquitto_sub
mosquitto_pub
2 Use the following commands to make sure that an MQTT message can be transmitted.
Terminal 1:mosquitto_sub -h YourLocalIpAddress -p 1883 -t test/mqtt
Terminal 2:mosquitto_pub -h YourLocalIpAddress -p 1883 -t test/mqtt -m "Hello, MQTT."
If Terminal 1 receives the message "Hello, MQTT.," it means that the settings have been successfully completed.
Step 5. Printing Using CloudPRNT Version MQTT
Trigger POST
Verify the operation of Trigger POST, which is executed by the CloudPRNT server at a specific timing in response to a POST request from the printer.
1. Prepare the server setting information file.
Write the settings in the cloudprnt-setting.json file under the /var/www/html/php_queue/php_queue directory.
This file is a response body (JSON file) with which the CloudPRNT server responds to a server setting information GET request executed by a CloudPRNT Version MQTT-compatible printer at a specific timing, such as power-on.
1 Copy the content of cloudprnt-setting_mqtt_triggerpost.json in the php_queue\cloudprnt-setting_Sample directory to the cloudprnt-setting.json file.
Specify the URL of the MQTT broker in the settingForMQTT.mqttConnectionSetting.hostName key value in the above JSON file. In this example, specify the IP address of the server PC.
{
    "title":"star_cloudprnt_server_setting",
    "version":"1.0.0",
    "serverSupportProtocol":["HTTP", "MQTT"],
    "settingForMQTT":{
        "useTriggerPOST":true,
        "mqttConnectionSetting":{
            "hostName":"172.16.212.228",
            "portNumber":1883,
            "useTls" : false,
            "authenticationSetting":{
                "username":"user",
                "password":"pass"
            }
        }
    }
}
See that the settingForMQTT. useTriggerPOST key value is true. It indicates that this value uses Trigger POST.
2. Register a printer and start operating it using CloudPRNT Version MQTT: Trigger POST.
When the server setting information file is ready, register a CloudPRNT Version MQTT-compatible printer to the CloudPRNT sample server.
Use the management.html page (http://<serverIP>/php_queue/management.html) of the sample server program. For details, refer to 3-2. How to use.
After the registration, turn the printer power on. The printer sends a server setting information GET request to the CloudPRNT server, and the server returns a server setting information file (JSON) as a response.
The printer starts running on CloudPRNT Version MQTT: Trigger POST according to the response.
3. Have the printer send a POST request.
Click "Get Status (MQTT)" in the right-most column on the management.html page.

If the following dialog box appears, it means that an MQTT message has been successfully issued from the CloudPRNT server.

The [request-post] message is issued by the CloudPRNT server to the printer.
When receiving the MQTT message, the printer sends a POST request.
If Status on the management.html page is updated, it means that the server has communicated appropriately with the printer.
4. Print data.
Click "Show" in the right-most column on the management.html page and then click "Print (MQTT: Trigger POST)" on the page that appears.
You will see that this protocol ensures lower-latency printing than CloudPRNT Version HTTP.
Full MQTT / Pass URL
Verify the operation of Full MQTT / Pass URL, which enables lower-latency communications than Trigger POST.
1. Prepare the server setting information file.
Write the settings in the cloudprnt-setting.json file under the /var/www/html/php_queue/php_queue directory.
1 Copy the content of cloudprnt-setting_mqtt.json in the php_queue\cloudprnt-setting_Sample directory to the cloudprnt-setting.json file.
Specify the URL of the MQTT broker in the settingForMQTT.mqttConnectionSetting.hostName key value in the above JSON file. In this example, specify the IP address of the server PC.
{
    "title":"star_cloudprnt_server_setting",
    "version":"1.0.0",
    "serverSupportProtocol":["HTTP", "MQTT"],
    "settingForMQTT":{
        "useTriggerPOST":false,
        "mqttConnectionSetting":{
            "hostName":"172.16.212.228",
            "portNumber":1883,
            "useTls" : false,
            "authenticationSetting":{
                "username":"user",
                "password":"pass"
            }
        }
    }
}
See that the settingForMQTT. useTriggerPOST key value is false. It indicates that this value uses Full MQTT / Pass URL.
2. Prepare the MQTT message receive program for the CloudPRNT server.
Set the MQTT message receive program for the CloudPRNT server.
Open mqtt_subscribe.sh in the /var/www/html/php_queue/php_queue directory in a text editor.
Modify the broker address specified with -h as shown in the line below according to your environment.
mosquitto_sub -h 172.16.212.228 -p 1883 -u user -P pass -t star/cloudprnt/to-server/# -v -V 311 | xargs -d'\n' -I@ bash -c "callPHP '@'"In this example, specify the same IP address as the above server setting information.
When the above settings are completed, execute mqtt_subscribe.sh with administrator privileges.
This program is designed to subscribe MQTT messages issued by the printer and invoke the PHP program every time a message is received.
3. Register a printer and start operating it using CloudPRNT Version MQTT: Full MQTT / Pass URL.
When the above settings are completed, register a CloudPRNT Version MQTT-compatible printer to the CloudPRNT sample server.
Use the management.html page (http://<serverIP>/php_queue/management.html) of the sample server program. For details, refer to 3-2. How to use.
After the registration, turn the printer power on. The printer sends a server setting information GET request to the CloudPRNT server, and the server returns a server setting information file (JSON) to the CloudPRNT server as a response.
The printer starts running on CloudPRNT Version MQTT: Full MQTT / Pass URL according to the response.
4. Acquire the printer status.
Click "Get Status (MQTT)" in the right-most column on the management.html page.

If the following dialog box appears, it means that an MQTT message has been successfully issued from the CloudPRNT server.

The [request-client-status] message is issued by the CloudPRNT server to the printer.
In Full MQTT / Pass URL, a printer status notification is made through a [client-status] message from the printer, instead of a POST request.
The printer that receives the [request-client-status] message issues a [client-status] message to notify of the status.
If Status on the management.html page is updated, it means that the CloudPRNT server has successfully received the message issued by the printer.
5. Print data.
Click "Show" in the right-most column on the management.html page and then click "Print (MQTT: Pass URL)" or "Print (MQTT: Full MQTT)" on the page that appears to verify the corresponding print operation.
For Pass URL, the payload JSON of a print-job message issued by the CloudPRNT server contains the URL of the server that stores the print data.
After receiving the message, the printer executes a print job request (GET), and when receiving print data, it starts printing.
For Full MQTT, the payload JSON of a print-job message issued by the CloudPRNT server contains the print data itself.
When receiving the message, the printer starts printing the print data described in the payload JSON.
After the printing, the printer issues a print-result message to notify the CloudPRNT server of the print result.