6.1. ICommandBuilder Migration Guide (A Function Incorporated in the StarPRNT V5)
This is an ICommandBuilder migration guide to minimize printer-model dependency.
ICommandBuilder is a function that enables human-readable command creation instead of conventional binary command creation and incorporated in the extension library of StarPRNT V5.0 or later (hereinafter, starioextension )
Until now, developers had to create commands after understanding the specifications of printer emulation, however this function can reduce learning costs and man-hours for adding printer models
Please use ICommandBuilder referring to this guide.
6.1.1. Required Work Contents
The works required to migrate to ICommandBuilder and add a printer model are as follows.
Important
Depending on the combination of printer models, it may be necessary to change the portSettings specification .
6.1.2. Implement starioextension
Make sure that your project includes starioextension. Use libraries of the same SDK version.
1. Implement libraries
Using Maven repositorydependencies { implementation 'com.starmicronics:stario:starioVersion' implementation 'com.starmicronics:starioextension:starioextensionVersion' ... }Using AAR filesdependencies { implementation(name: 'stario', ext: 'aar') implementation(name: 'starioextension', ext: 'aar') ... }
2. Import libraries
The following are the package names of starioextension and stario to be added this time.
com.starmicronics.stario
com.starmicronics.starioextension
Details of the library installation procedure are described in How to add the library .
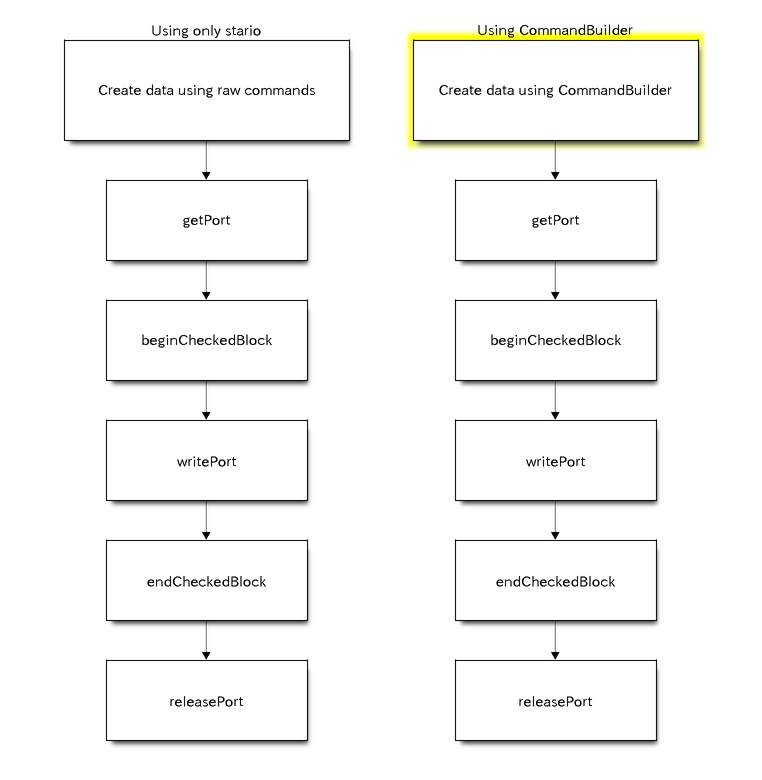
6.1.3. How to change API and command creation method (Introduction of ICommandBuilder)
Differences in overall flow
As shown in the following flow, no changes other than the command creation method are required to use ICommandBuilder .
Changes in print data creation program (printer built-in font)
The code for printing the printer built-in font used for characters on receipts will change as shown in the sample below. Please make the necessary change according to the function you are using.
See ICommandBuilder for a list of supported features.
Note
The TSP100 series does not support printer fonts. Please see Changes in Changes in print data creation program (image data)
ArrayList<byte[]> command = new ArrayList<byte[]>();

command.add(new byte[] { 0x1b, 0x40 });             // Initialization
command.add(new byte[] { 0x1b, 0x1d, 0x61, 0x01 }); // Alignment
command.add("Hello world".getBytes());
command.add({0x1b, 0x64, 0x02});                    // Cut paper
ICommandBuilder builder = StarIoExt.createCommandBuilder(emulation);

builder.beginDocument();
builder.appendAlignment(AlignmentPosition.Right);
builder.append("Hello world".getBytes());
builder.appendCutPaper(CutPaperAction.PartialCutWithFeed);
builder.endDocument()

byte[] command = builder.getCommands();
Changes in print data creation program (image data)
The code for printing image data used for store logos etc.
See ICommandBuilder for a list of supported features.
ArrayList<byte[]> commands = new ArrayList<byte[]>();
RasterDocument rasterDoc = new RasterDocument(RasSpeed.Medium, RasPageEndMode.FeedAndFullCut, RasPageEndMode.FeedAndFullCut, RasTopMargin.Standard, 0, 0, 0);
StarBitmap starbitmap = new StarBitmap(bitmap_image, false, maxWidth);

commands.add(rasterDoc.BeginDocumentCommandData());
commands.add(starbitmap.getImageRasterDataForPrinting_Standard(true));
commands.add(rasterDoc.EndDocumentCommandData());

//
// Class: Graphic data to Star command
//
public class StarBitmap {

    // omitted

    StarBitmap(Bitmap picture, boolean supportDithering, int maxWidth) {
        try {
            if (picture.getWidth() > maxWidth) {
                ScallImage(picture, maxWidth);
            } else {
                height = picture.getHeight();
                width = picture.getWidth();
                pixels = new int[height * width];

                for (int y = 0; y < height; y++) {
                    for (int x = 0; x < width; x++) {
                        pixels[PixelIndex(x, y)] = picture.getPixel(x, y);
                    }
                }
            }
            dithering = supportDithering;
            imageData = null;
        } catch (OutOfMemoryError e) {
            throw e;
        }
    }
    public byte[] getImageRasterDataForPrinting_Standard(boolean compressionEnable) {
            ////////////////////////////////////////////////////////////////////////////////////
            // About 100 lines omitted
            // Create an array according to the specifications of Star_Raster_Command (ESC * r)
            ////////////////////////////////////////////////////////////////////////////////////
        return imageData;
    }
ICommandBuilder builder = StarIoExt.createCommandBuilder(emulation);

builder.beginDocument();
builder.appendBitmap(bitmap_image, true, width, true); // create Star command from bitmap data
builder.appendCutPaper(CutPaperAction.PartialCutWithFeed);
builder.endDocument();
byte[] command = builder.getCommands();
6.1.4. How to add a printer model
When adding or migrating a printer model, if you are using ICommandBuilder to create printer commands, you will only need to change the emulation in most cases.
However, in some situations, additional changes are required. Please make the necessary changes referring to the information below.
How to change the emulation ( ICommandBuilder )
The mC-Print3 and other printers may support different emulations.
Check the supported emulation on the Emulation page and change the emulation when creating an ICommandBuilder instance.
For example, in case of TSP100/TSP650II and mC-Print3, it is necessary to change the emulation according to the table below.
Printer |
Emulation |
|---|---|
TSP650II |
StarLine |
TSP100 |
StarGraphic |
mC-Print3 |
StarPRNT |
// TSP650II (StarLine)
// Emulation emulation = Emulation.StarLine;

// TSP100 (StarGraphic)
// Emulation emulation = Emulation.StarGraphic;

// mC-Print3 (StarPRNT)
Emulation emulation = Emulation.StarPRNT;
ICommandBuilder builder = StarIoExt.createCommandBuilder(emulation);
How to search for printers ( searchPrinter )
The printer search method by searchPrinter is the same.
If the model name obtained from the search is used for some determination in the application, it is necessary to change it
For example, The printer model names included in the search results are as follows.
LAN interfaces
Printer
Model Name (PortInfo)
mC-Print2
“MCP21”, “MCP20”
mC-Print3
“MCP31”, “MCP30”
mC-Label2
“MCL21”
mC-Label3
“MCL32”
TSP100IV
“TSP143IV”
TSP100IV SK
“TSP143IV”
TSP100IIILAN
“TSP143IIILAN”, “TSP143IIIW”
TSP650II
“TSP654”
TSP700II
“TSP743II”
TSP800II
“TSP847II”
BSC10II
“BSC10II”
SP700
“SP712”, “SP742”, “SP717”, “SP747”
USB interfaces
Printer
Model Name (PortInfo)
mC-Print2
“mC-Print2”
mC-Print3
“mC-Print3”
mC-Label2
“mC-Label2”
mC-Label3
“mC-Label3”
mPOP
“mPOP”
TSP100IV
“Star TSP143IV-UE”, “Star TSP143IV-UEWB”
TSP100IV SK
“Star TSP143IV-UE SK”, “Star TSP143IV-UEWB SK”
TSP100III
“Star TSP143IIIU”
TSP100IIU+
“Star TSP143IIU+”
TSP650II
“TSP654II”
TSP700II
“TSP743II”
TSP800II
“TSP847II”
BSC10II
“BSC10II”
SP700
“SP712”, “SP742”, “SP717”, “SP747”
SM-S230i
“Star SM-S230i”
Bluetooth interface
Printer
Model Name (PortInfo)
mC-Print2
“mC-Print2-XXXXX”
mC-Print3
“mC-Print3-XXXXX”
mC-Label2
“mC-Label2-XXXXX”
mC-Label3
“mC-Label3-XXXXX”
mPOP
"STAR mPOP-XXXXX"[1], "mPOP-XXXXX"[2] TSP100IV
“TSP100IV-XXXXX”
TSP100IV SK
“TSP100IVSK-XXXXX”
TSP100III
“TSP100-XXXXX”
TSP650II
“Star Micronics”
TSP700II
“Star Micronics”
TSP800II
“Star Micronics”
SP700
“Star Micronics”
SM-S210i
"Star Micronics"[3], "SM-S210I-XXXXX"[4] SM-S230i
"Star Micronics"[3], "SM-S230I-XXXXX"[4] SM-T300
"Star Micronics"[3], "SM-T300-XXXXX"[4] SM-T300i
"Star Micronics"[3], "SM-T300i-XXXXX"[4] SM-T400i
"Star Micronics"[3], "SM-T400i-XXXXX"[4] SM-L200
“Star Micronics”
SM-L300
“Star Micronics”
XXXXX : 5-digit identification number that differs for each product
| [1] | POP10 |
| [2] | POP10CBI |
| [3] | Firmware version less than 5.0 |
| [4] | Firmware version 5.0 or later |
How to specify getPort - portName parameter
Bluetooth interface
If the return value of searchPrinter ( PortInfo ) is used to specify portName , there is no need to change the parameter.
However, if the parameter is specified directly (fixed value, etc.), the default value of the device name differs between mC-Print3 and other models, so the parameter may need to be changed.
For example, the default values of TSP100/TSP650II and mC-Print3 are as follows.
Printer |
Bluetooth DeviceName |
|---|---|
TSP100 |
“TSP100-XXXXX” |
TSP650II |
“Star Micronics” |
mC-Print3 |
“mC-Print3-XXXXX” |
XXXXX : 5-digit identification number that differs for each product
StarIOPort port = null;
String portSettings = "";

// TSP650II (Bluetooth)
// String portName = "BT:Star Micronics";

// TSP100 (Bluetooth)
// String portName = "BT:TSP100-XXXXX";

// mC-Print3 (Bluetooth)
// String portName = "BT:mC-Print3-XXXXX";

// No changes required if used "BT:"
String portName = "BT:";

port = StarIOport.getPort(portName, portSettings, 10000, context);
Other interfaces
No specific device names are specified for each printer. Refer to the getPort page and set the appropriate portName for each interface.
How to specify getPort - portSettings parameter
The identifier that should be used with each model may be different. Please change it referring to 2. portSettings Parameter of getPort .
For example, the identifiers of portSettings of TSP100/TSP650II and mC-Print3 are the same.
Printer |
portSettings |
|---|---|
TSP100 |
“” |
TSP650II |
“” |
mC-Print3 |
“” |
StarIOPort port = null;
String portName = "BT:";

// String portSettings = "l10000"
String portSettings = "";

port = StarIOport.getPort(portName, portSettings, 10000, context);
How to specify the printable area
The initial value of the printable area setting differs depending on the printer models. Specify the printable area with appendPrintableArea as necessary.
If graphic data is printed by using appendBitmap etc., please change the layout according to the printable area of the printer model you want to migrate to.
6.1.5. Code flow from command creation to data transmission
The following is the flow from command creation to writing. In actual operation, execute the following function in a non-UI thread.
public void printSample() {
    try {
        ICommandBuilder builder = StarIoExt.createCommandBuilder(StarIoExt.Emulation.StarPRNT);

        builder.beginDocument();
        builder.append("Hello, World!!").getBytes();
        builder.appendCutPaper(CutPaperAction.PartialCutWithFeed);
        builder.endDocument();

        byte[] commands = builder.getCommands();

        String portName = "BT:";
        String portSettings = "";
        StarIOPort port = StarIOPort.getPort(portName, portSettings, 1000, context);

        StarPrinterStatus status;
        status = port.beginCheckedBlock();

        if (status.offline) {
            // Printer Offline
        }

        port.writePort(commands, 0, commands.length);

        status = port.endCheckedBlock();
        if (status.coverOpen) {
            // Printer CoverOpen
        } else if (status.receiptPaperEmpty) {
            // Printer ReceiptPaperEmpty
        } else if (status.offline) {
            // Printer Offline
        }

        // Print Success

    } catch (StarIoPortException e) {
        // Port Exception
    }
}